How to Integrate WP Timetics with Google Calendar and Automate Your Scheduling

Switching between multiple calendars can quickly become a headache, especially if you’re taking appointments on your WordPress site while keeping Google Calendar up to date.
That’s where WP Timetics comes in. It is a powerful scheduling plugin that now lets you sync your bookings directly to Google Calendar.
In this guide, we’ll walk you through how to integrate WP Timetics with Google Calendar so your bookings automatically sync and you don’t have to switch between platforms to stay organized.
Why Integrate WP Timetics with Google Calendar?
Connecting WP Timetics with Google Calendar helps keep your schedule organized and up to date. Here’s what the integration does:
- Syncs booking appointments: Bookings made in WP Timetics appear in your Google Calendar without manual entry.
- Keeps calendars auto-updated: Changes to bookings are reflected automatically, reducing the chance of missing updates.
- Eliminates conflicts: Your site’s availability and Google Calendar availability always match, so you never accidentally double-book a slot.
- Supports user convenience: Clients see real-time availability on your site and pick a slot that actually works, building trust and reducing back-and-forth.
- Adds Google Meet links (if used): You can include a Google Meet link in the calendar event for online meetings.
📣 Prerequisite
Before setting up the Google Calendar integration in WordPress, make sure you have the following:
1. A live WordPress site with WP Timetics installed and activated.
2. A Google account to connect with Google Calendar.
A step-by-step guide to integrate Google Calendar
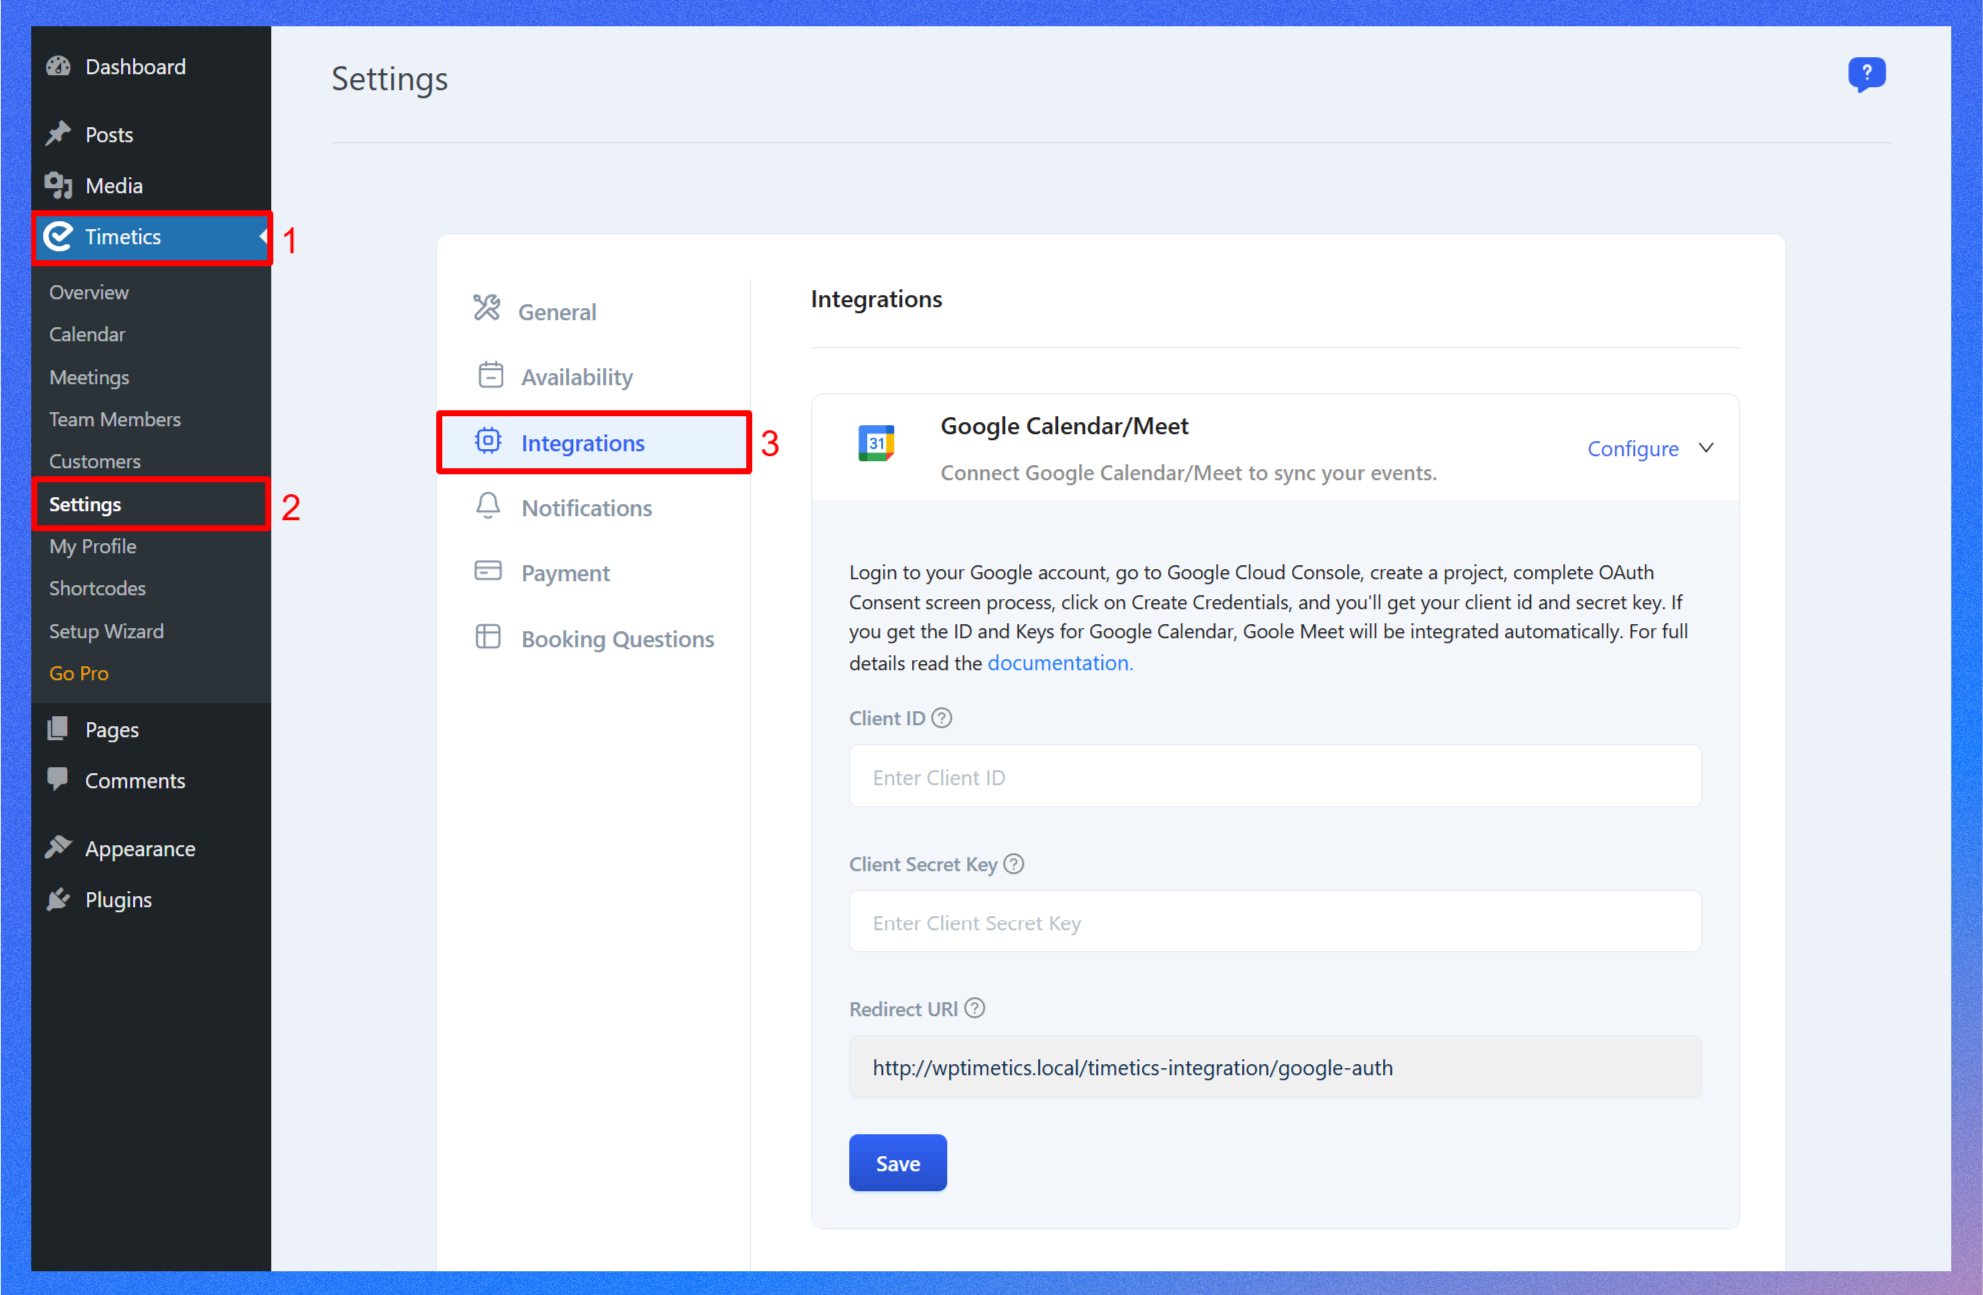
Start by navigating your WordPress dashboard and Timetics > Settings > Integrations. You’ll see a list of all available integrations, including Google Calendar.
Step 1: Create a project in the Google Cloud Console
Now, to integrate Google Calendar with WP Timetics, you must configure Google API Access, and to configure Google API access, you must enable the Google Calendar API. Here are the steps:
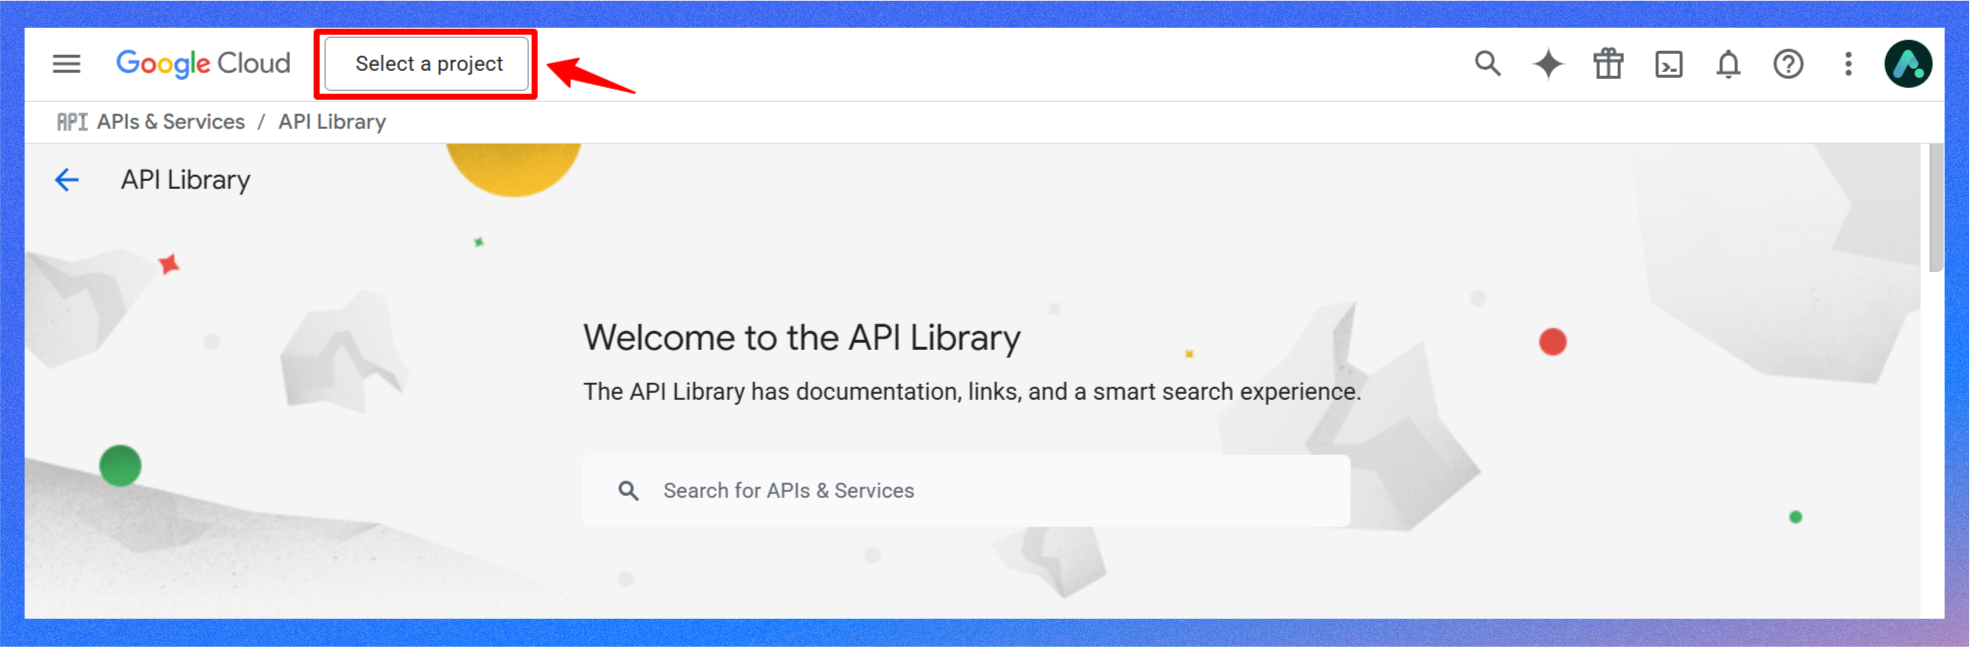
- Log in to your Google account, then go to Google Cloud Console, or simply go to this link: https://console.cloud.google.com/apis/library.
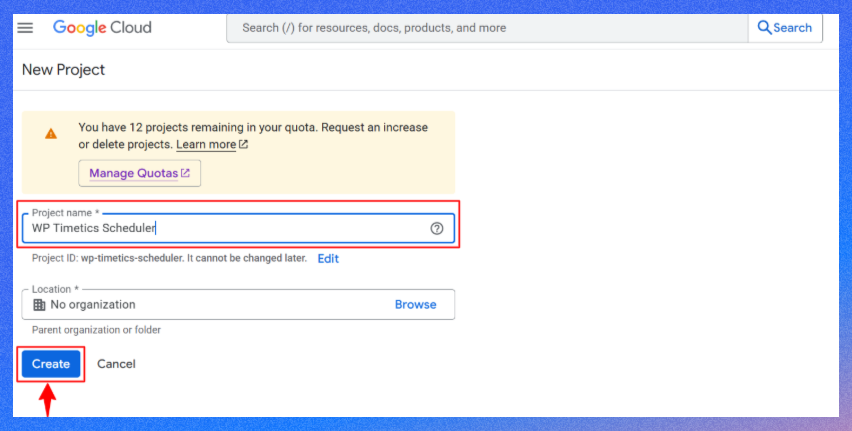
- Once you’re in, you must create a new project to add a Google calendar to Timetics. Click Select a project > New Project to create a new project.
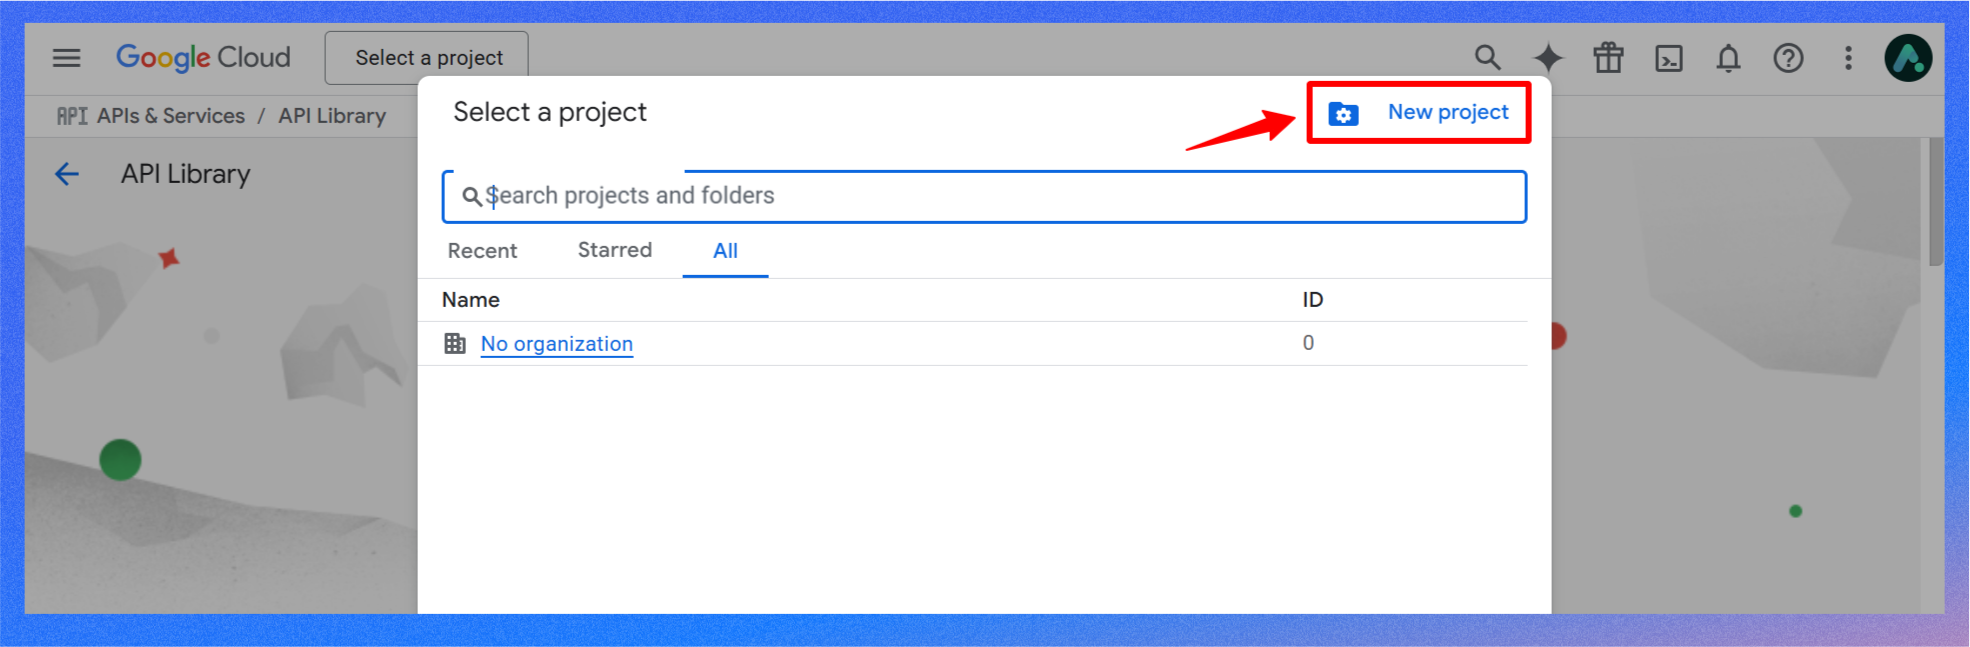
- Now, give it a name (for example, “WP Timetics Scheduler”) and click Create. Your new project will appear in the project list once it’s ready.
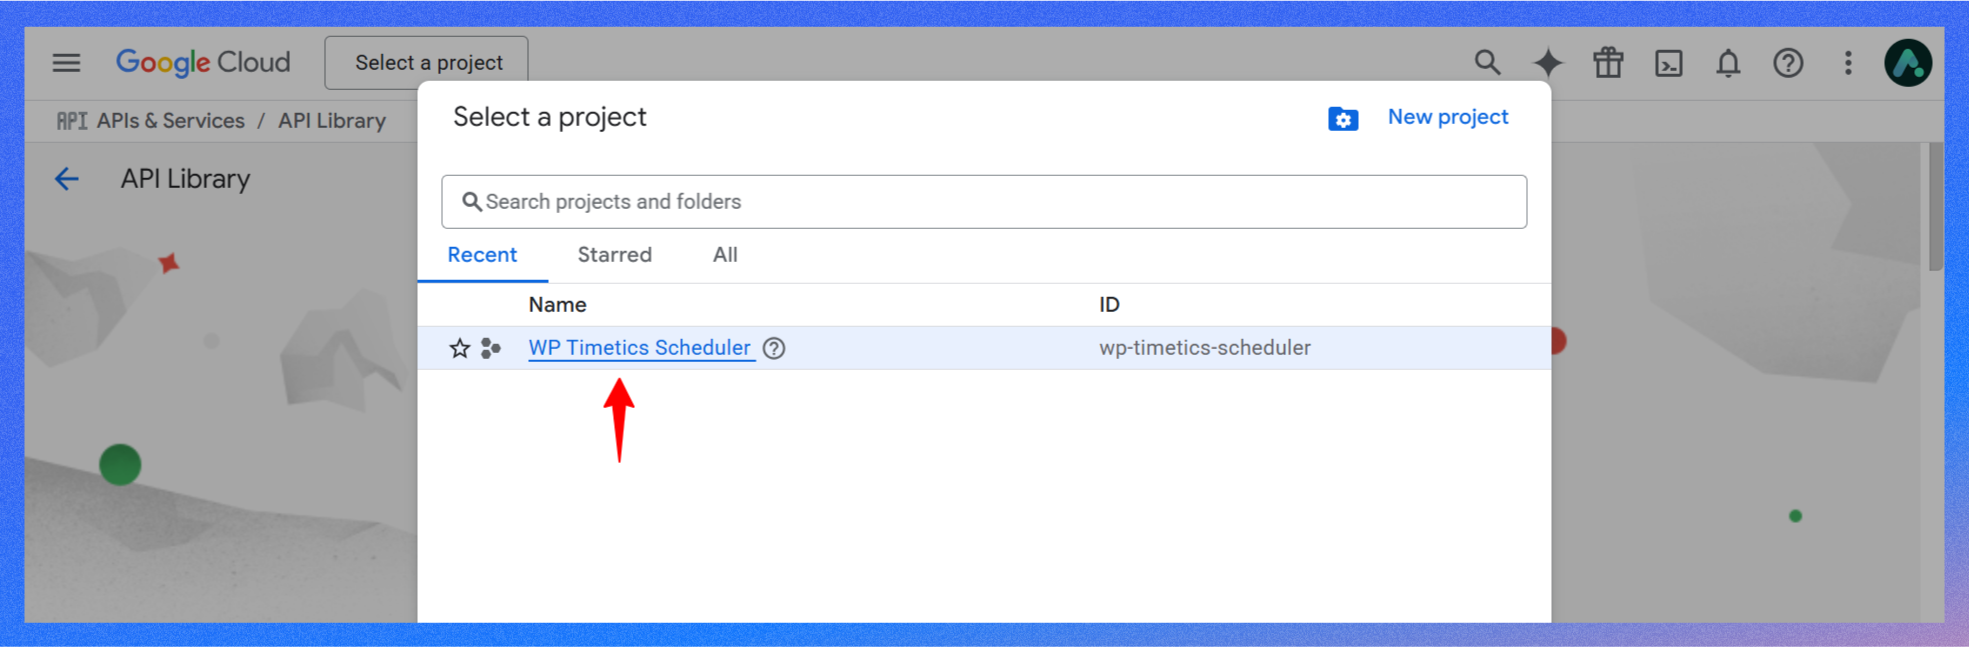
- Next, select the project you already created by clicking on the Select a project.
Step 2: Enable the Google Calendar API
Now that you have a project, itès time to enable the Google Calendar API. But first, make sure your new project is selected.
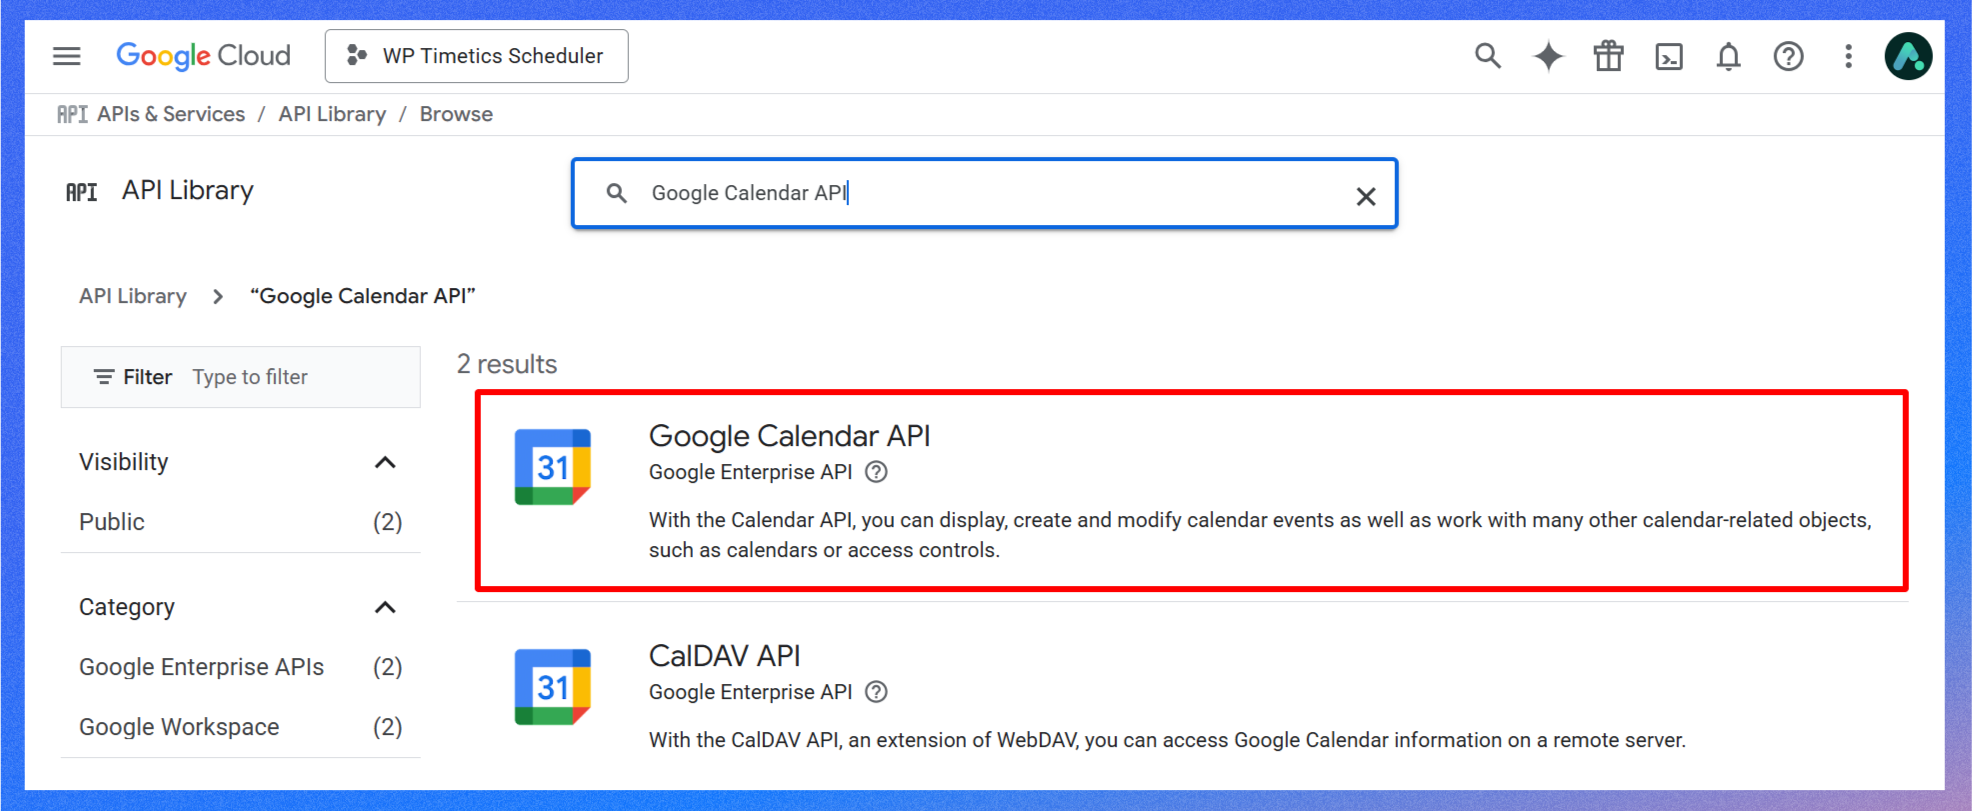
- Go to APIs & Services > Library. In the search box, type “Google Calendar API”.

- From the results, select Google Calendar API.
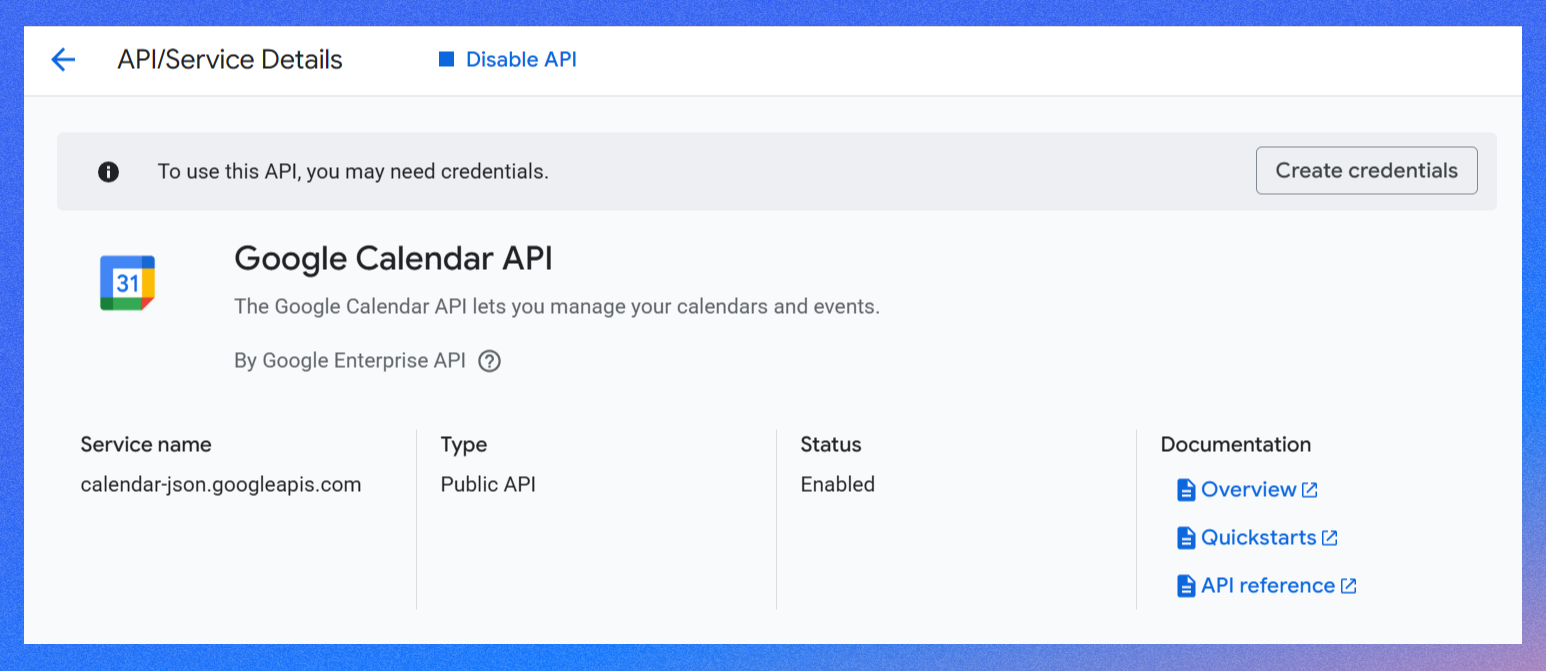
- Click the Enable button to turn on the Calendar API for your project.
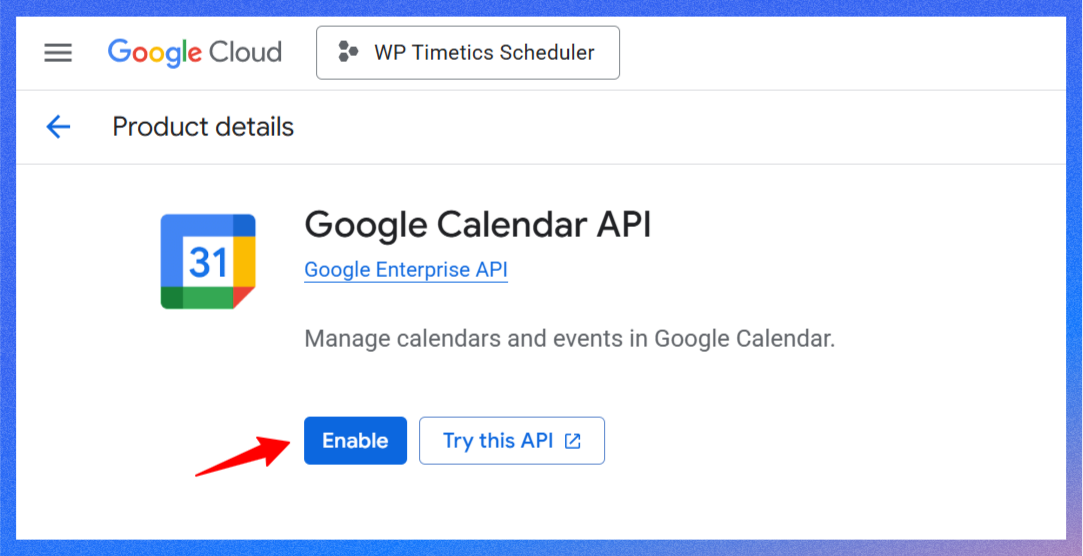
- After enabling the Google Calendar API, you will be redirected to the API/Service Details page.
Step 3: Set up the OAuth consent screen
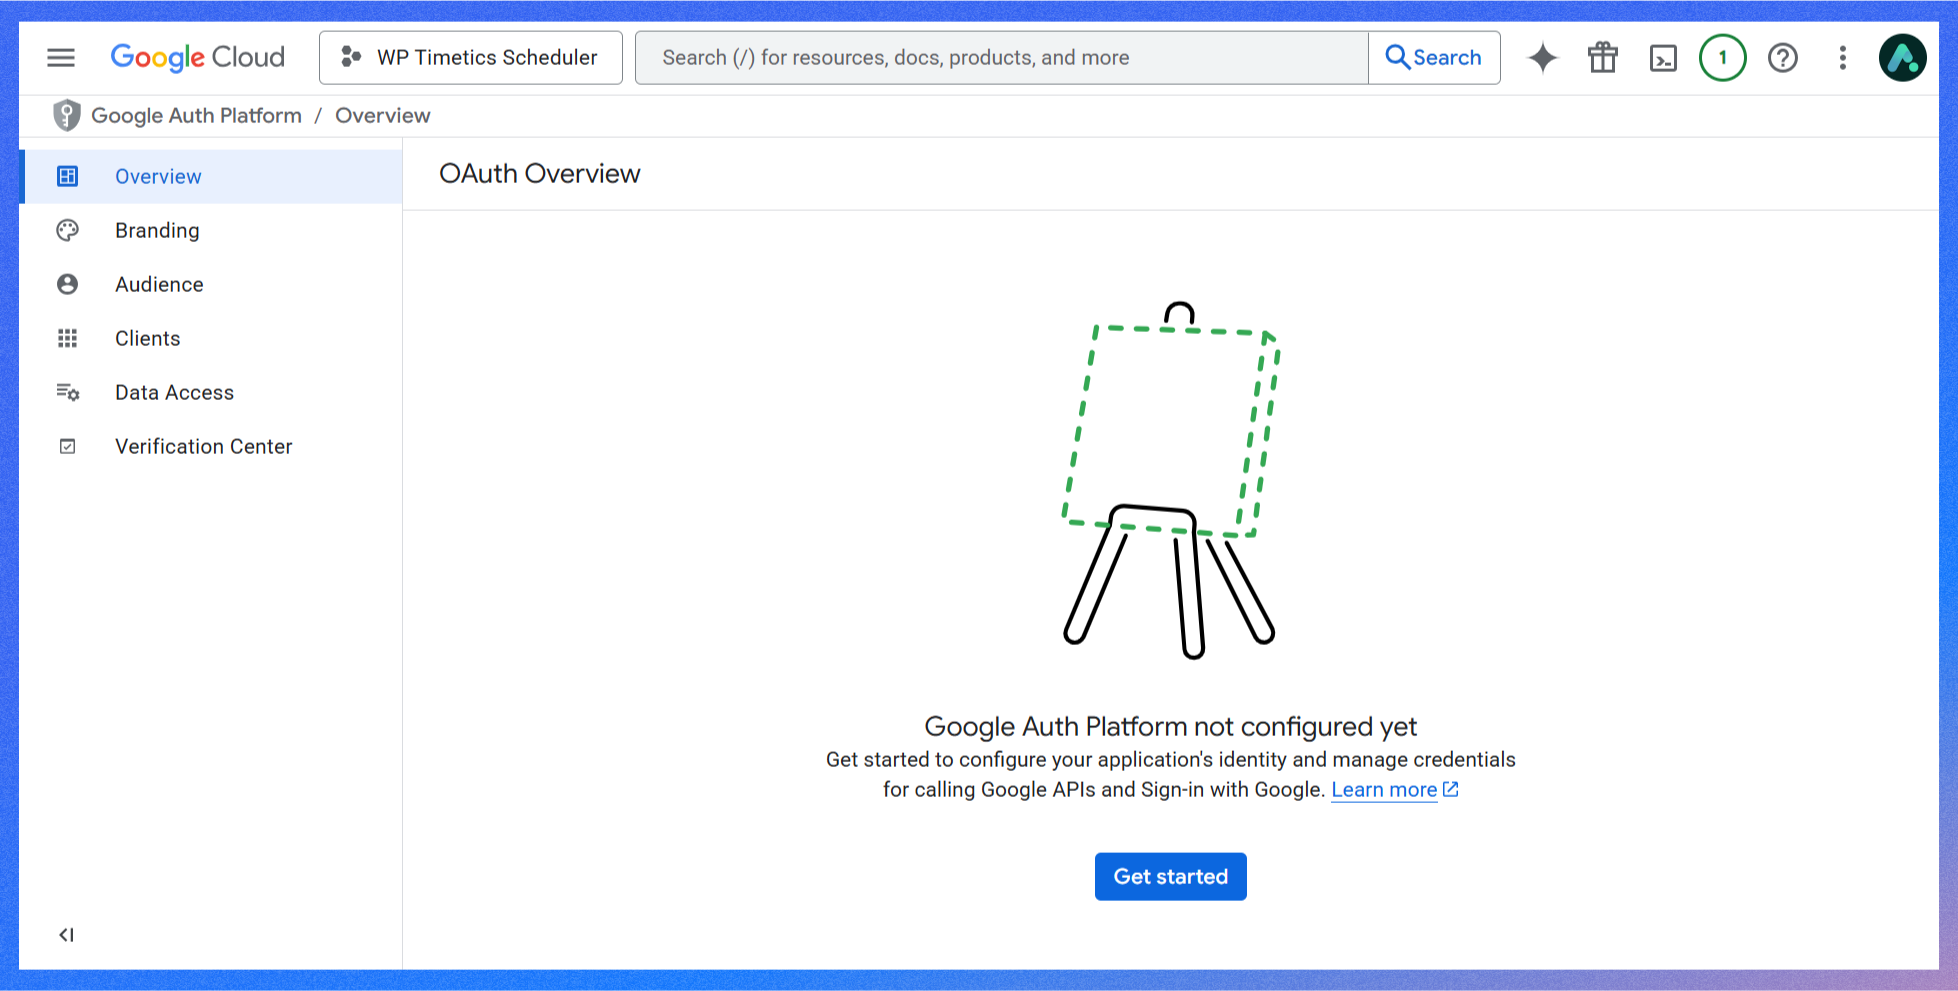
Next, you have to set up the OAuth consent screen. Go to the APIs & Services > OAuth consent screen in the Cloud Console sidebar.
Since your Google Auth Platform is not configured yet, you must configure it before proceeding.
Overview
- Simply click on the Get started button to start the configuration.
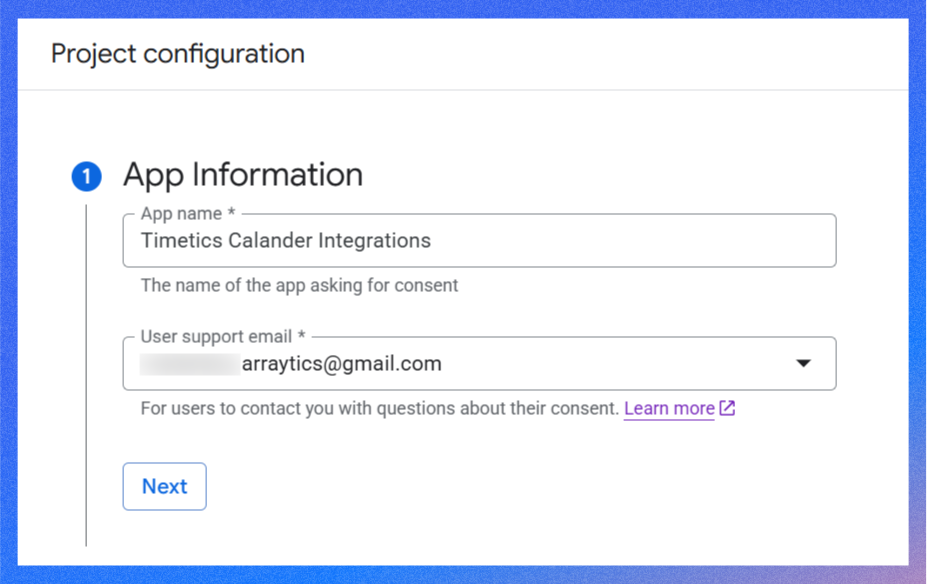
- It will take you to the Project configuration page. Under the App Information section, add your App name and user support email, then click Next.
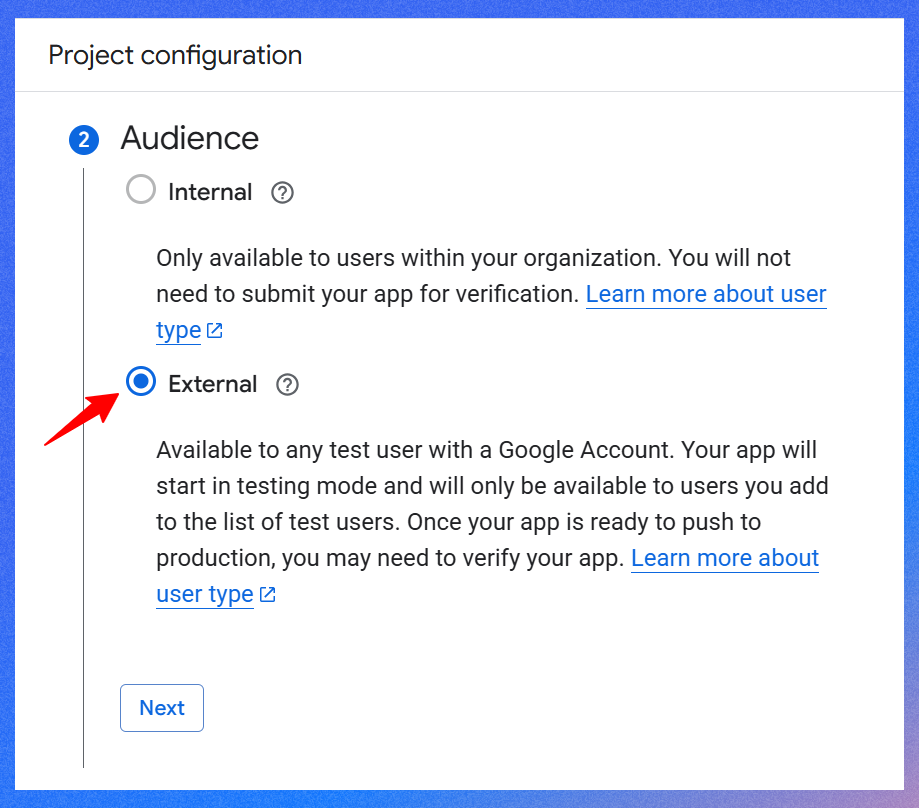
- In the Audience section, select External to make your App available only to the users you add as test users. Once selected, click Next to move on to the next step.
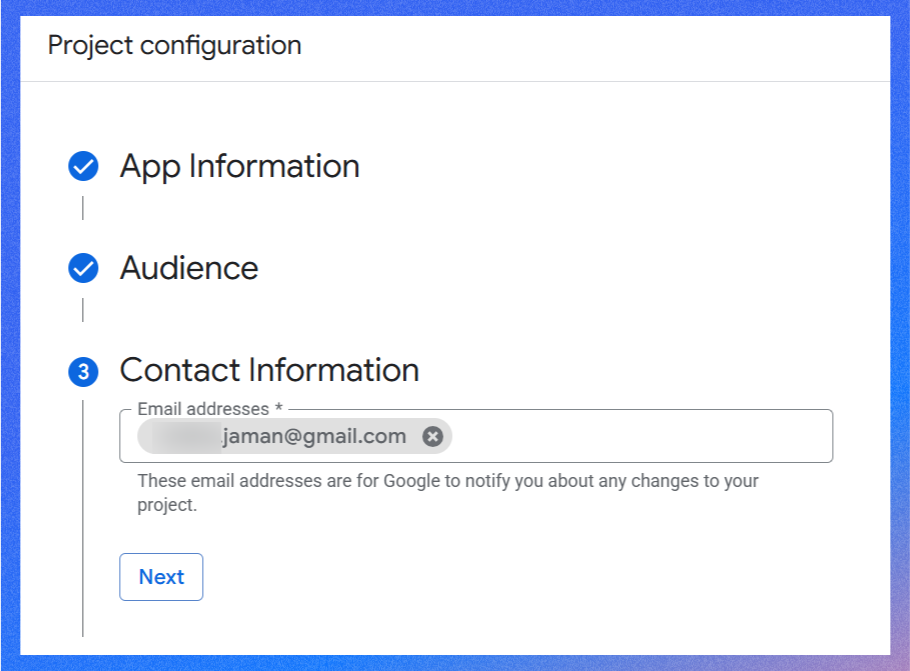
- Next, under the Contact Information, enter at least one email address to notify you about any changes to your project. Once done, click Next to move on to the next step.
- This is the final step. Simply check the box to agree to the user data policy, then click Continue. Finally, click the Create button at the bottom left corner to finish the setup. It will take some time to process.

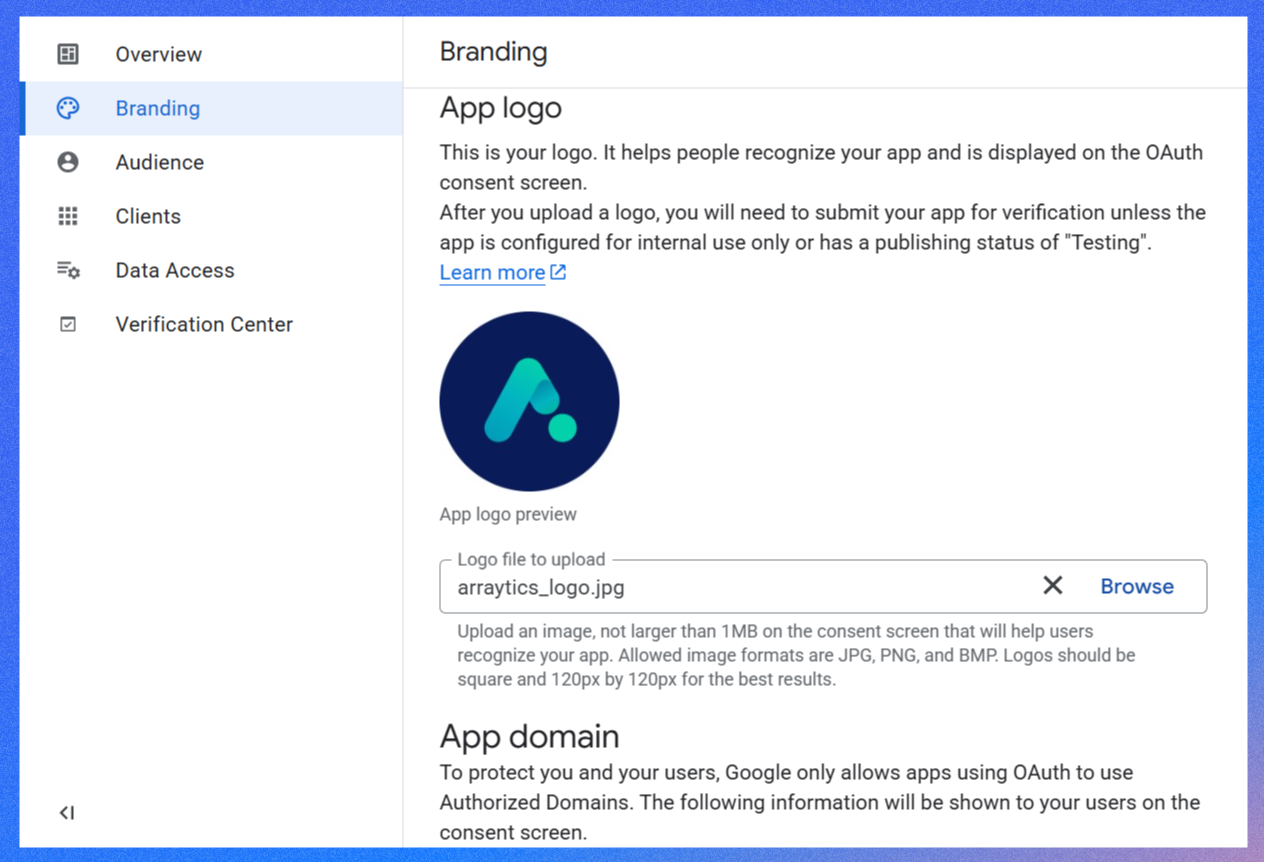
Branding
- Under the branding tab, you can add your App logo, App domain, or update developer contact information if needed.
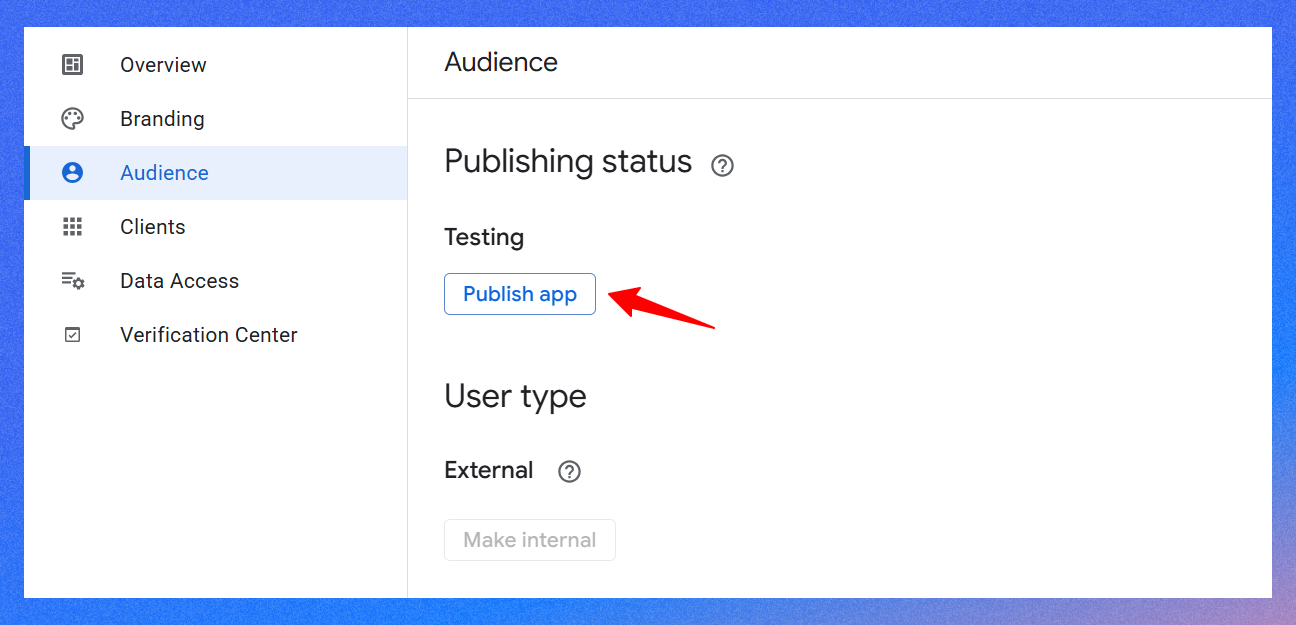
Audience
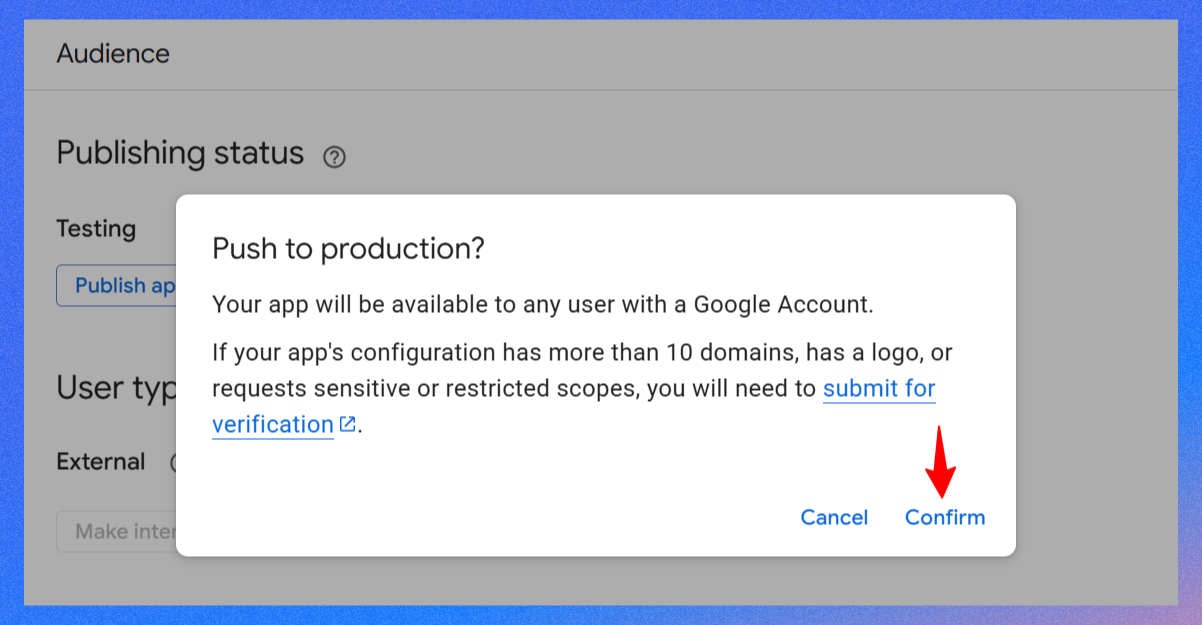
- From here, click on the Publish app button. A confirmation prompt will appear, asking you to approve the changes before the app goes into production.
- Now, click on the Confirm button to make changes. Later, you can add one or more users to this app.
Note: Keep the rest of the settings, such as Clients, Data Access, as they are.
Step 4: Create OAuth credentials
Now, return to the APIs & Services page and head over to the Credentials menu from the left-hand menu.
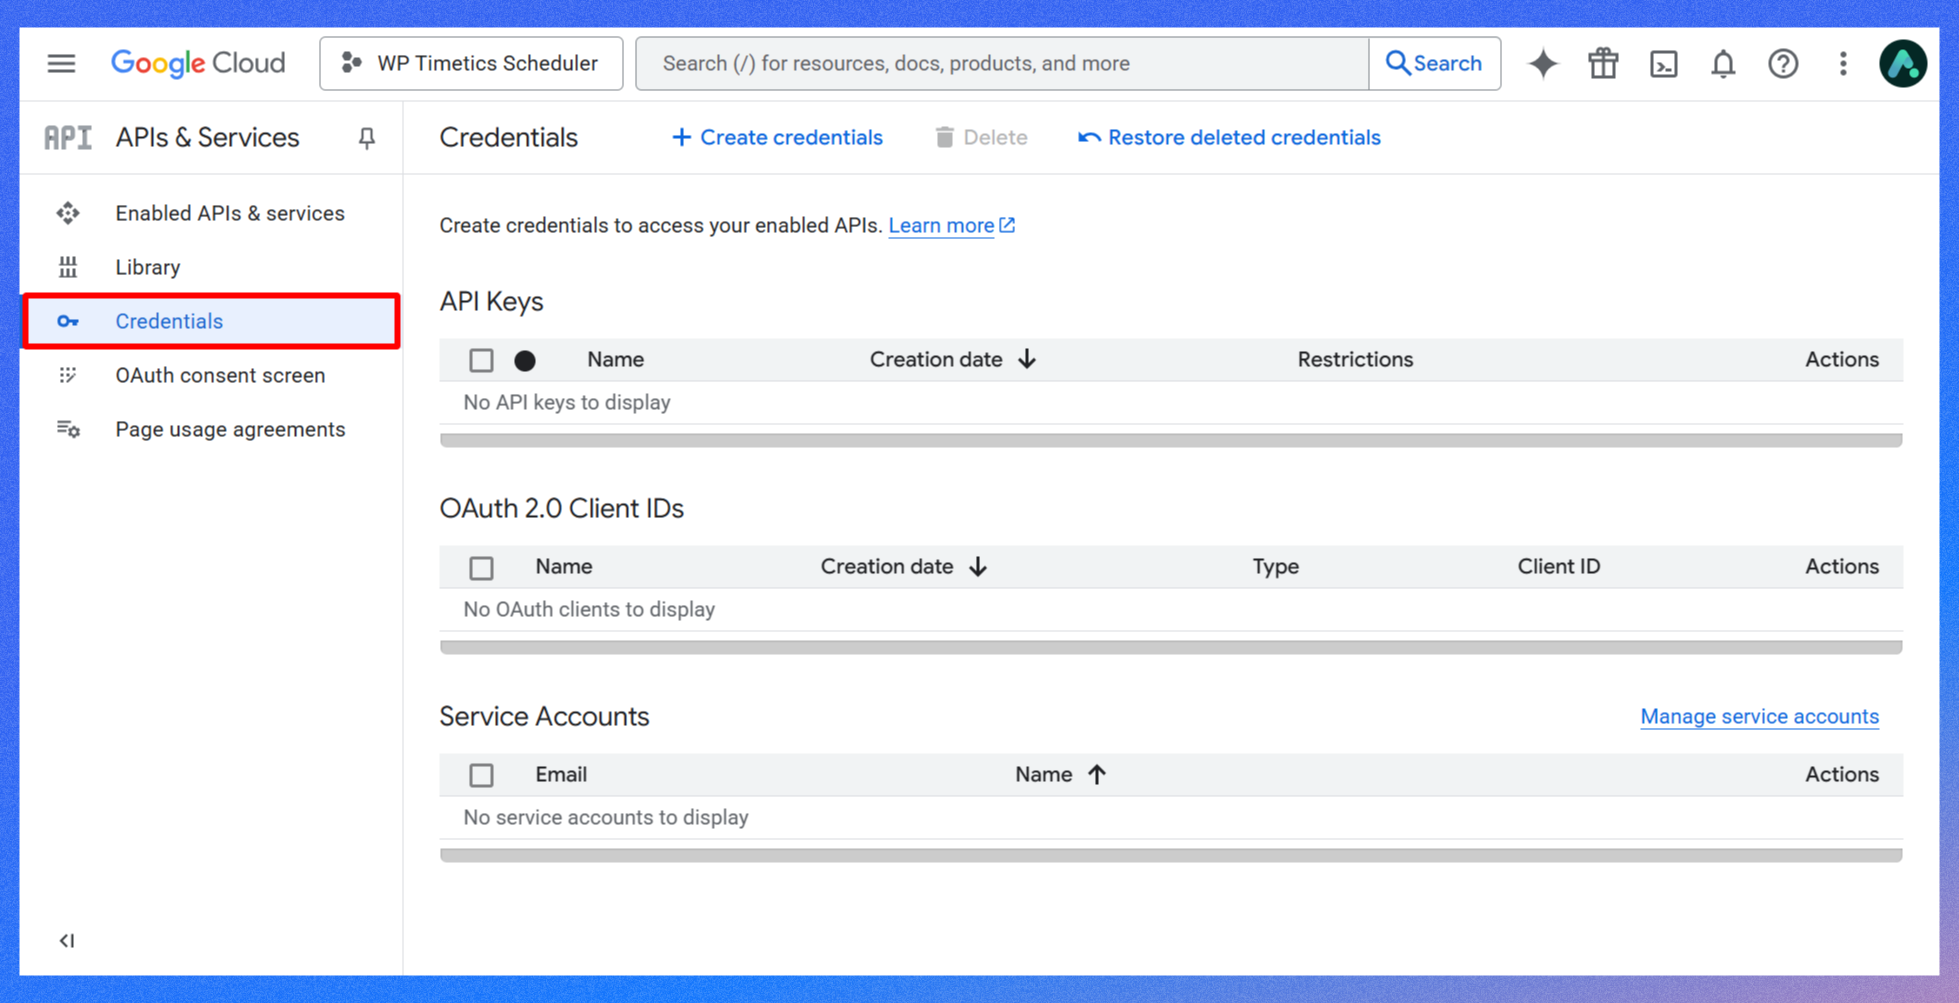
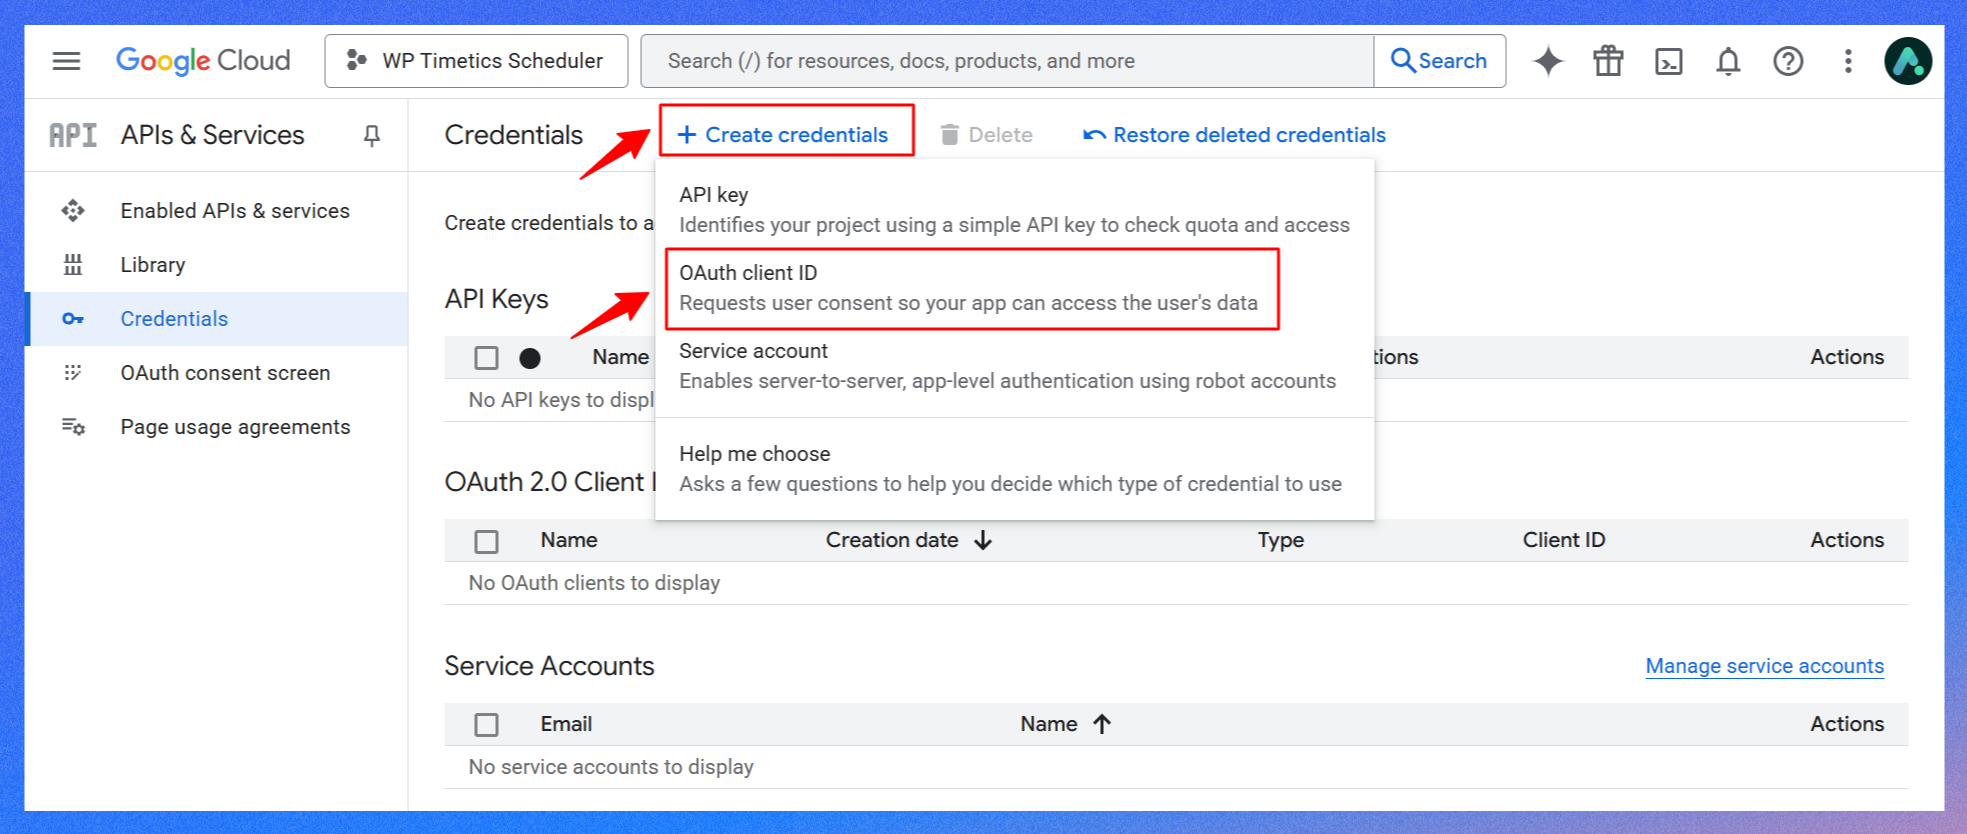
- From the Credentials page, create new credentials for your app. Simply, click on the Create credentials link and choose OAuth client ID.
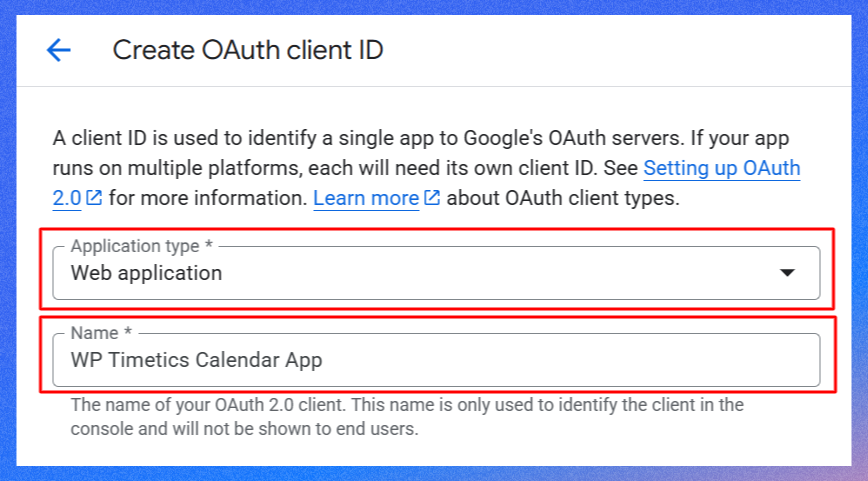
- From the Create OAuth client ID section, select Web application as the application type, then give it a name like WP Timetics Calendar App.
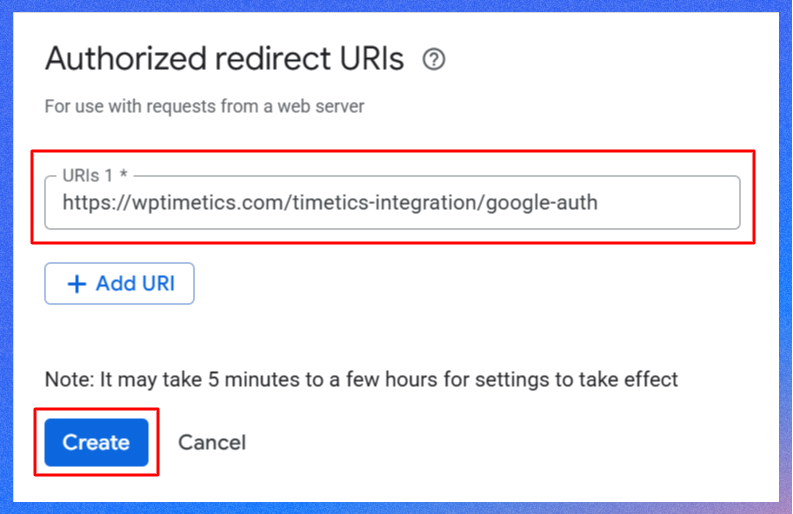
- In the Authorized redirect URIs section, add the URI provided by WP Timetics. You can find this on the WP Timetics Settings page in your WordPress admin.
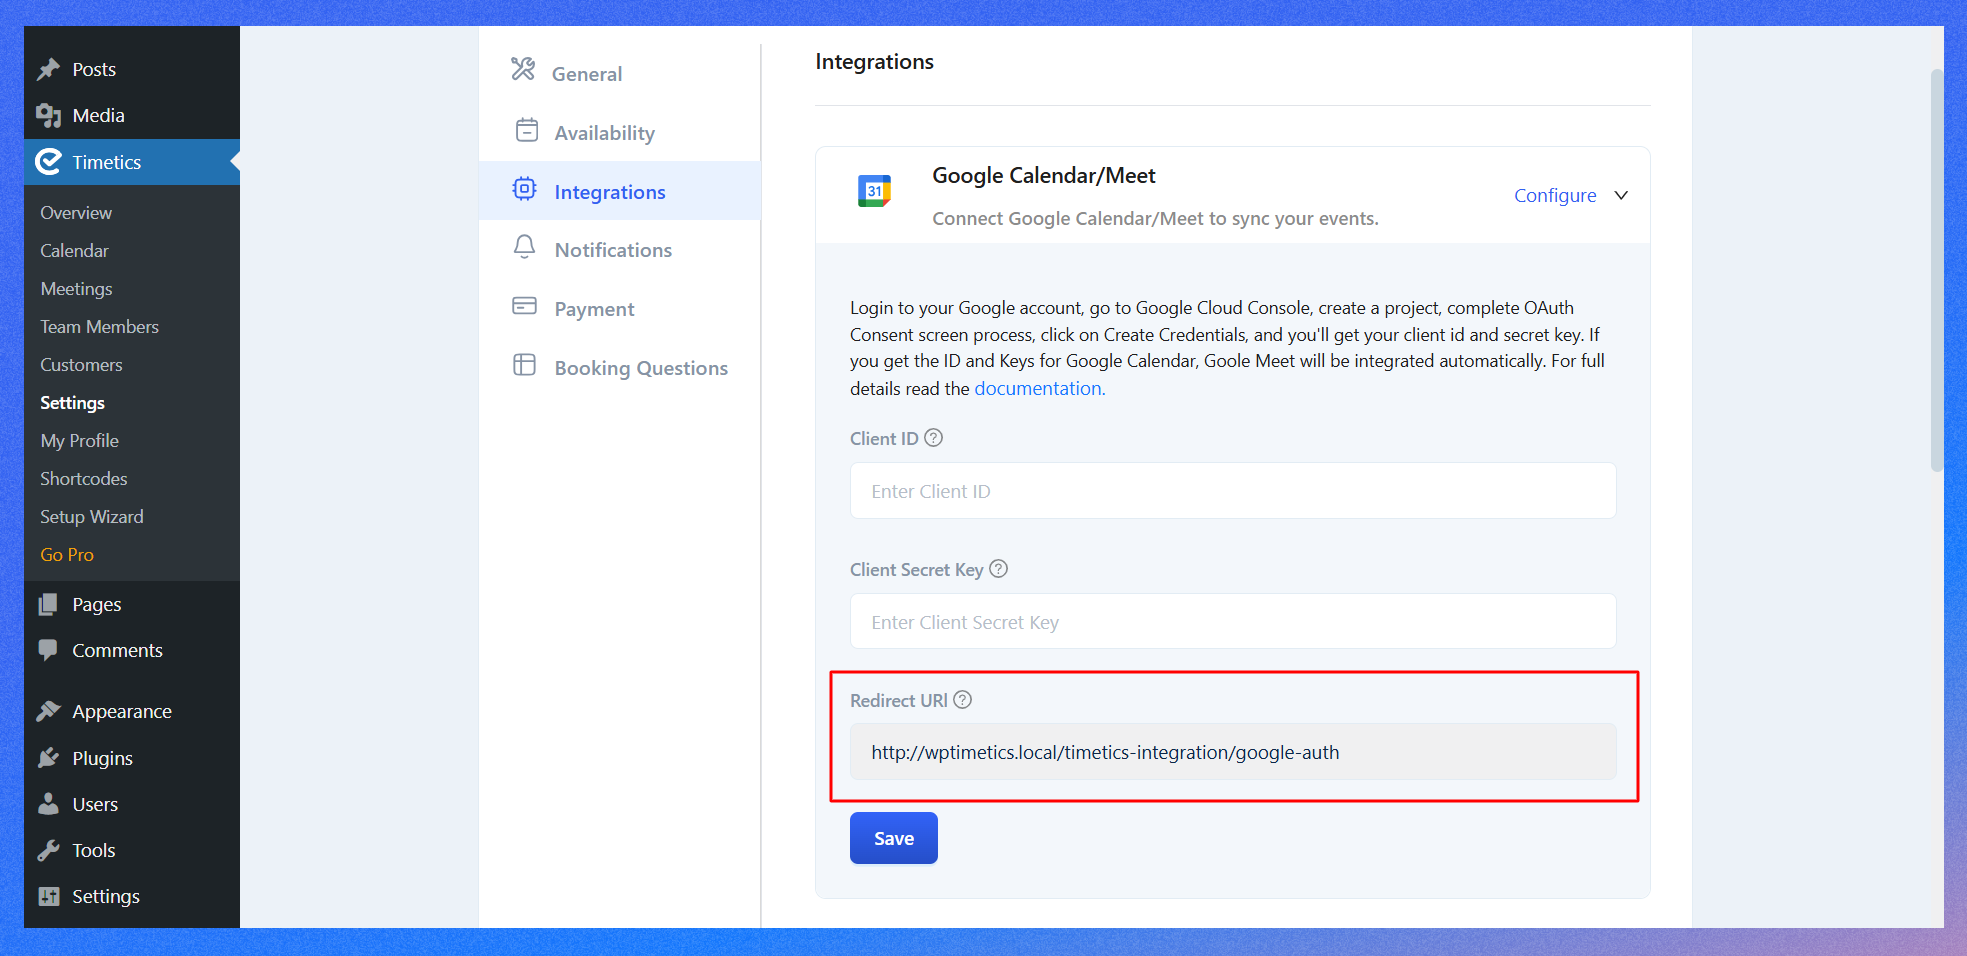
- Now, copy the URL and paste it. Finally, click Create.
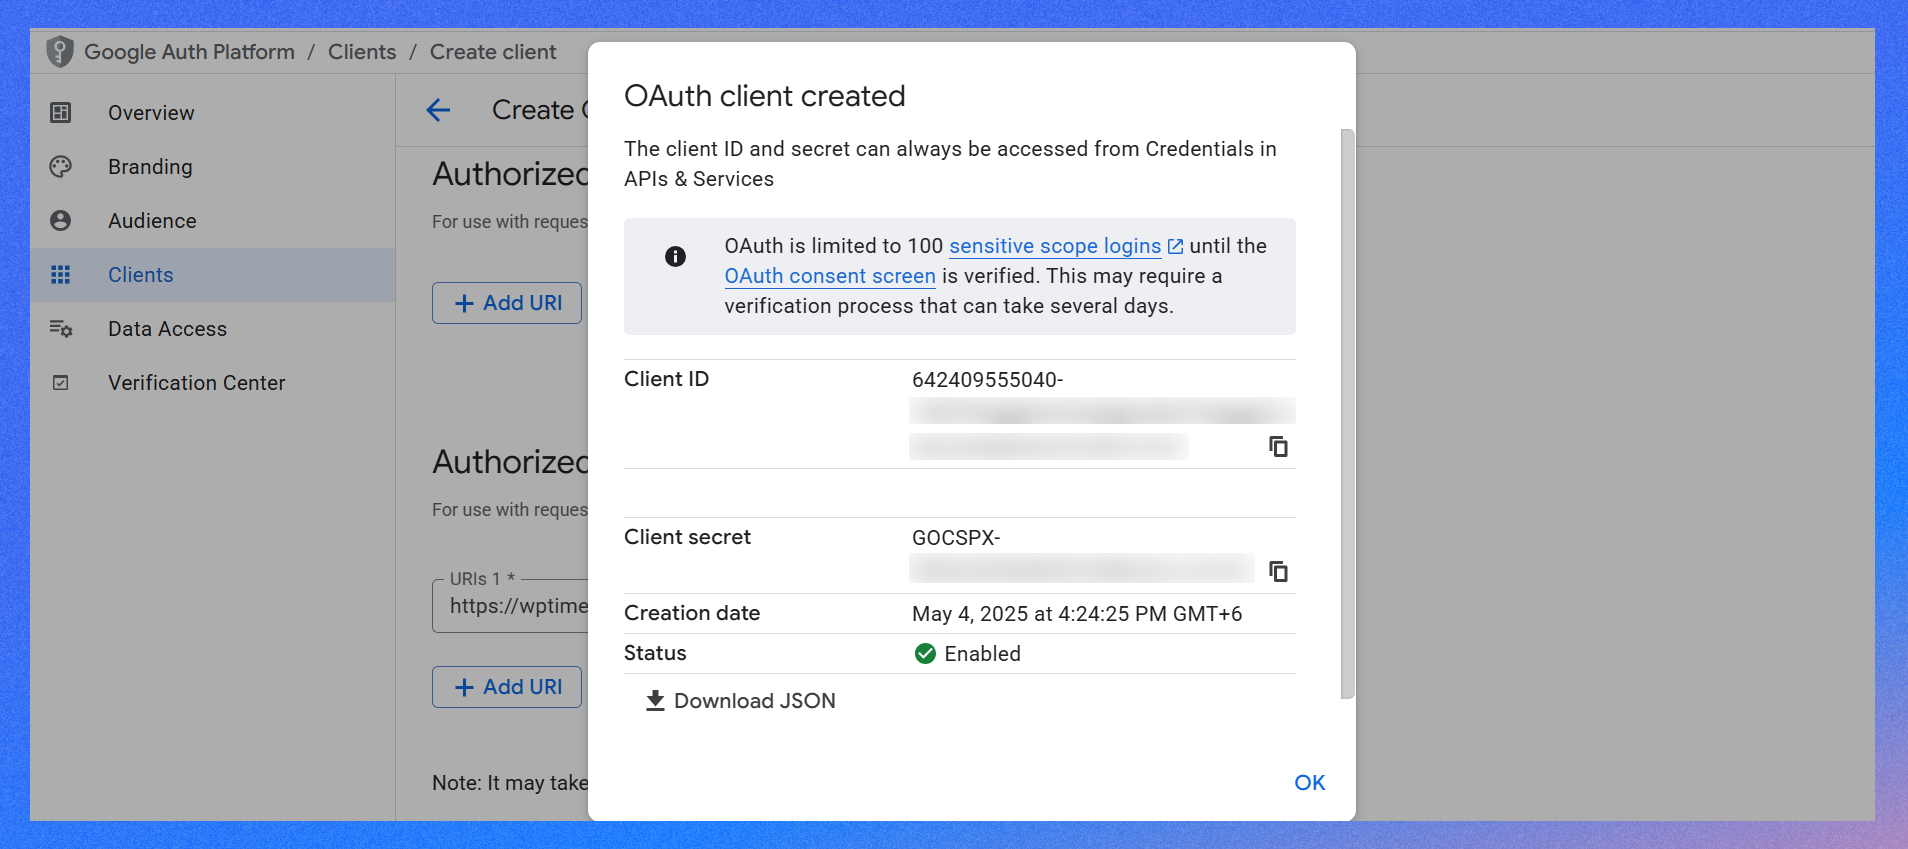
- When you click the Create button, a popup will appear with your Client ID and Client secret code. Keep this window open or copy these values; you’ll need them next.
Step 5: Copy the Client ID and Client Secret Key into WP Timetics
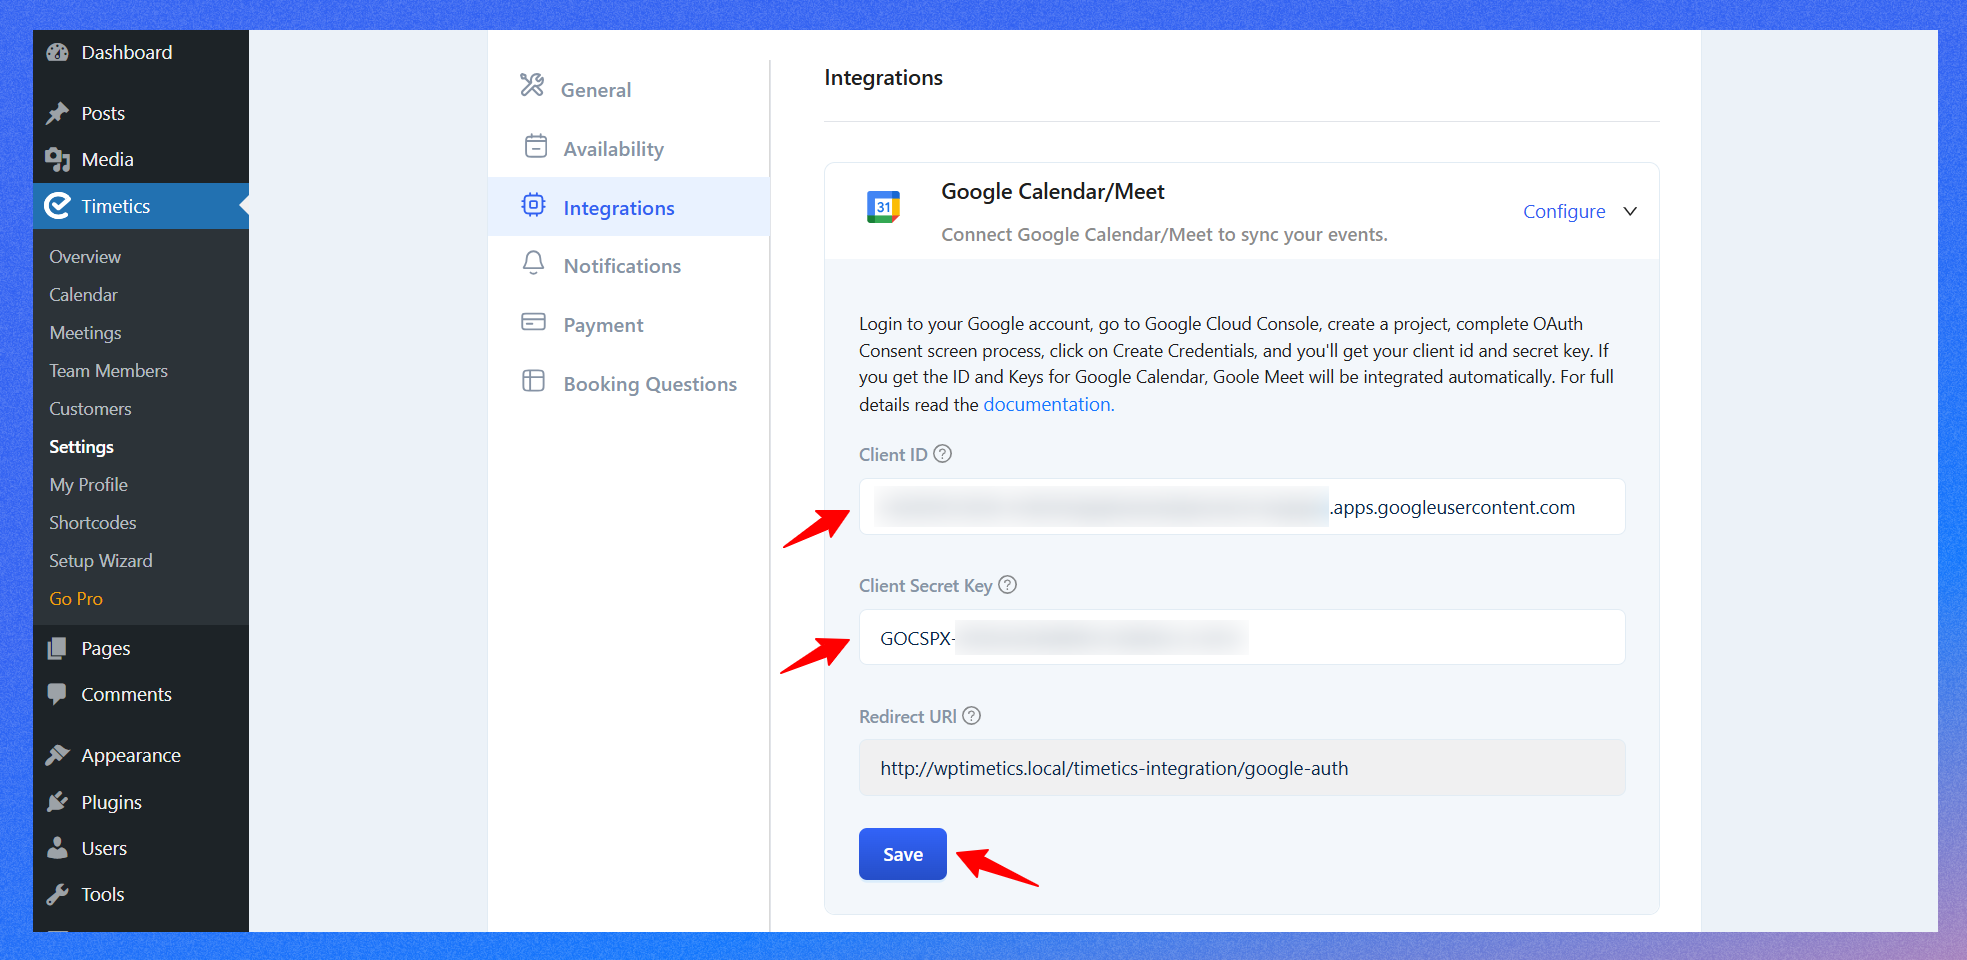
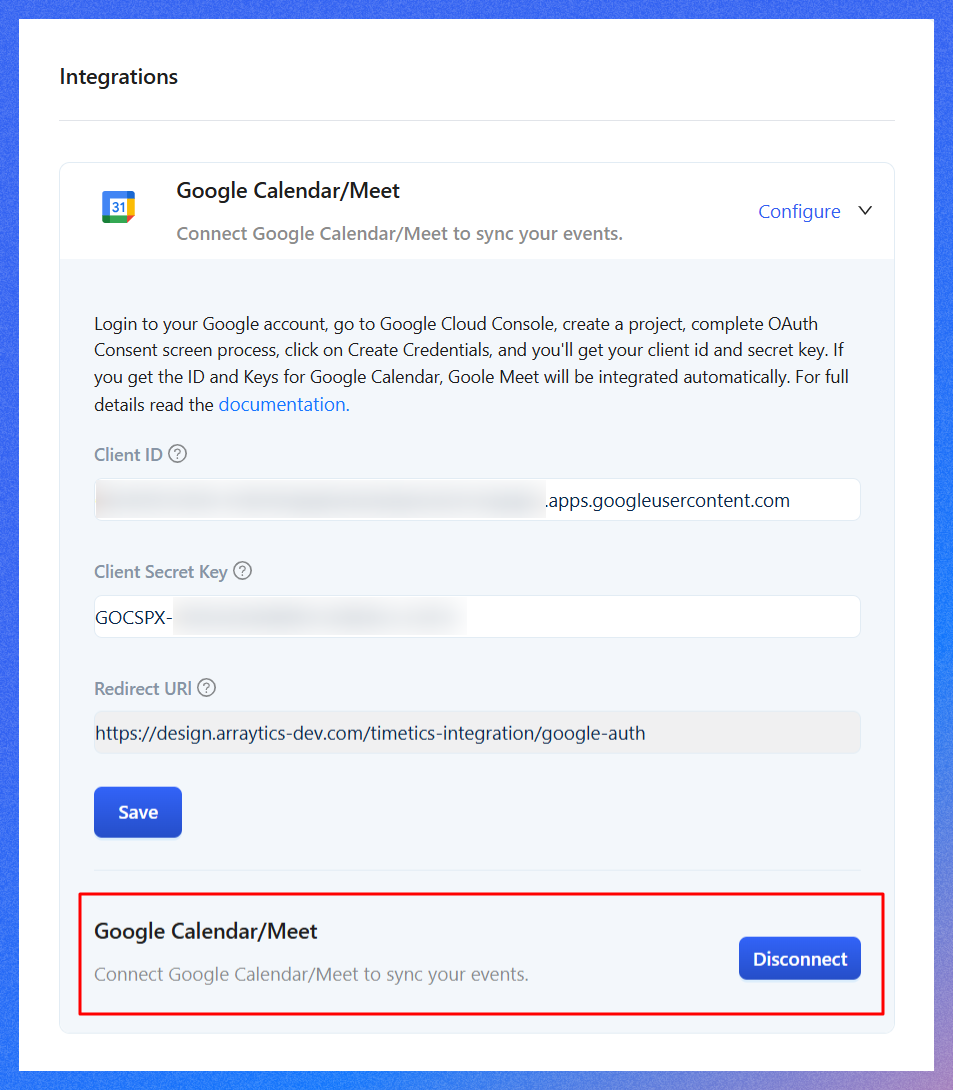
Switch to your WordPress admin dashboard and go to WP Timetics > Settings > Google Calendar/Meet integration section.
Here, paste the Client ID and Client Secret that Google gave you into the corresponding fields and click on the save button. This links your Timetics plugin to the Google API project you created.
Step 6: Authenticate the integration with your Google account
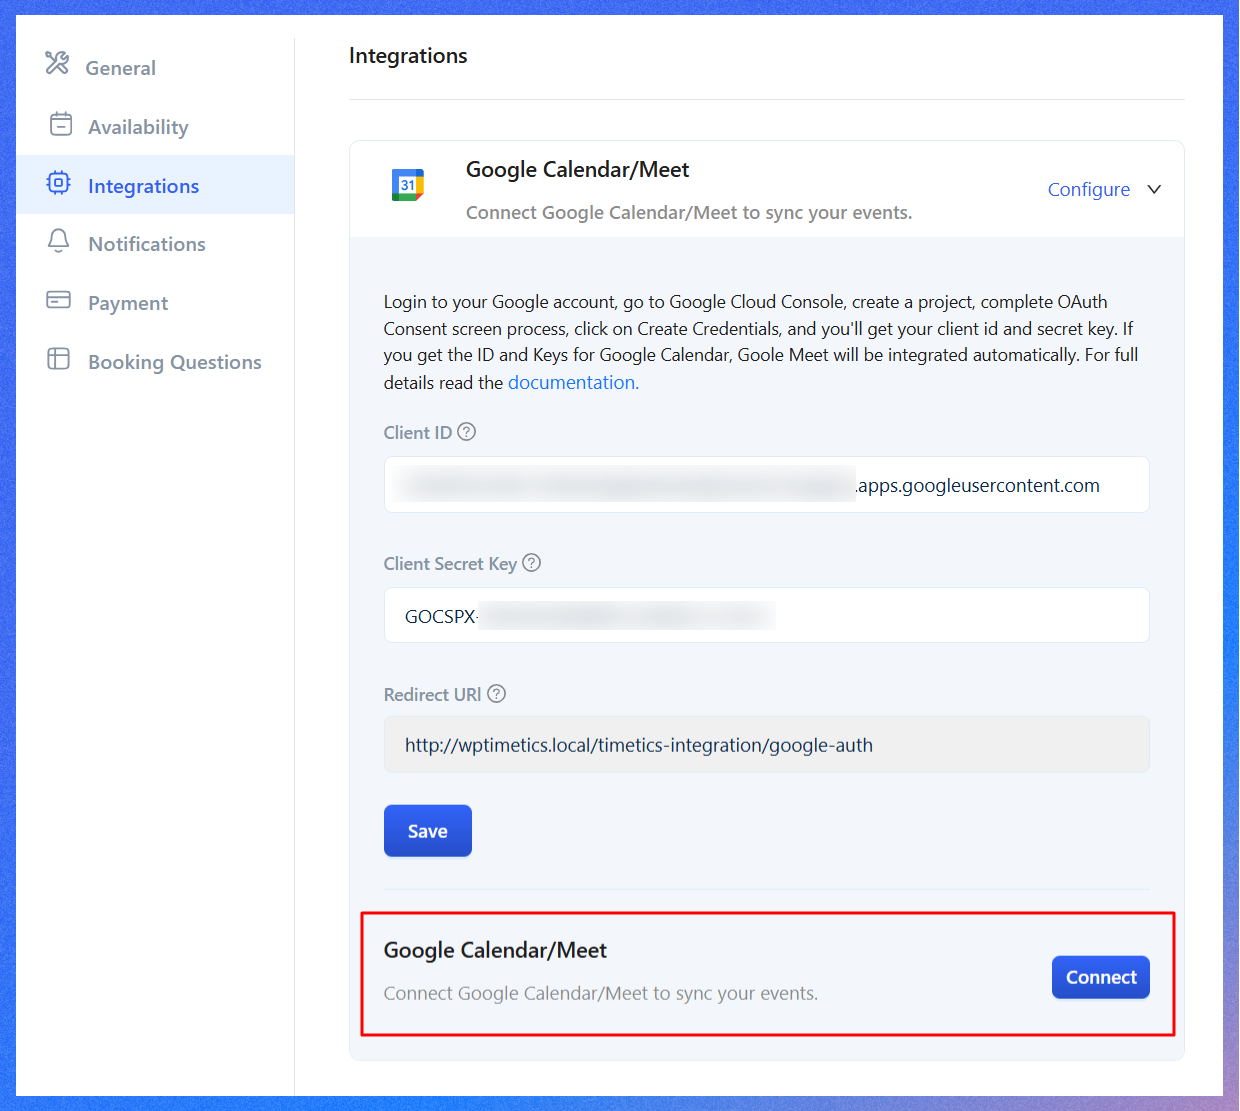
Now, you need to connect the app to start syncing your data from your website to Google Calendar.
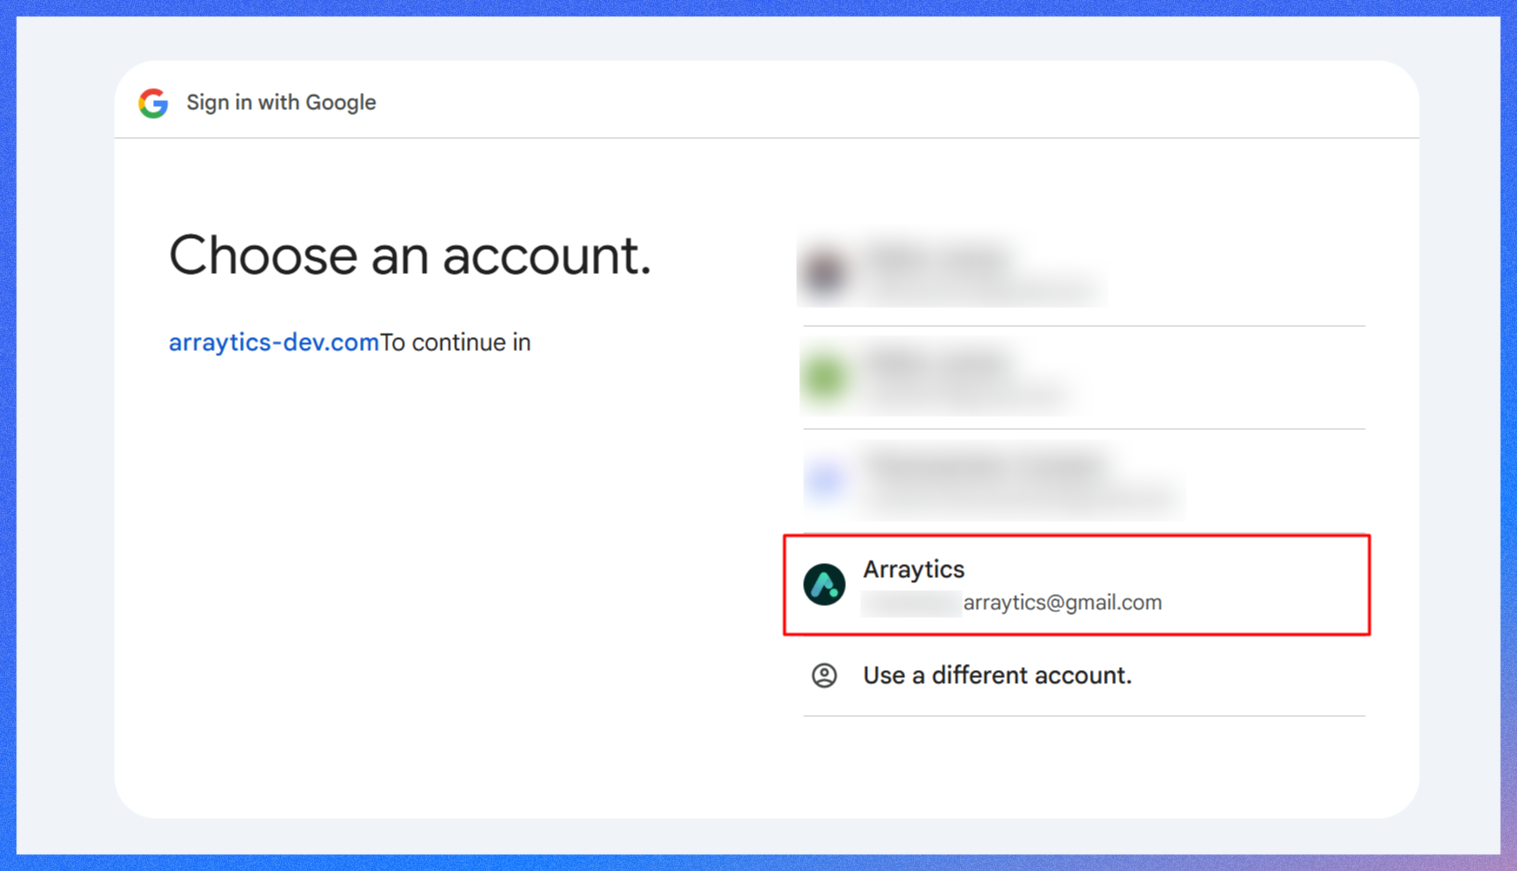
- Simply click the Connect Google Calendar button from the same page.
- This will open a Google login window. Log in with the same Gmail account you used to create the project and credentials.
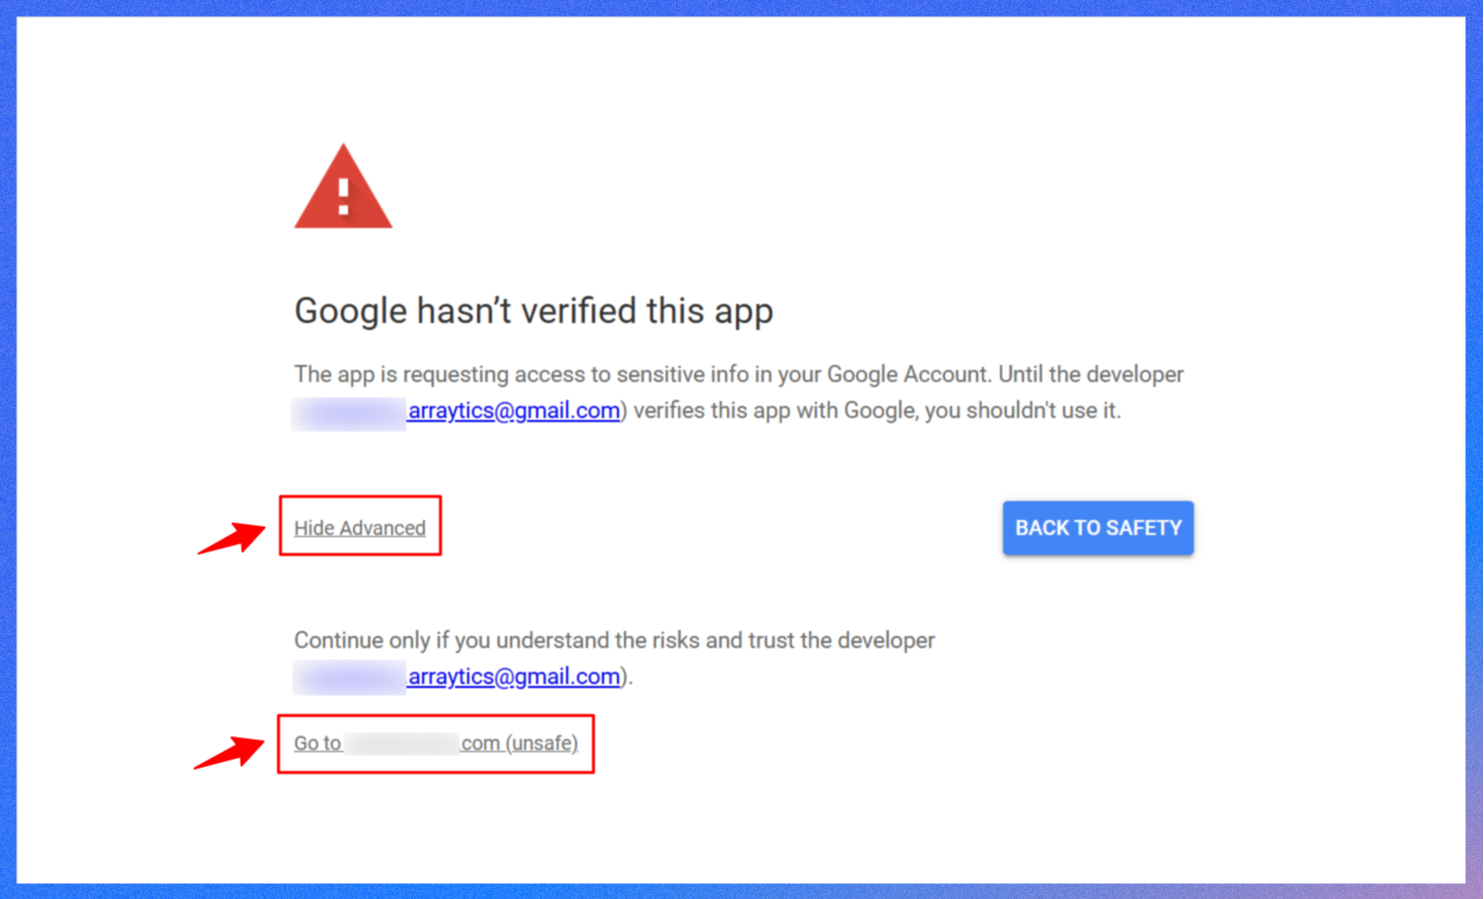
- You might see a warning saying, “This app isn’t verified.” This happens because your app is new and Google hasn’t reviewed it yet. Click Advanced, then Go to [Your App Name] (unsafe). This lets you proceed safely with the integration.
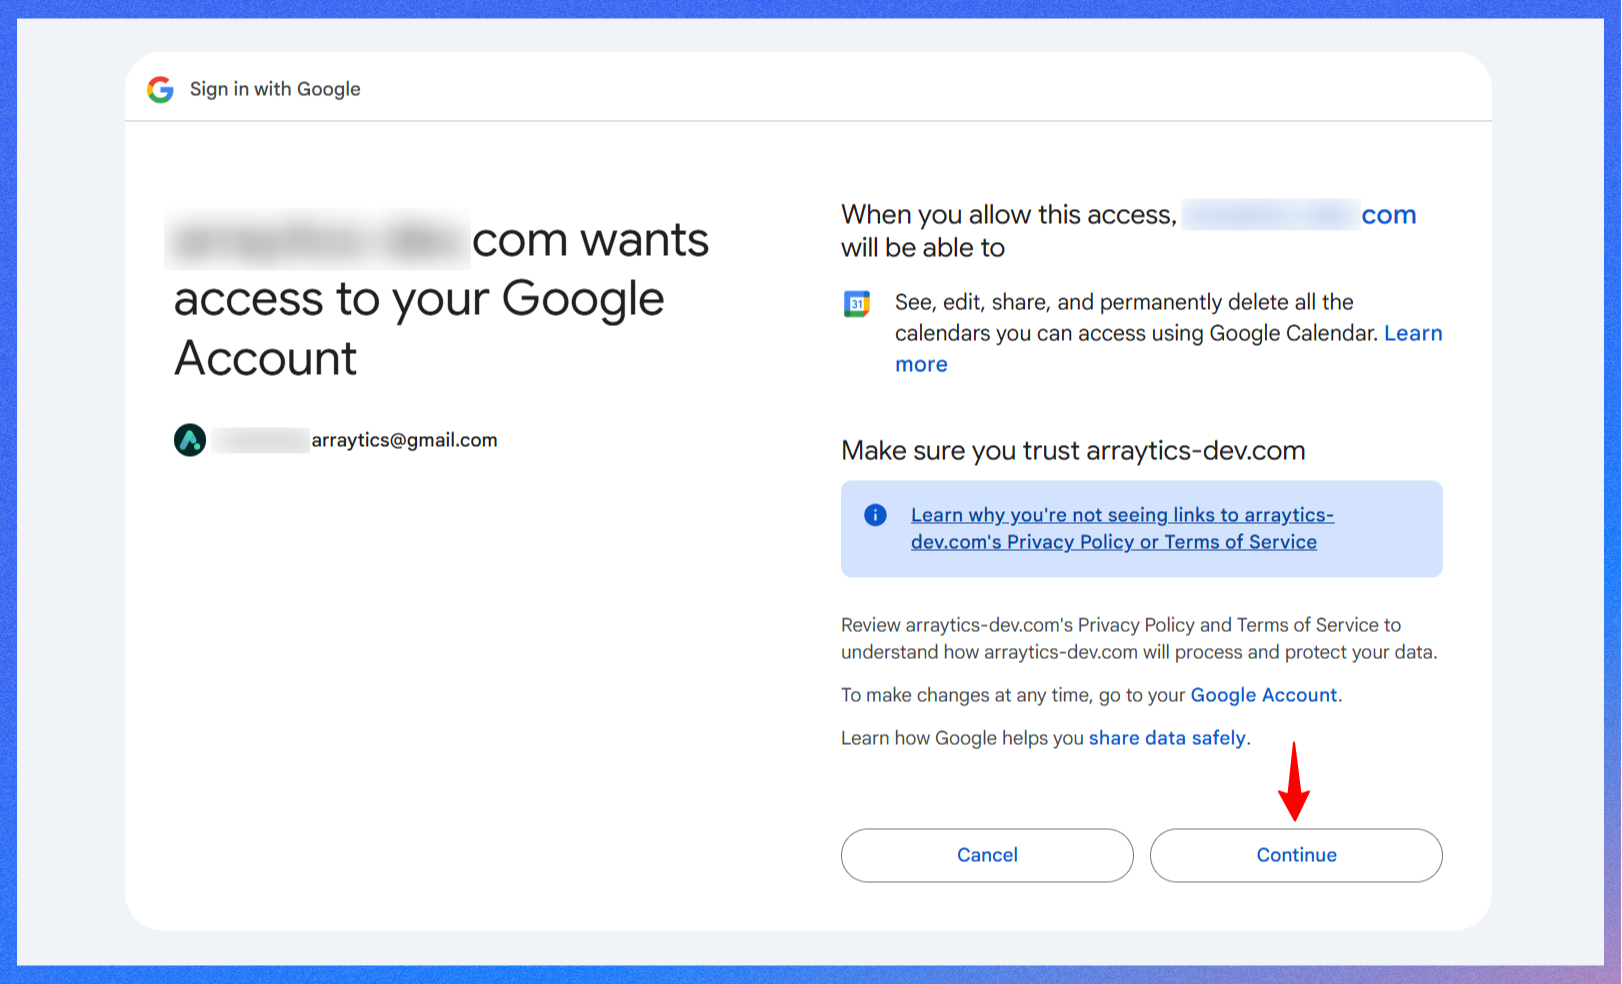
- On the next screen, simply click the Continue button.
- You can now view the integration through Dashboard > Timetics > Settings > Integrations. The button has been successfully connected.
Troubleshooting common issues and how to solve them
Even with everything set up, you may encounter a few hiccups. Here’s how to handle the most common problems during the Google Calendar integration in WordPress WP Timetics.
1. “Google hasn’t verified this app.” Warning
This is a standard message when you use custom Google API credentials. It means Google hasn’t reviewed your app yet, not that it’s unsafe.
How to fix it:
- Click the “Advanced” link on the warning screen.
- Then click “Go to [your domain] (unsafe)” to continue.
- This allows you to bypass the warning and proceed with the connection.
Don’t worry — this is safe as long as you’re using your own Google account and app credentials.
2. Incorrect redirect URI
If you see an error that says “redirect_uri_mismatch,” it means the redirect URI in your Google project doesn’t match what WP Timetics is using.
How to fix it:
- Go to your WP Timetics > Settings > Integrations tab and copy the exact Redirect URI provided there.
- Then, return to the Google Cloud Console, open your project, go to Credentials, and edit your OAuth 2.0 client settings.
- Paste the correct URI under Authorized redirect URIs and save your changes.
Matching the URI exactly (no extra slashes or characters) is important. Even a small typo or missing slash can cause this issue.
3. Permission errors or sync failures
Sometimes, calendar events may not sync after connecting your account, or you might see a permission error.
How to fix it:
- Ensure you use the same Google account to create the OAuth credentials.
- Double-check that the correct permissions were granted during the connection step.
- Try disconnecting and reconnecting the calendar from WP Timetics > Settings > Integrations.
If the problem continues, rechecking the Client ID and Secret values or generating new credentials can help.
FAQs
Can I use multiple Google accounts with WP Timetics?
Yes, WP Timetics allows you to connect multiple Google accounts—just one at a time per WordPress user profile. If you manage different services or calendars, you can switch between Google accounts by reconnecting through the WP Timetics > Settings > Integrations panel.
Is the integration free?
Yes, integrating WP Timetics with Google Calendar is completely free. There are no hidden charges for connecting your calendar or using Google Meet features.
Does this Google Calendar Integration work in real-time?
Yes, once connected, WP Timetics syncs appointments with Google Calendar in real-time. This means any new booking made through your site will appear instantly in your Google Calendar.
Will it sync recurring appointments?
Yes, WP Timetics supports recurring appointments, and these will be synced to Google Calendar just like regular bookings. Whether you’re setting up weekly consultations, classes, or monthly meetings, the plugin ensures that recurring schedules remain accurate and up to date on both platforms.
Conclusion
Connecting WP Timetics with Google Calendar helps you keep your schedule organized without updating things in two places. Once set up, your bookings can sync automatically, so you don’t miss anything, and your clients stay informed.
If you’re using WP Timetics already, this integration can make your daily workflow easier. If you’re new to it, WP Timetics gives you a simple way to manage appointments from your WordPress site, with built-in features like calendar sync, team scheduling, and seat-based booking.