20 Google Calendar Tips for Better Planning and Productivity
Google Calendar is more than a simple calendar application. It’s a powerful tool for managing daily tasks, meetings, and busy schedules.
You can set appointments, share calendars with others, and manage your to-do list all in one place.
In this guide, you’ll find 20 practical tips to help you use Google Calendar better—whether you’re a professional, a student, or a busy parent. Each tip is easy, straightforward, and ready to use.
Who uses Google Calendar?
Google Calendar is a powerful tool for anyone juggling tasks, meetings, or responsibilities. No matter your role, these calendar tips will help you take control of your time, improve planning, and boost productivity.
These tips are especially useful for:
- Professionals & office workers: To manage meetings, deadlines, and daily tasks without missing anything.
- Students: To plan classes, study time, and exams more efficiently.
- Freelancers: To organize client meetings, project timelines, and personal tasks.
- Business owners & Entrepreneurs: Stay on top of meetings, team schedules, and goal planning.
- Remote workers: To coordinate across time zones and manage online meetings smoothly.
- Project managers: To schedule team tasks, track progress, and meet deadlines.
- Teachers and educators: Plan lessons, meetings, and class activities efficiently.
- Event planners: To track multiple events, bookings, and reminders in one place.
- Parents: To manage family activities, school events, and appointments.
- Healthcare professionals: To keep track of appointments, rounds, and personal schedules.

Tip 1: Set working hours & appointment slots for better time management
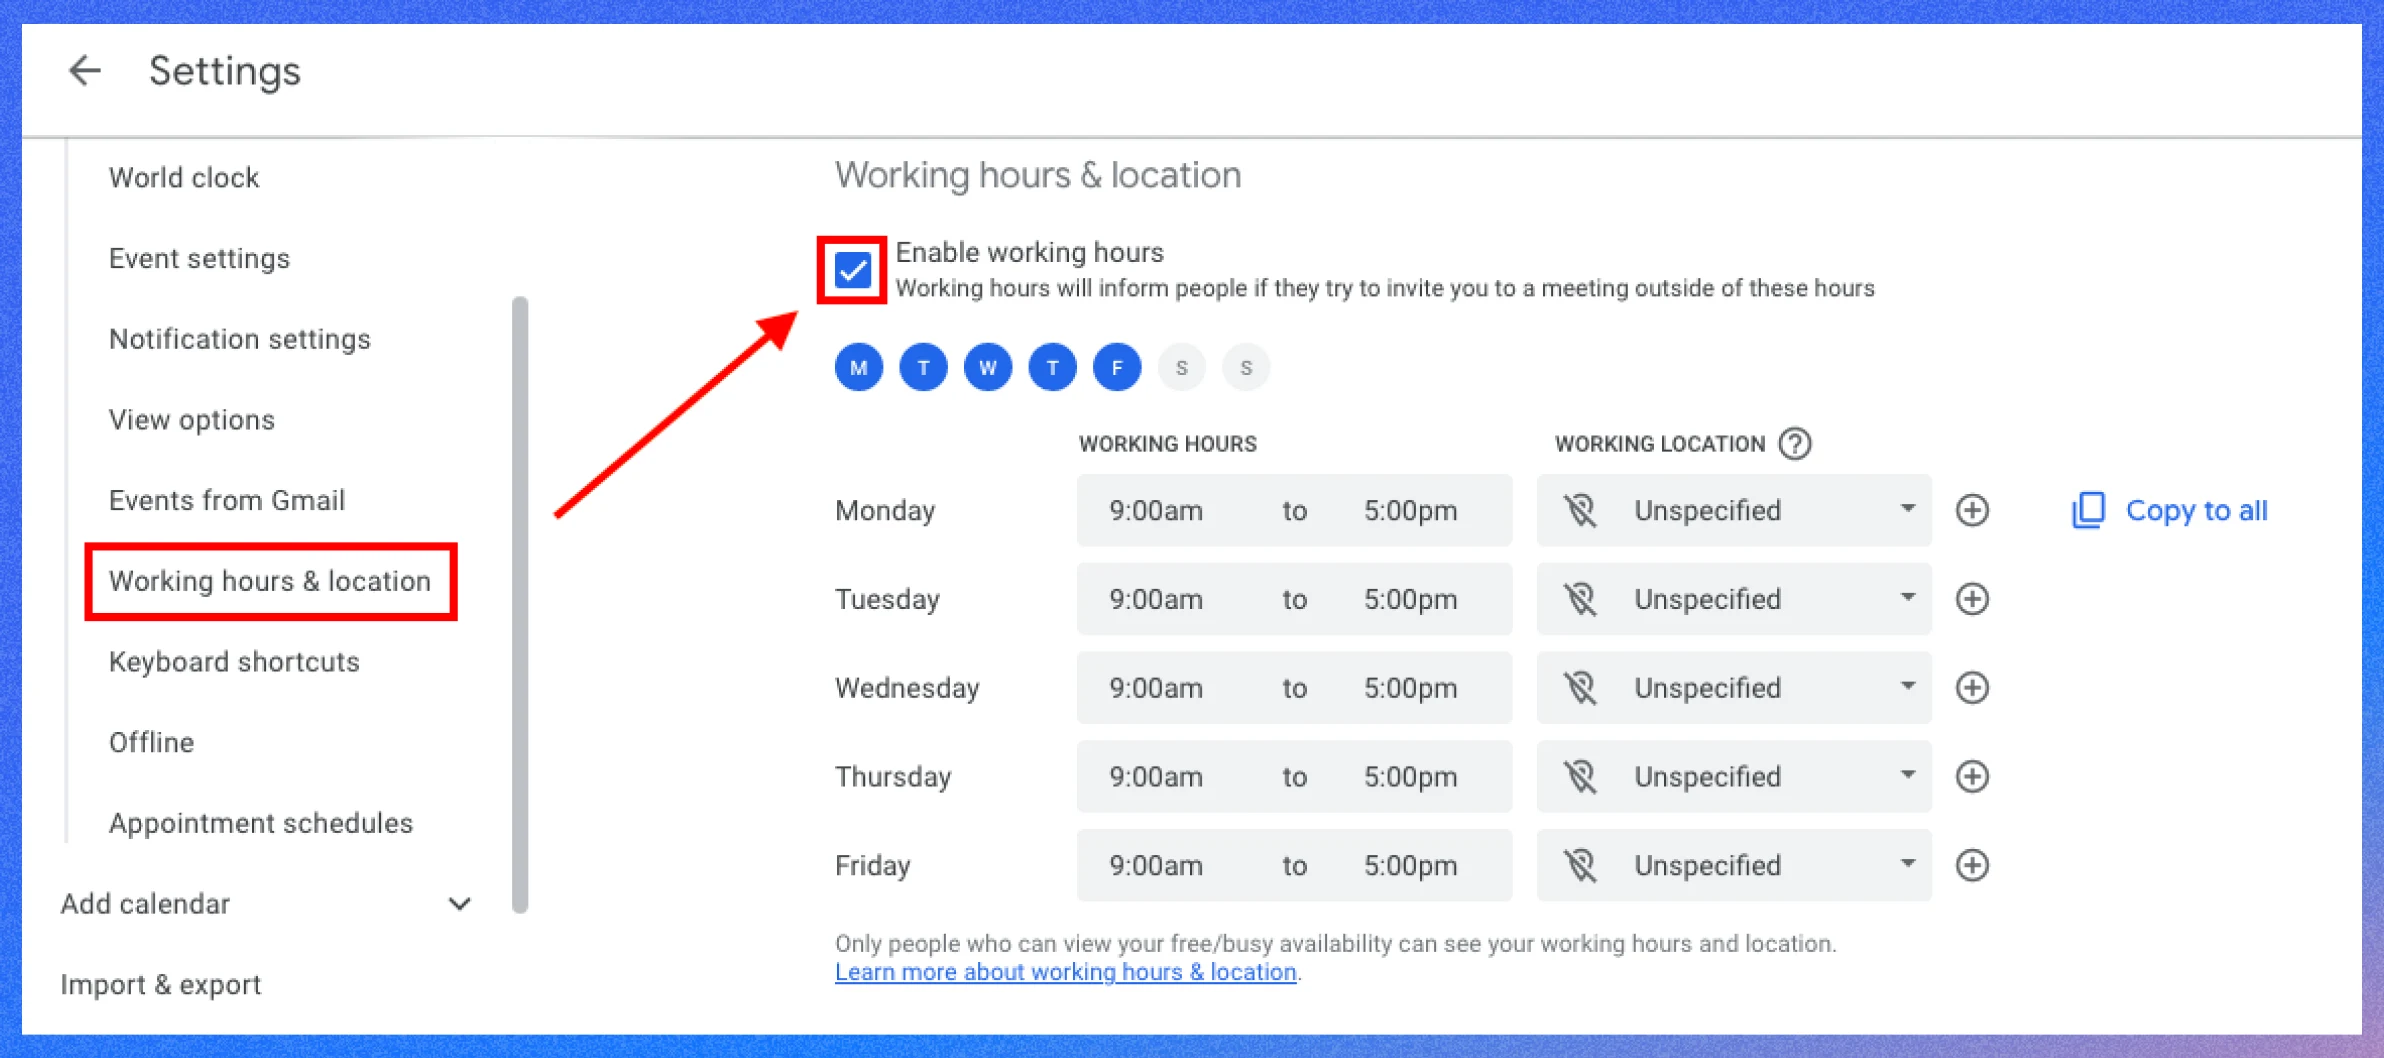
Setting working hours in Google Calendar helps protect your personal time by discouraging meeting invites outside your availability.
The Appointment Schedule feature lets others book time with you directly, eliminating scheduling back-and-forth.
- How to set working hours: Go to Settings > General > Working hours, select your workdays, and set your hours (e.g., 9 AM–5 PM).
- How to create appointment schedules: Click “Create” > “Appointment schedule,” set a title (e.g., “Client Calls”), choose available time slots, and share the booking link.
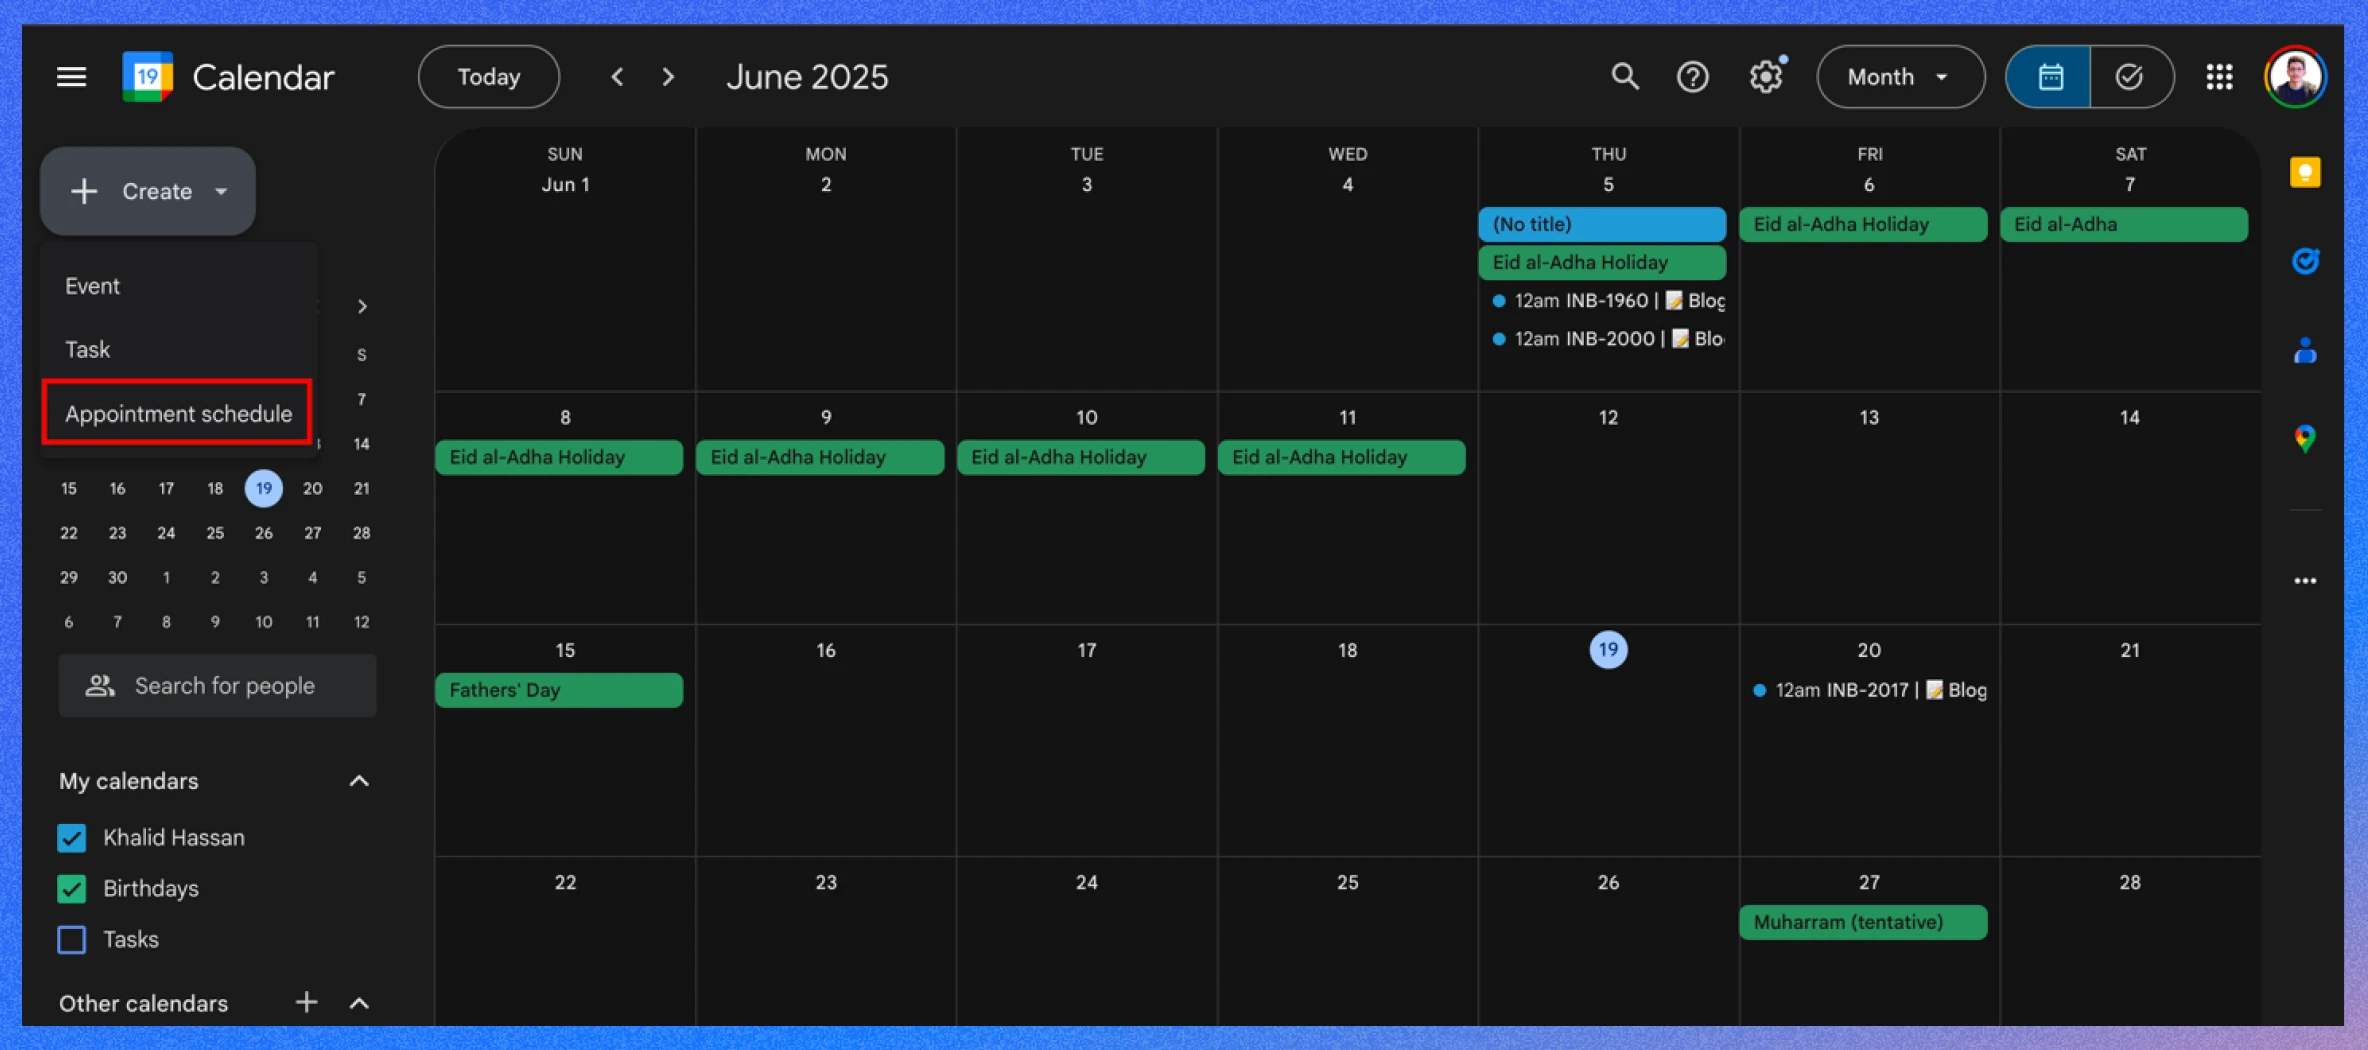
- Example: Set working hours to 10 AM–6 PM and create a 30-minute slot for weekly team check-ins.
- Benefit: Maintains work-life balance and simplifies booking for others.
📌 Note: The working hours feature in Google Calendar is exclusive to Google Workspace accounts and is not available for free personal accounts.
Tip 2: Add a secondary time zone & world clock for easier global scheduling
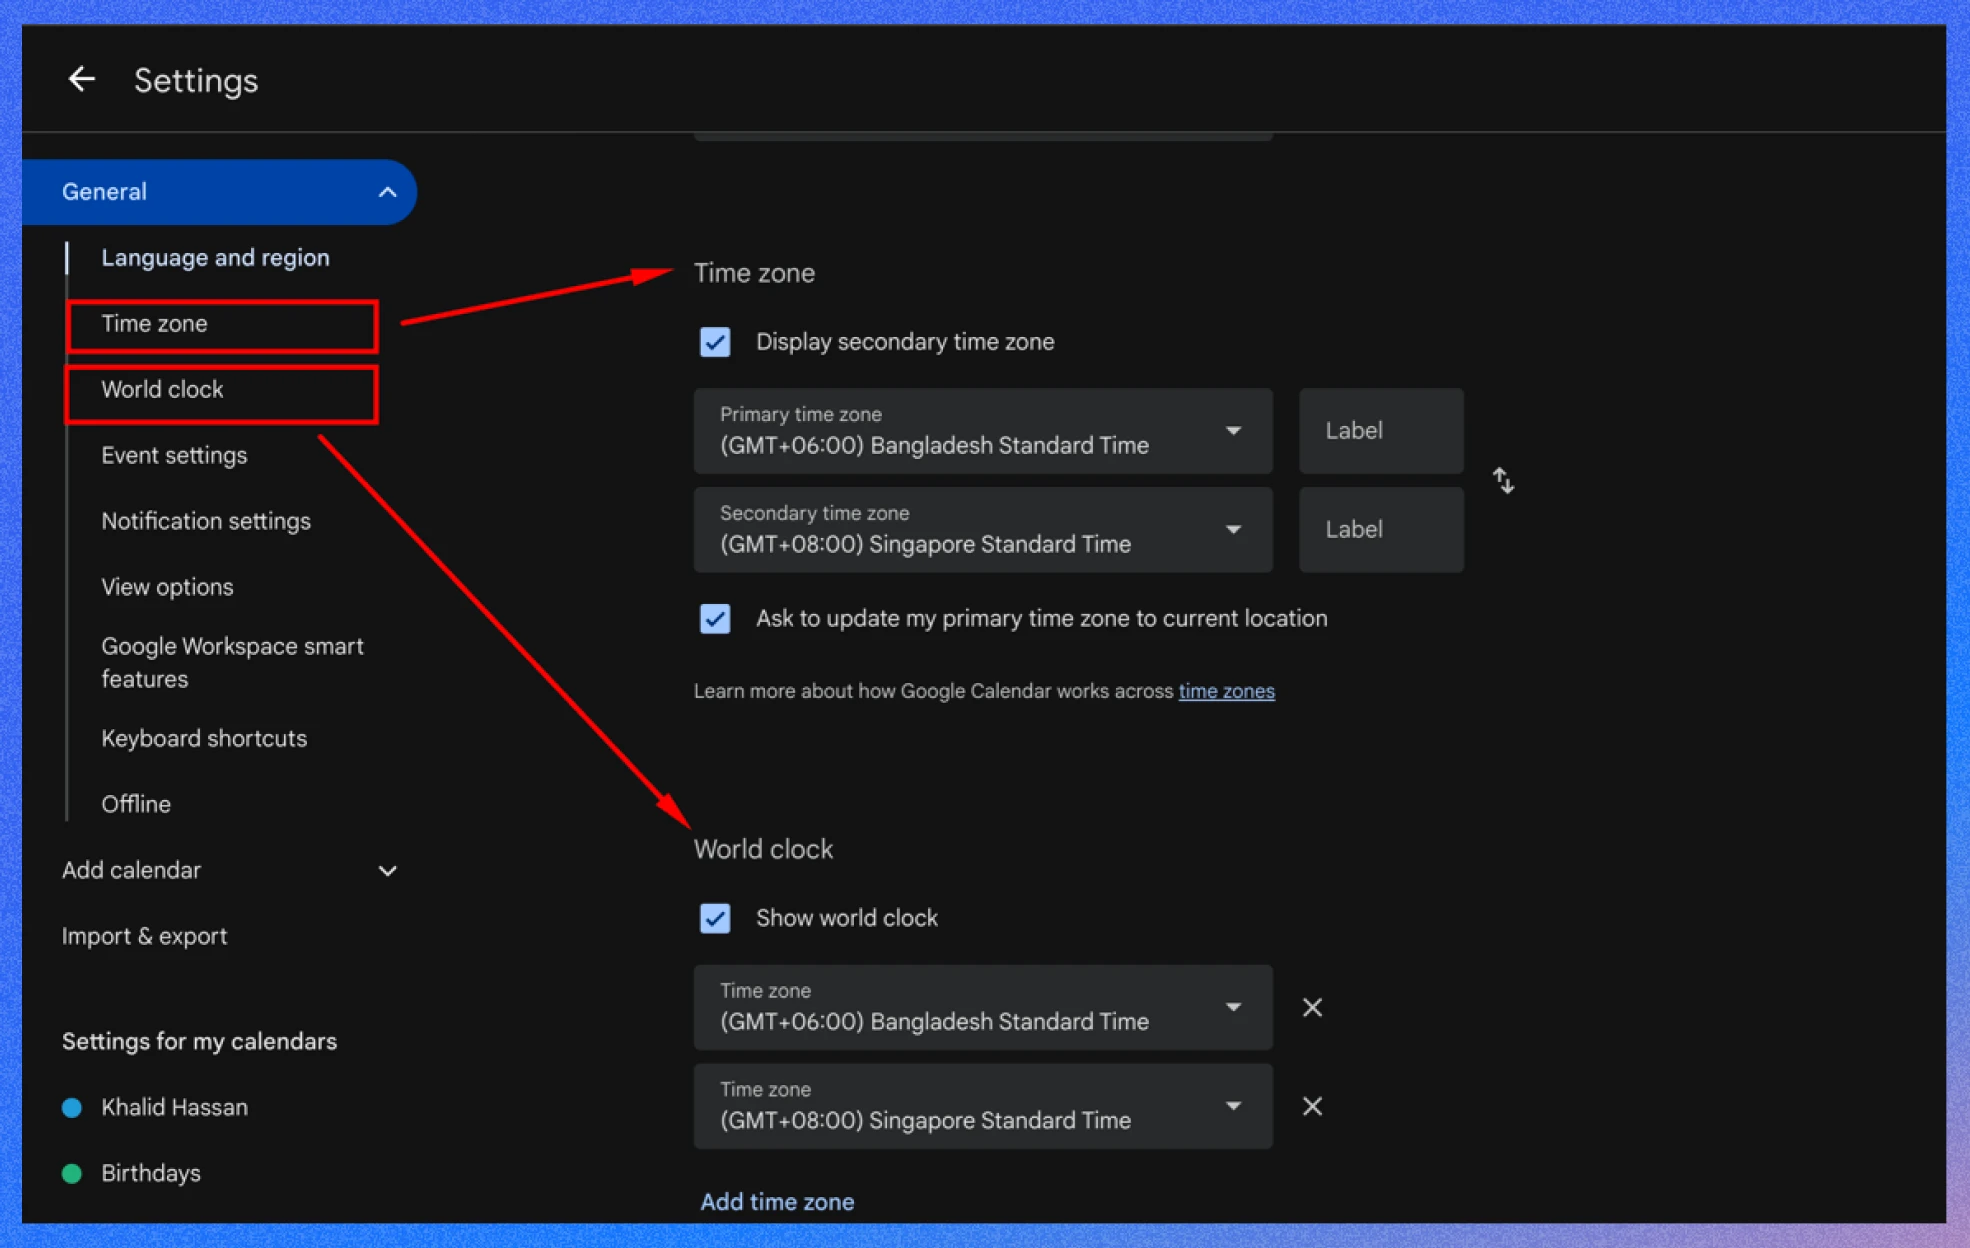
If you collaborate across time zones, adding a secondary time zone or enabling the World Clock ensures accurate scheduling.
The secondary time zone displays alongside your primary one, while the World Clock shows current times in multiple locations.
- How to add a secondary time zone: Go to Settings > General > Time Zone, check “Display secondary time zone,” and select a time zone.
- How to enable World Clock: In Settings > General > World clock, check “Show world clock” and add desired time zones.
- Example: Add London’s time zone if you’re in New York to schedule calls with UK colleagues.
- Benefit: Prevents scheduling errors and makes global coordination easier.
💁 Goodreads: WordPress Security in 2025: Safeguarding Your Website- Read more
Tip 3: Use Google Tasks & daily agenda for task tracking
You can use Google Tasks and the Daily Agenda to manage task priorities.
Tasks integrate directly into your calendar, and the Agenda view or daily emails provide a clear overview of your day.
- How to use tasks: In the left sidebar, click “Tasks. ” Create a task, set a due date, and it will appear on your calendar.
- How to use daily agenda: Switch to “Agenda” view at the top of your calendar or enable daily agenda emails in Settings > General > Daily agenda.
- Example: Add a task like “Prepare presentation” due Friday, and check your Agenda view to plan your day.
- Benefit: Combines tasks and events in one view, helping you stay on track.
Tip 4: Use color-coding for quick identification
Assigning different colors to multiple calendars makes your schedule visually intuitive. You can create separate calendars for work, personal, or hobbies, each with a unique color.
- How to do it: In the left sidebar, click “Other calendars” > “Create new calendar,” name it, and choose a color(Hover over the calendar name and use the three dots to navigate)..
- Example: Use blue for work, green for personal, and red for fitness events.
- Benefit: Quickly identify the list, reducing confusion and improving focus.
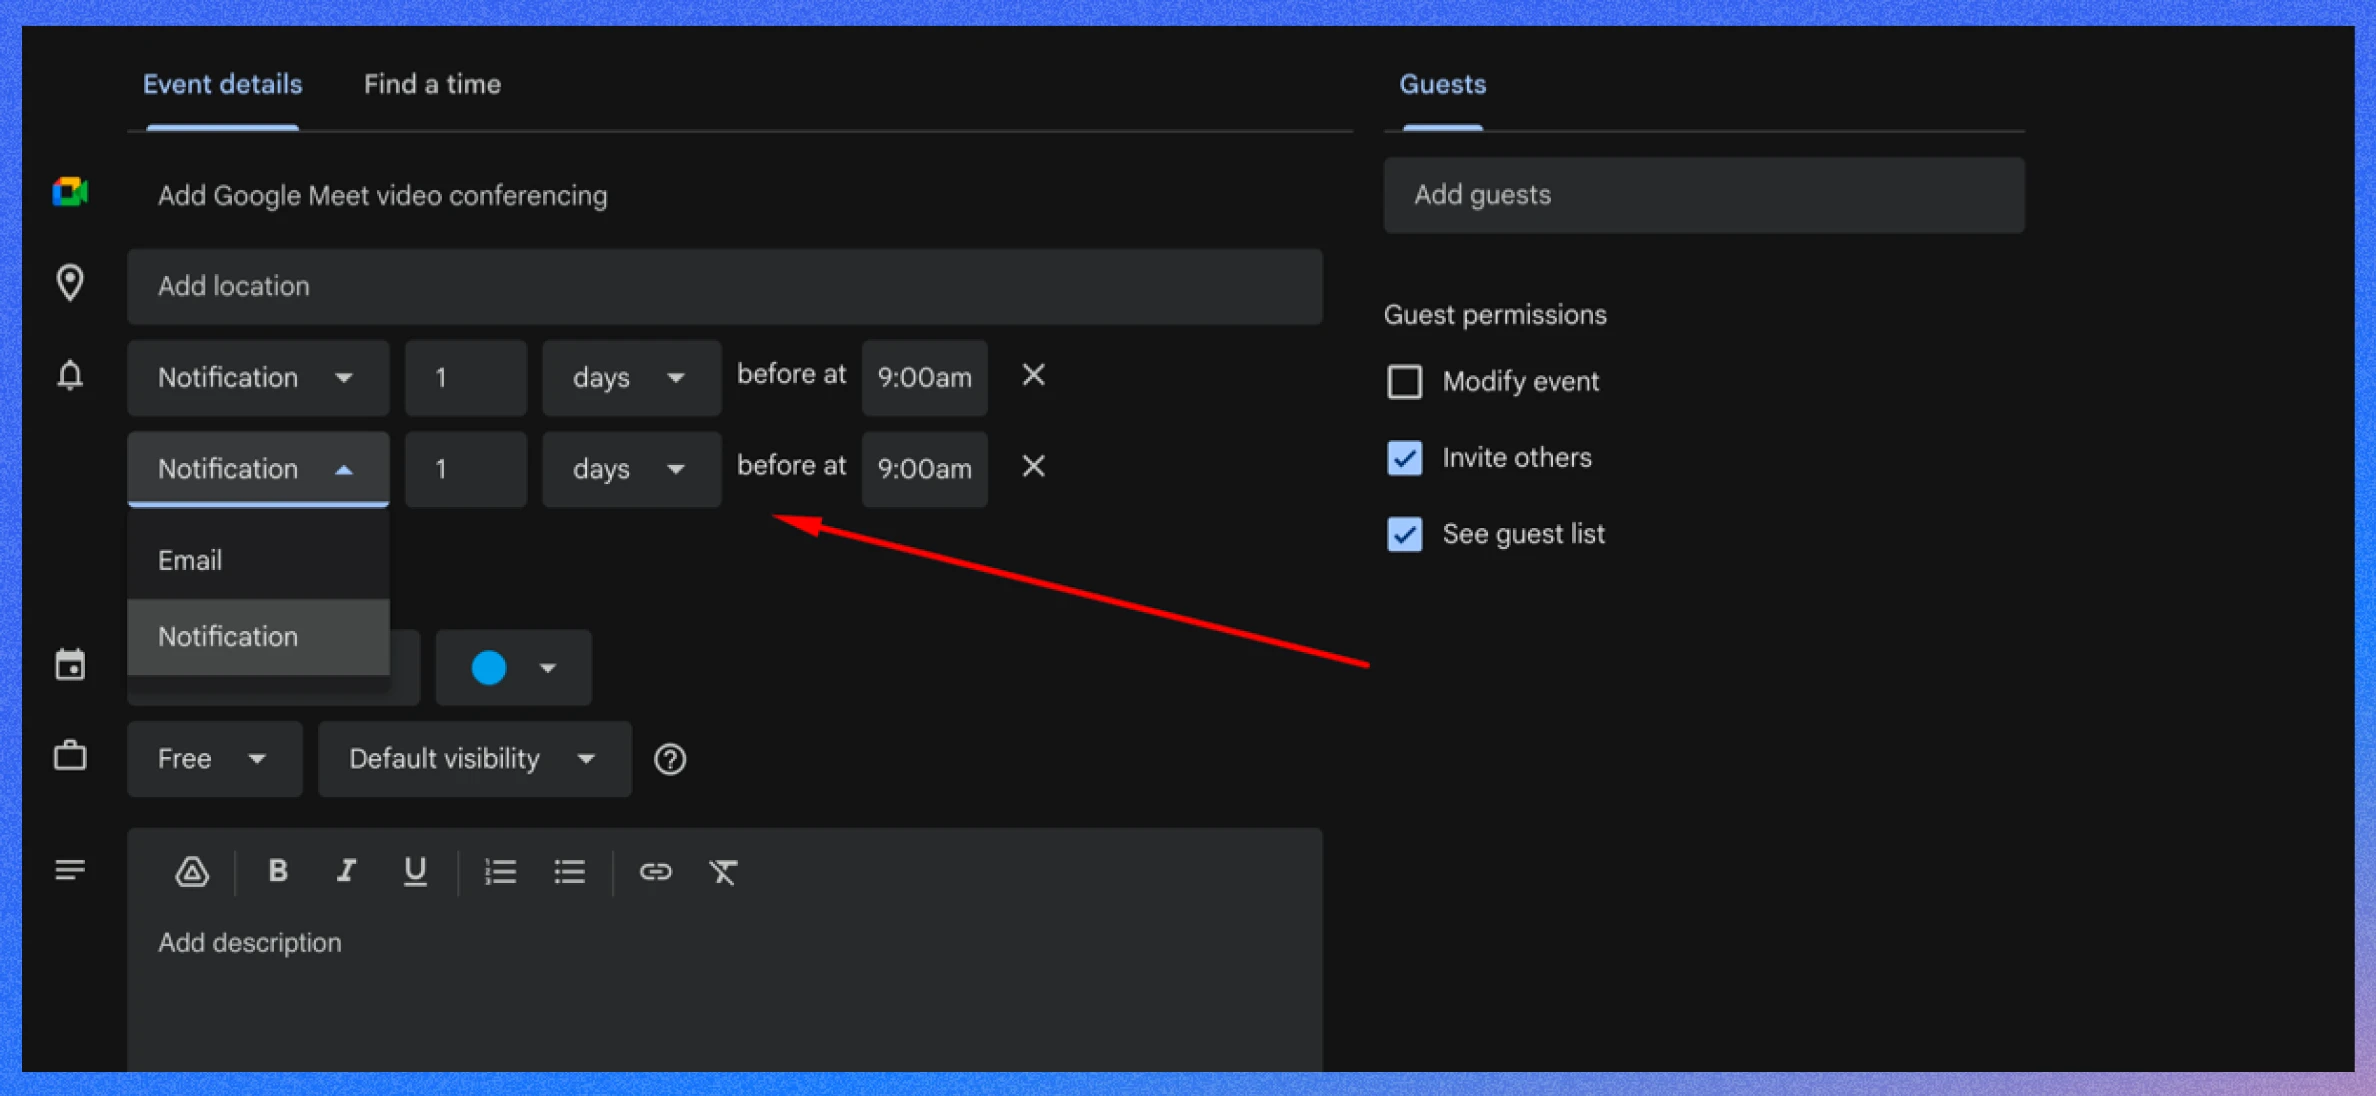
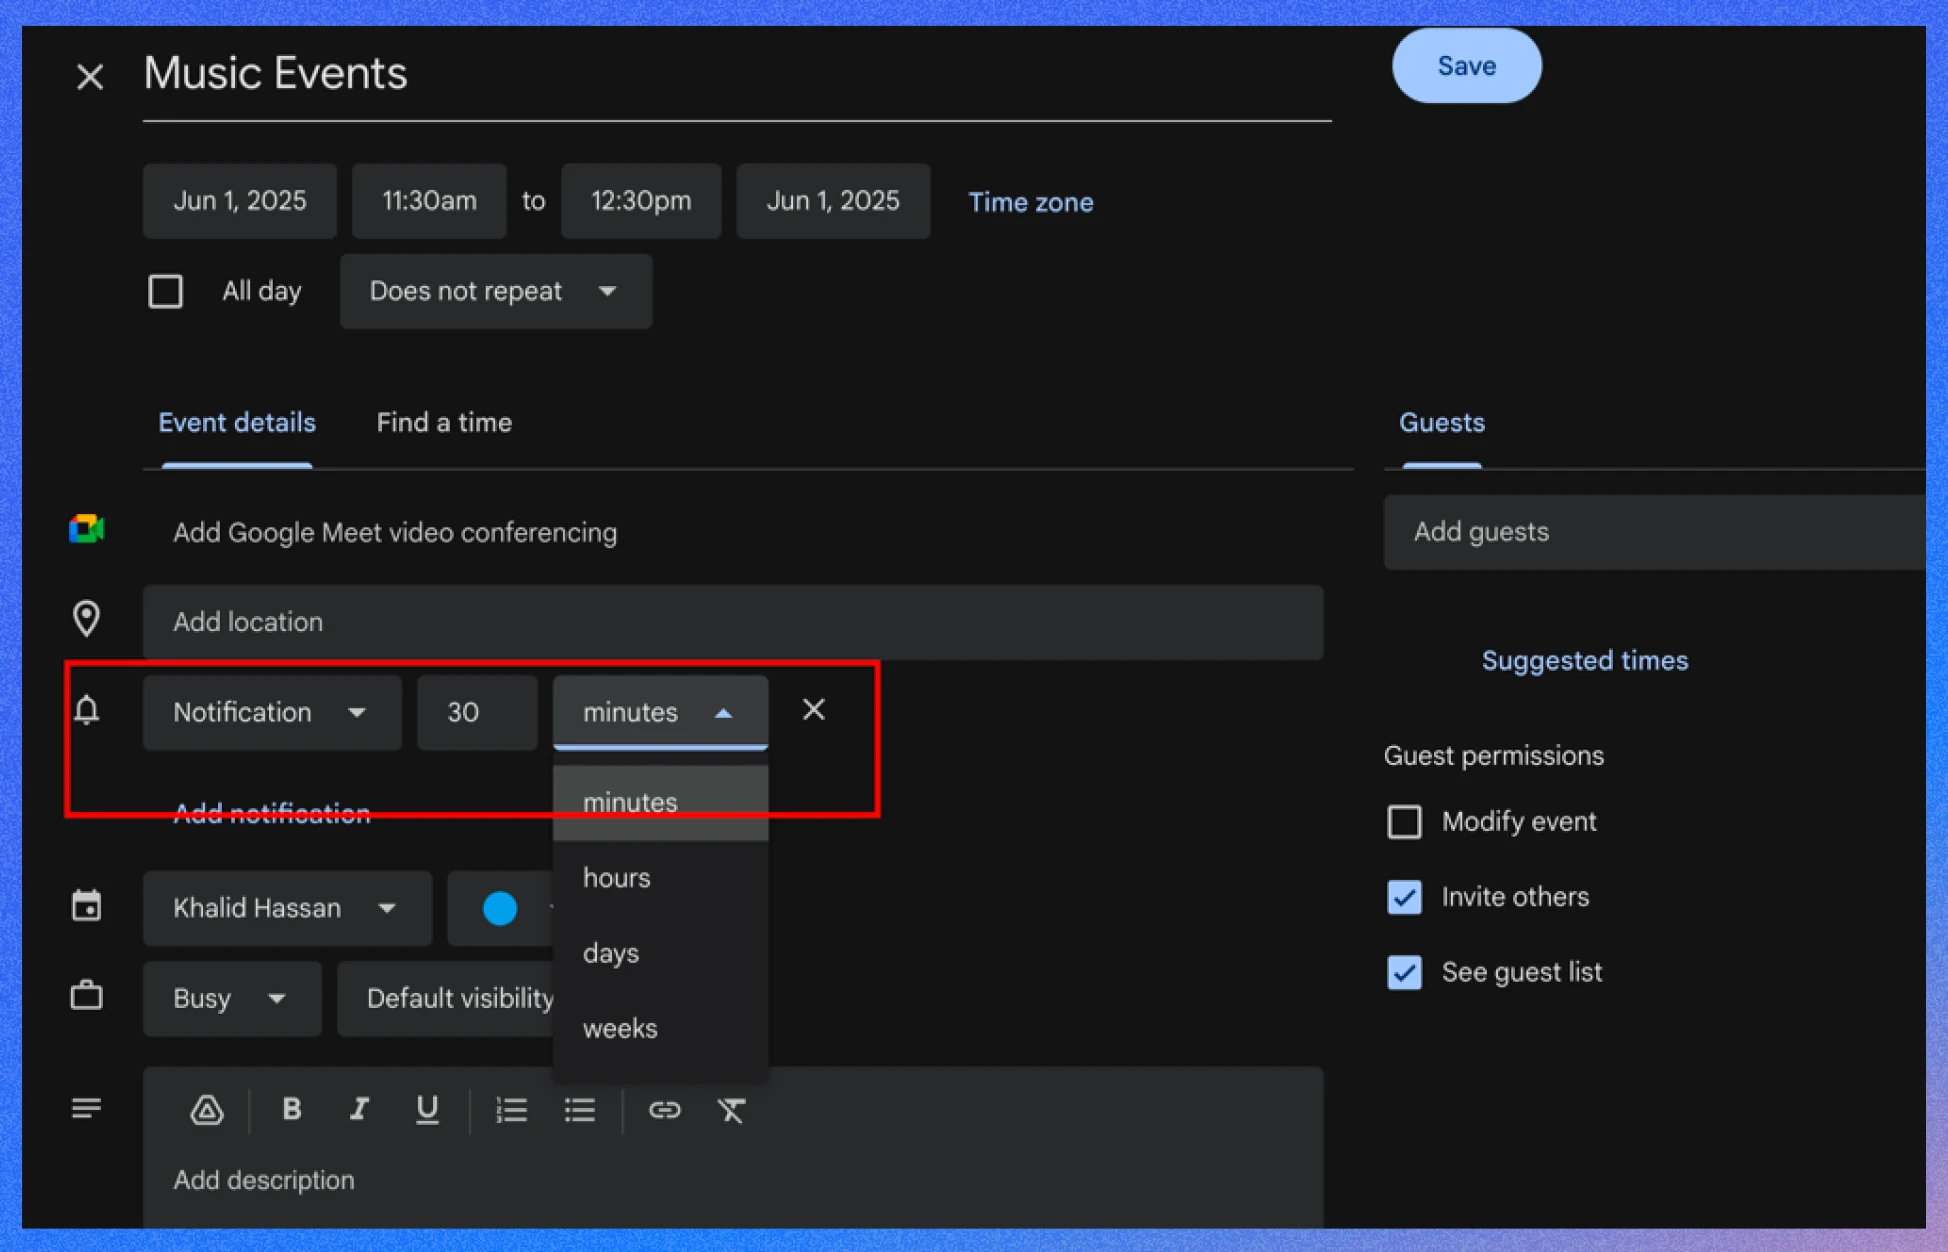
Tip 5: Use smart notifications & default reminders for staying on schedule
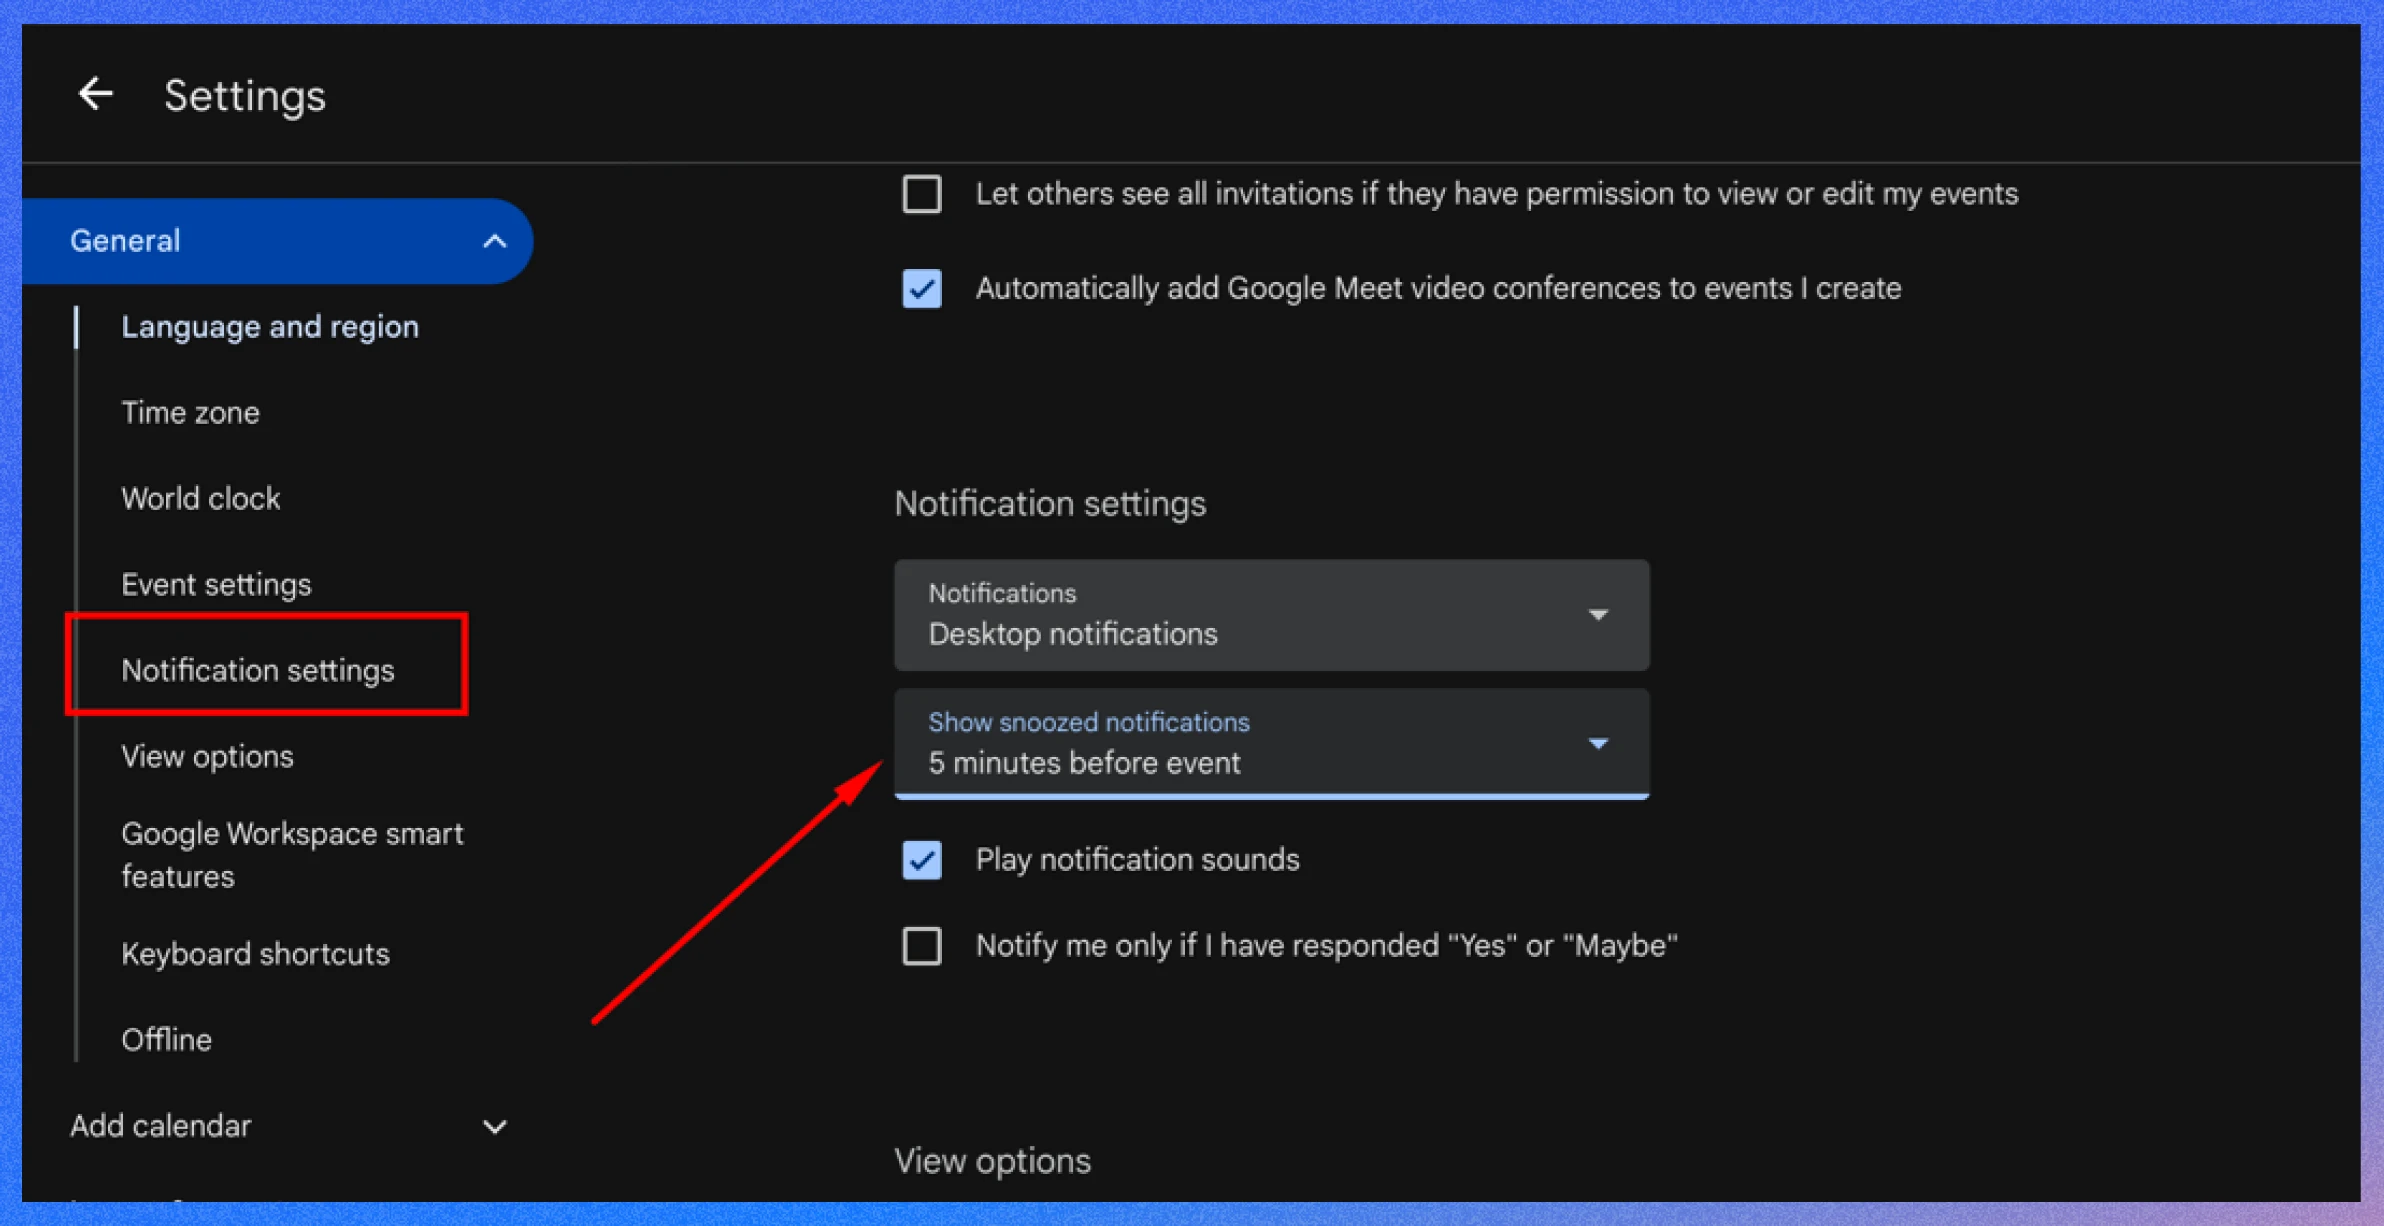
Google Calendar’s notification system ensures you never miss an event. You can set default reminders for all events or customize them for specific ones, choosing methods like email or pop-up alerts.
- How to set default reminders: Go to Settings > General > Notifications, select your preferred method and timing (e.g., 5 minutes before).
- How to customize reminders: When creating an event, add or adjust reminders under “Notifications.”
- Example: Set a 30-minute email reminder for meetings and a 5-minute pop-up for personal tasks.
- Benefit: Keeps you prepared and punctual without manual tracking.
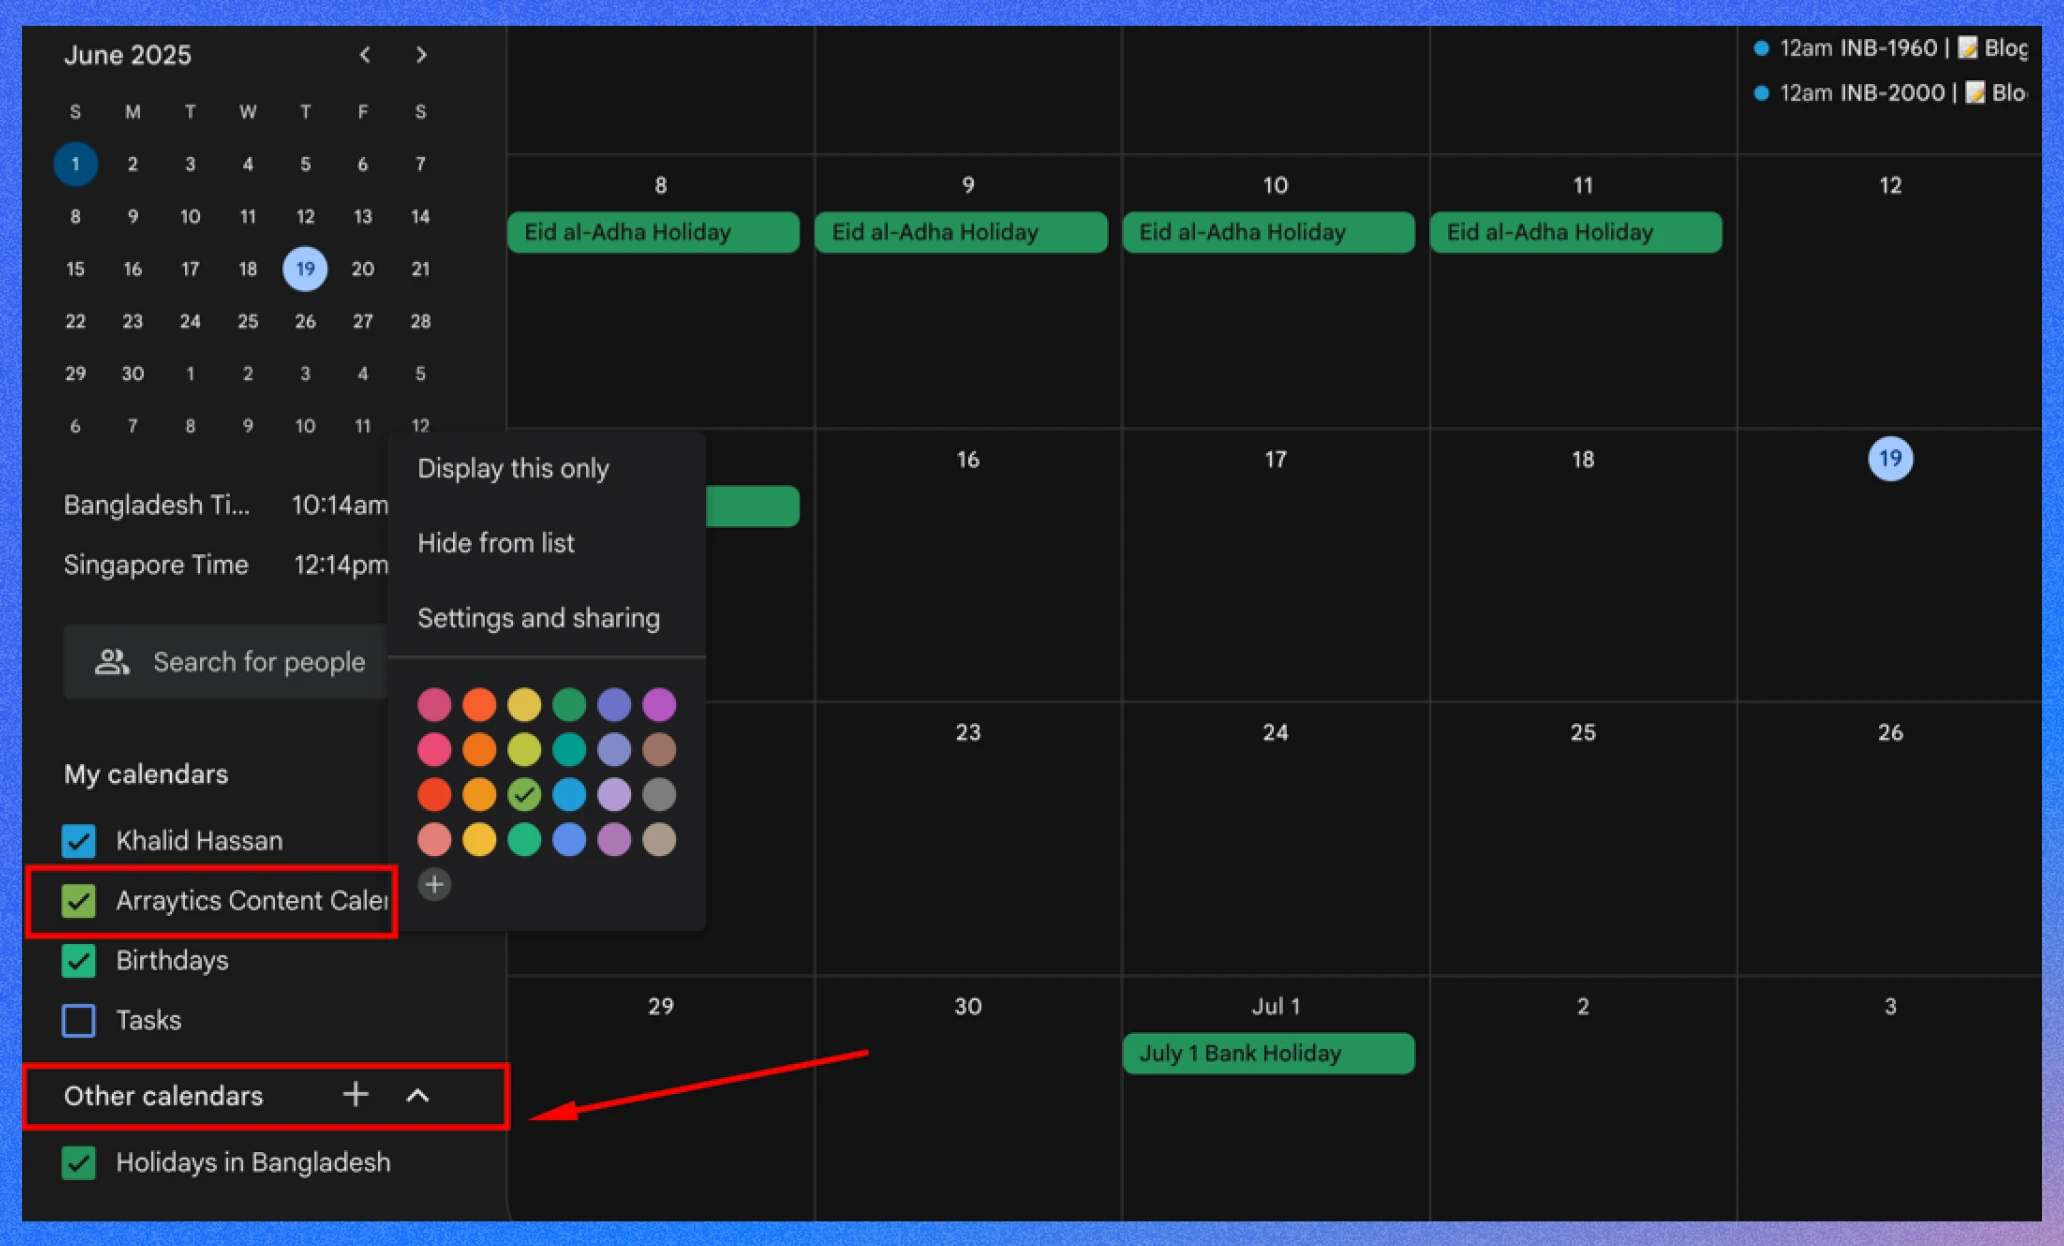
Tip 6: Create multiple calendars for various needs
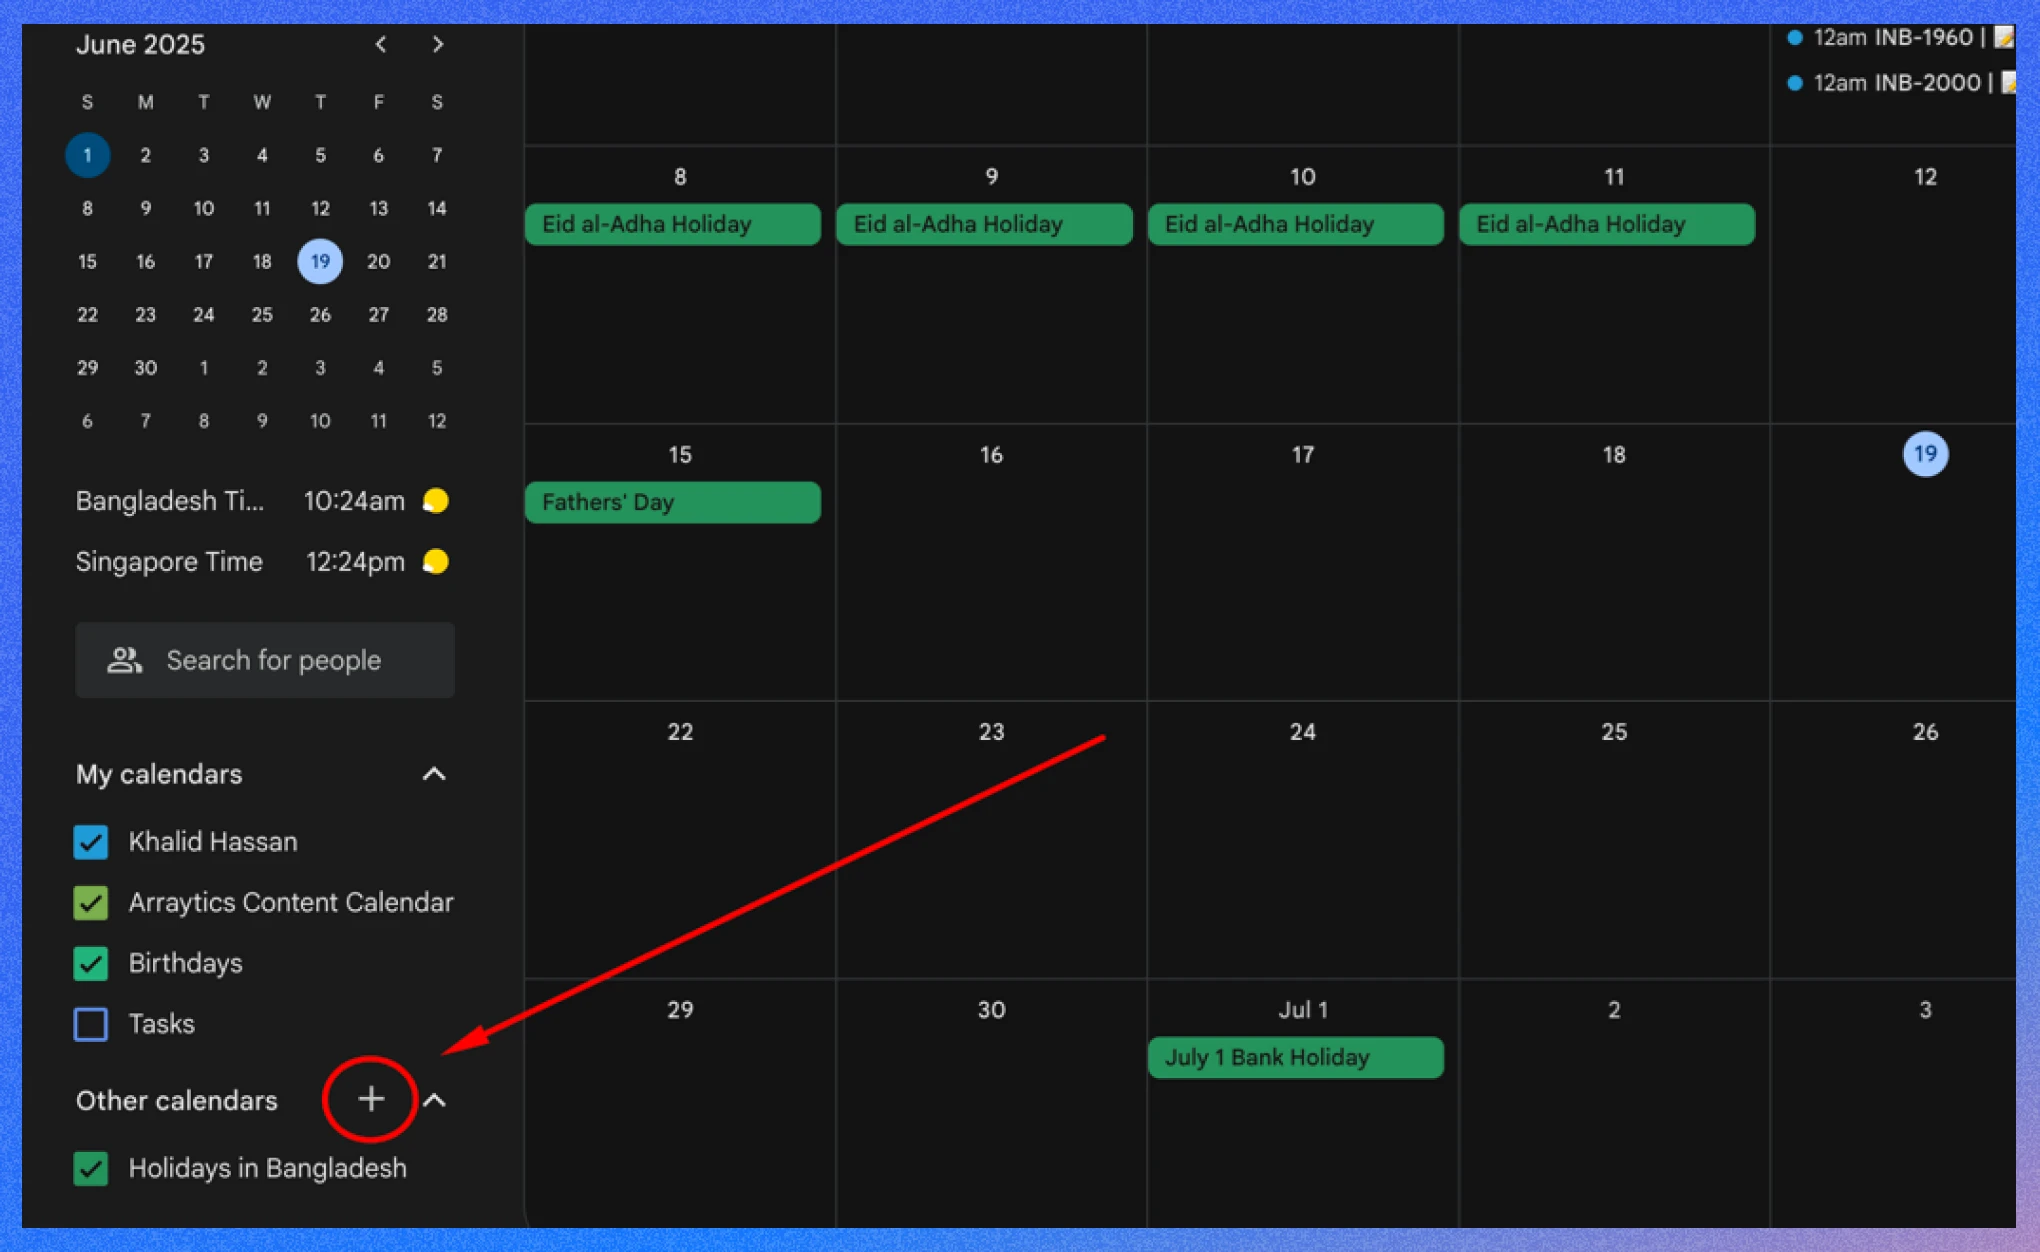
Multiple calendars allow you to organize different aspects of your life, such as work projects, family events, or personal goals.
You can also subscribe to public calendars for holidays or sports schedules.
- How to do it: Go to “Other calendars” > “Create new calendar,” name it (e.g., “Family”), and set permissions.
- Example: Create a “Team Projects” calendar for work deadlines and a “Kids’ Activities” calendar for family.
- Benefit: Keeps your schedule organized and clutter-free.
💁 Related Reading: How to Integrate WP Timetics with Google Calendar and Automate Your Scheduling- Read more
Tip 7: Efficiently set up recurring events for saving time
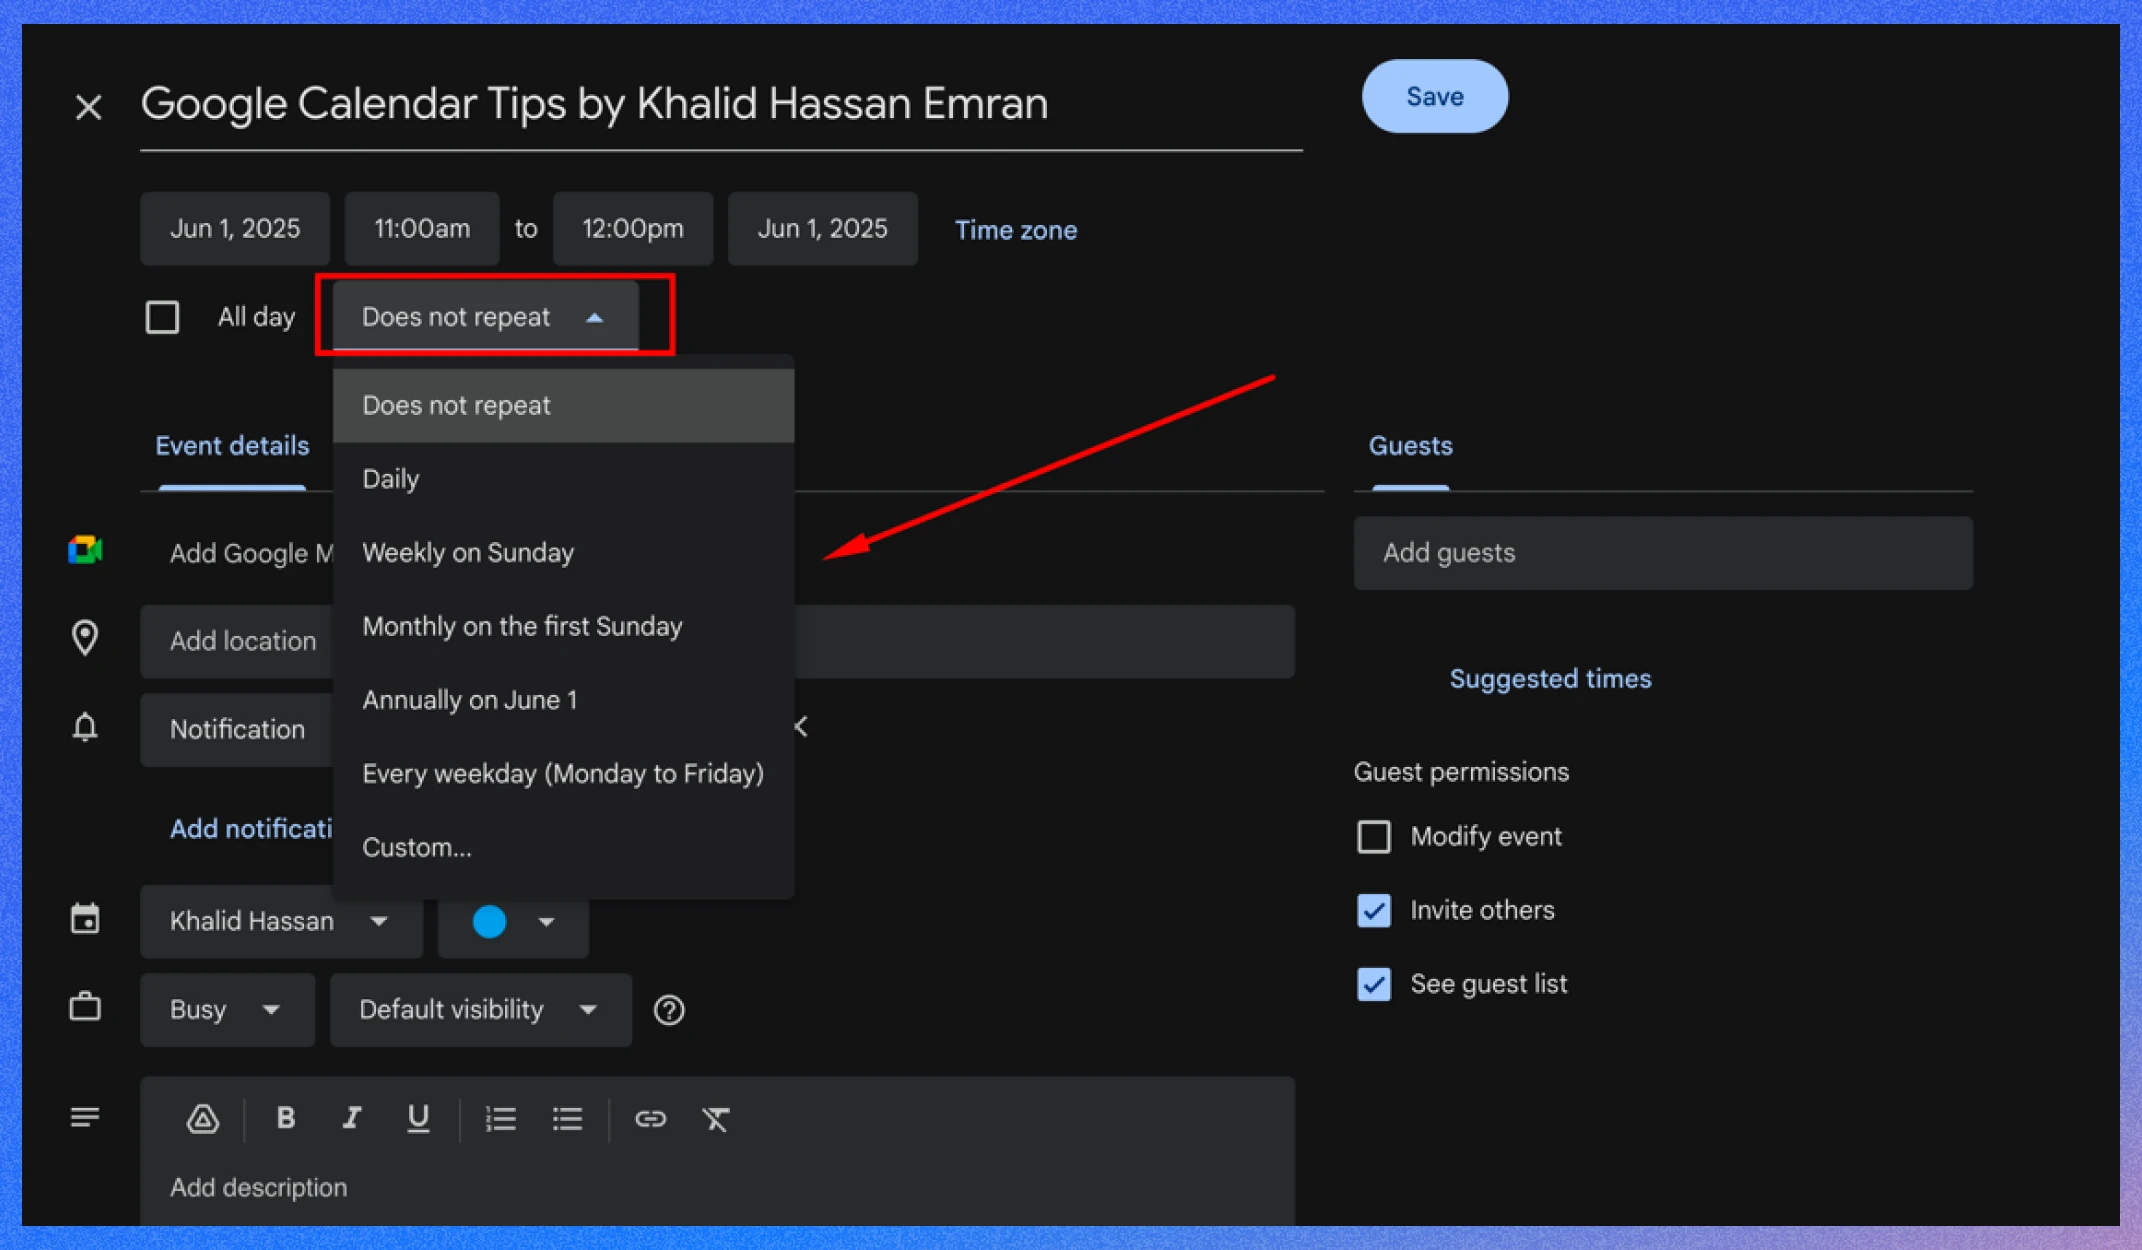
Recurring events save time for regular activities like weekly meetings or monthly reports. You can set events to repeat daily, weekly, or at custom intervals.
- How to do it: When creating an event, click “Does not repeat,” choose a repeat option (e.g., “Weekly”), and set an end date if needed.
- Example: Schedule a “Team Sync” every Monday at 10 AM for six months.
- Benefit: Automates scheduling for routine tasks, ensuring consistency.
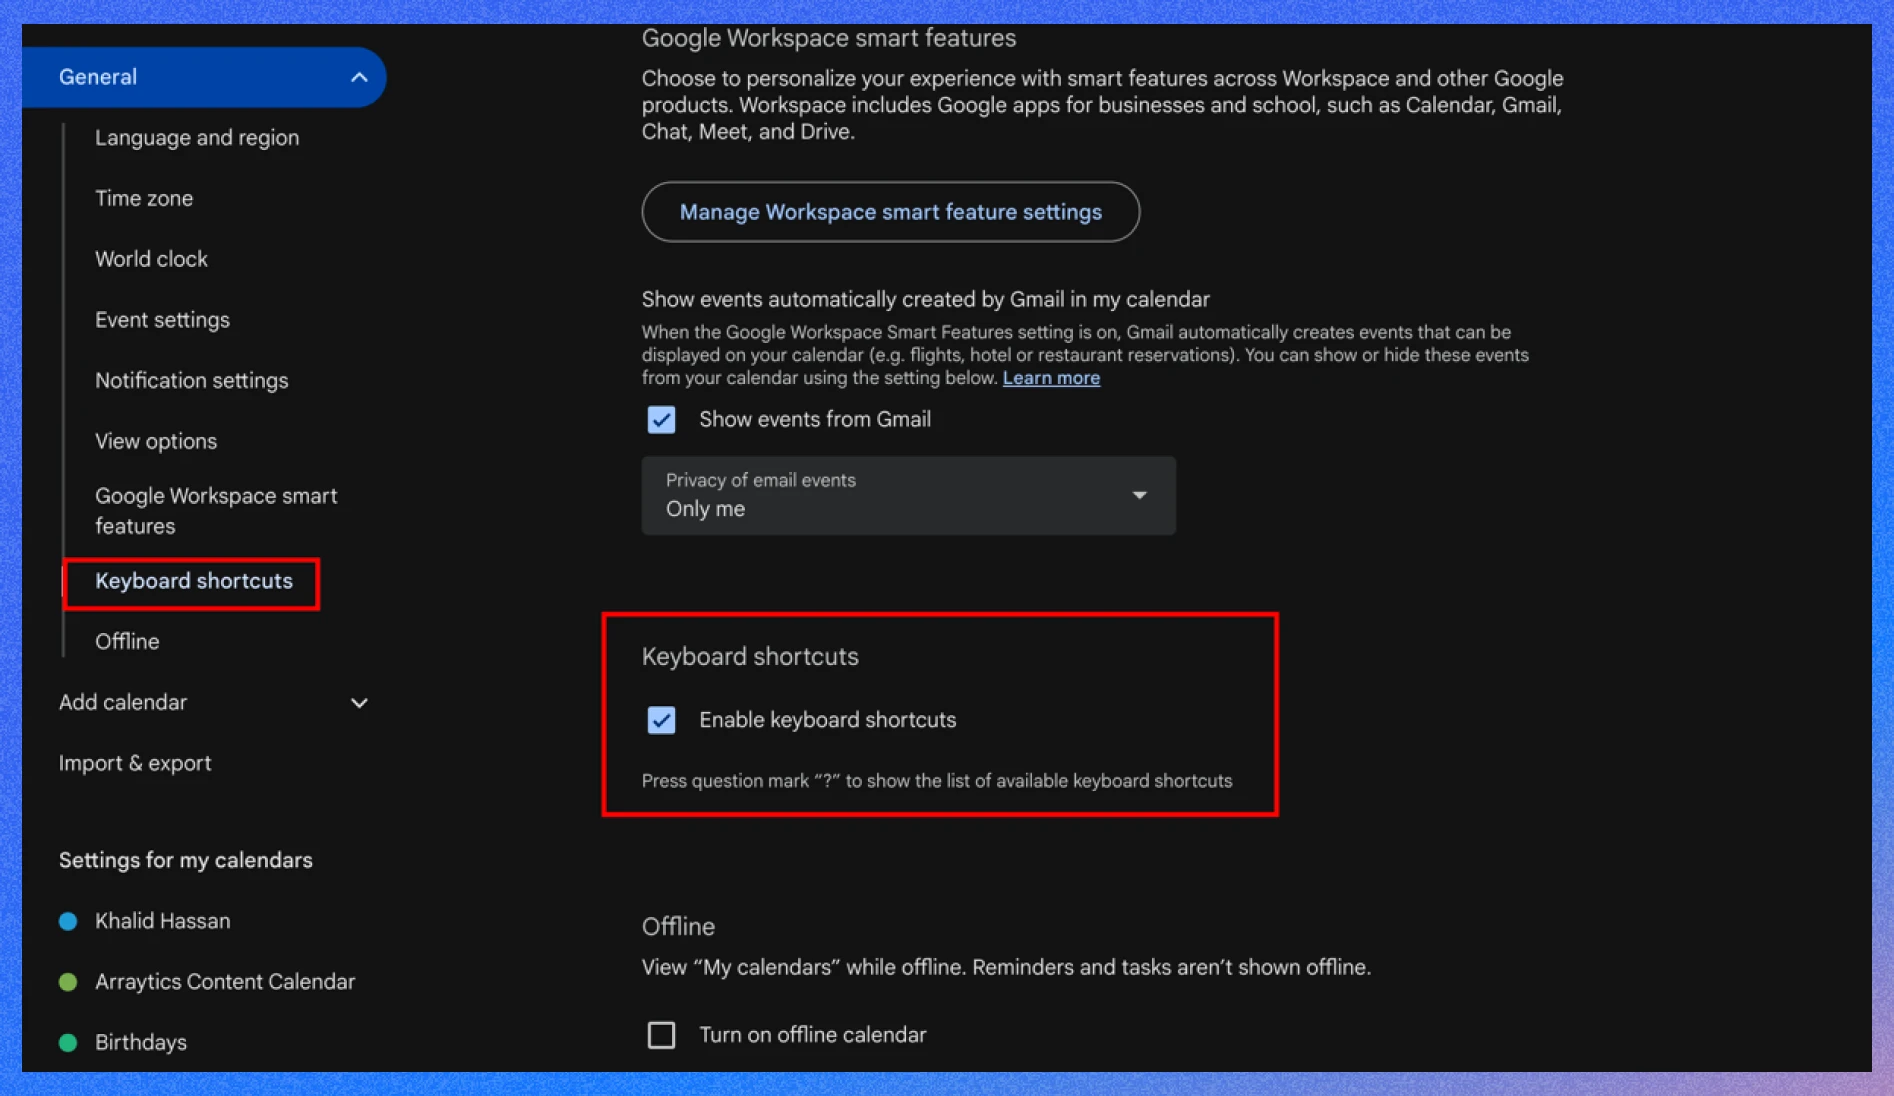
Keyboard shortcuts make navigating Google Calendar faster, especially for frequent users. They allow quick actions like creating events or switching views.
- How to use shortcuts: Enable shortcuts in Settings > General > Keyboard shortcuts. Common ones include “C” for new event, “D” for day view, and “M” for month view.
- Example: Press “C” to create a meeting, then “W” to switch to week view.
- Benefit: Speeds up calendar management, saving time.
Tip 9: Manage group schedules with “Find a time” for conflict-free meetings

The “Find a time” feature simplifies scheduling meetings by showing participants’ availability side by side, helping you pick a time that works for everyone.
- How to do it: Create an event, add guests, and click “Find a time” to view their calendars in Day or Week view.
- Example: Schedule a team meeting by checking colleagues’ availability for Wednesday afternoon.
- Benefit: Reduces scheduling conflicts and email exchanges.
Tip 10: Receiving daily agenda emails for better planning
Daily agenda emails deliver a morning summary of your events and tasks, helping you plan your day effectively.
- How to enable it: Go to Settings > General > Daily agenda, and select “Email” under “Daily agenda.”
- Example: Receive an email at 7 AM listing your meetings and tasks for the day.
- Benefit: Provides a quick, at-a-glance overview to prioritize your day.
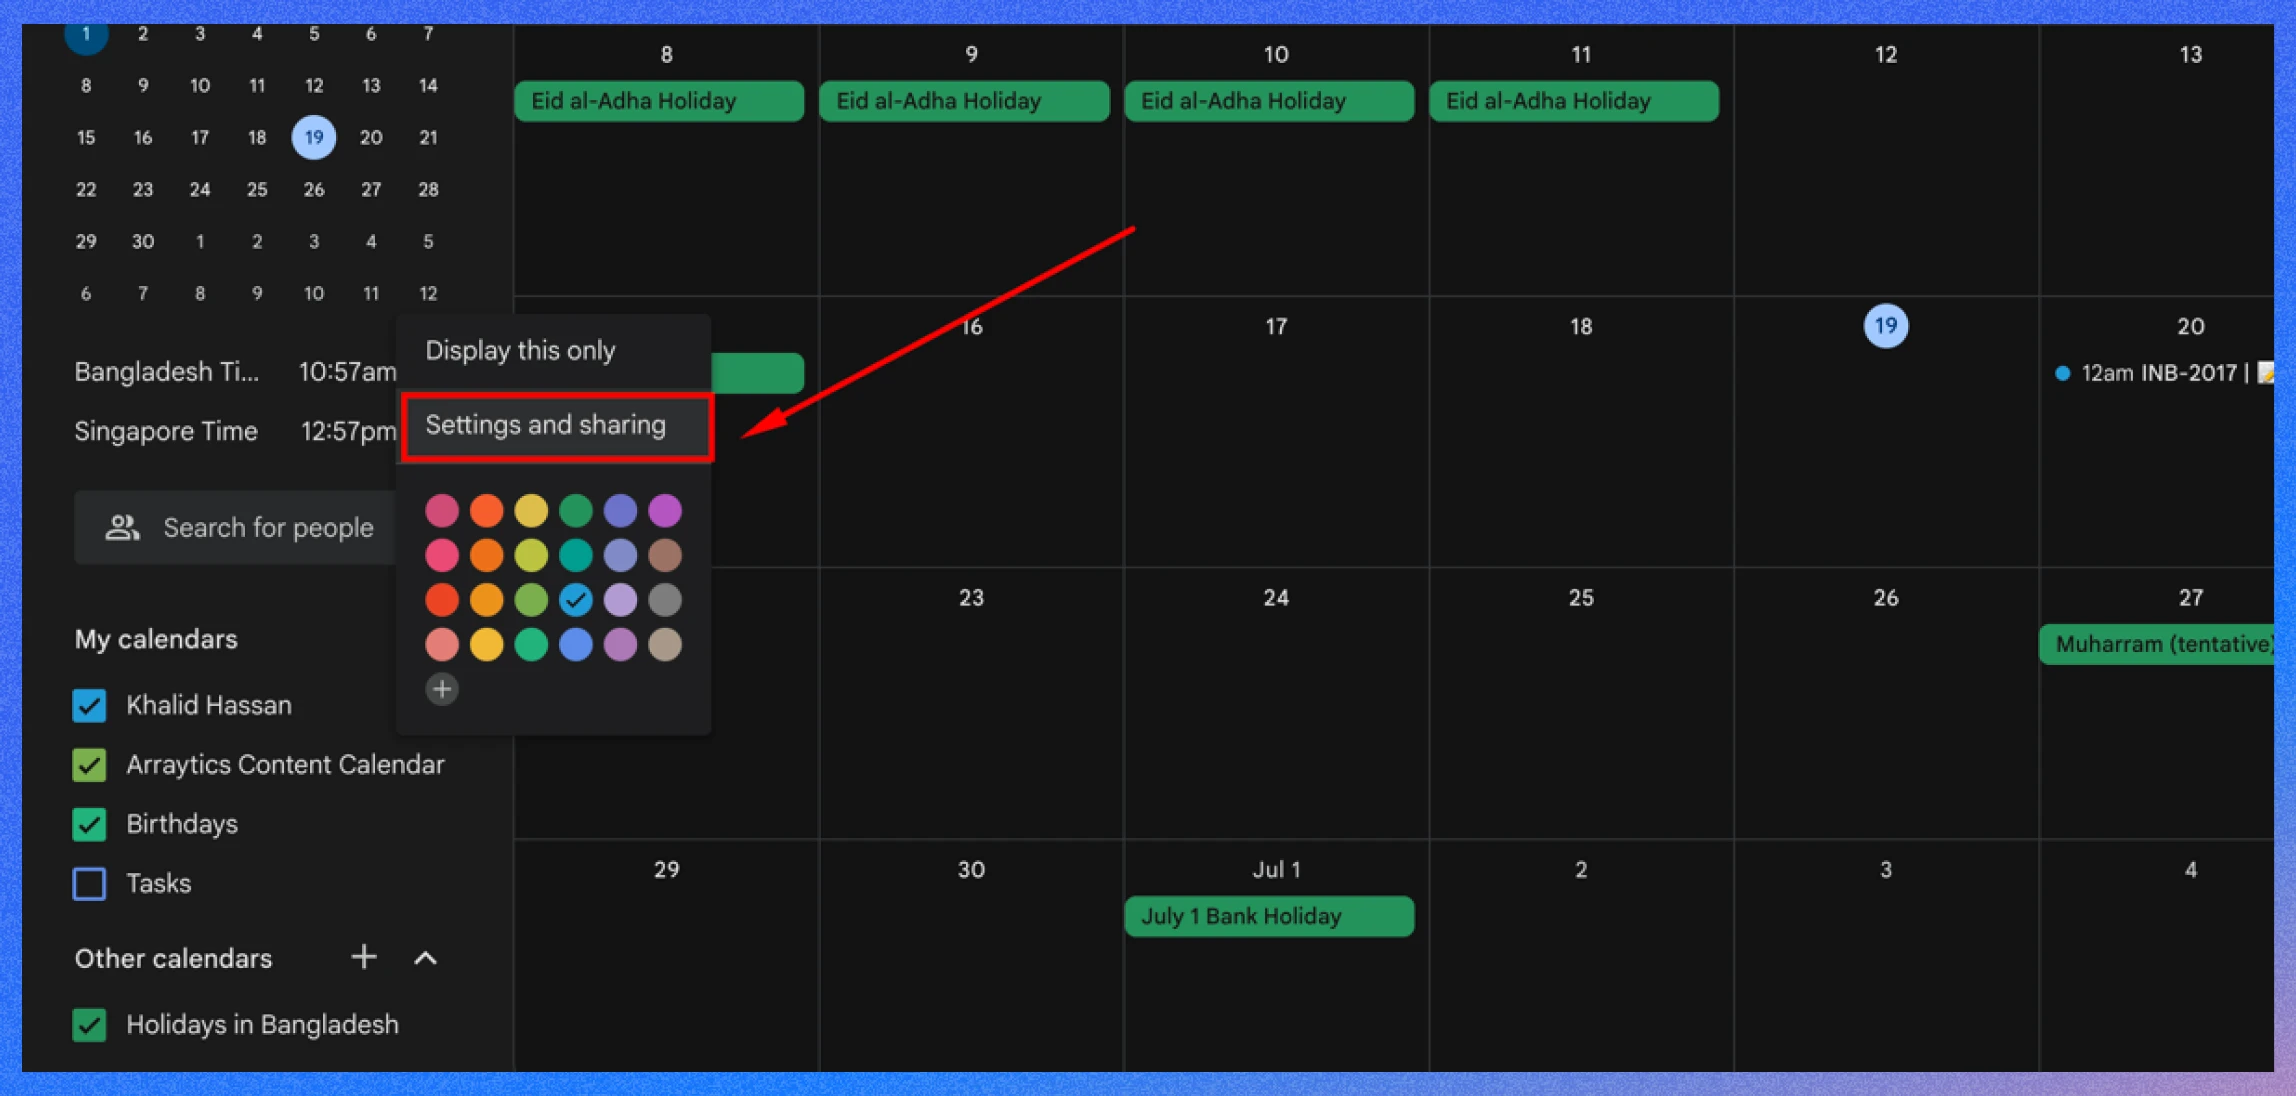
Sharing calendars with others fosters better coordination for team projects or family plans. You can set permissions to allow viewing or editing.
- How to do it: Click a calendar’s name, select “Settings and sharing,” add email addresses, and choose permissions (e.g., “See only free/busy” or “Make changes”).
- Example: Share a “Project Deadlines” calendar with your team for collaborative planning.
- Benefit: Enhances teamwork and transparency.
💁 Goodreads: 10 Best WordPress Booking Plugins in 2025- Read more
Tip 12: Set up reminders and working hours for work-life balance
Custom reminders and working hours ensure you stay on top of tasks while protecting your personal time. Reminders can be tailored per event, and working hours limit meeting invites.
- How to set reminders: Add reminders when creating events or set defaults in Settings > General > Notifications.
- How to set working hours: Go to Settings > General > Working hours and define your availability.
- Example: Set a 15-minute reminder for appointments and working hours from 9 AM–5 PM.
- Benefit: Prevents overscheduling and keeps you prepared.
Tip 13: Use time insights for better time management
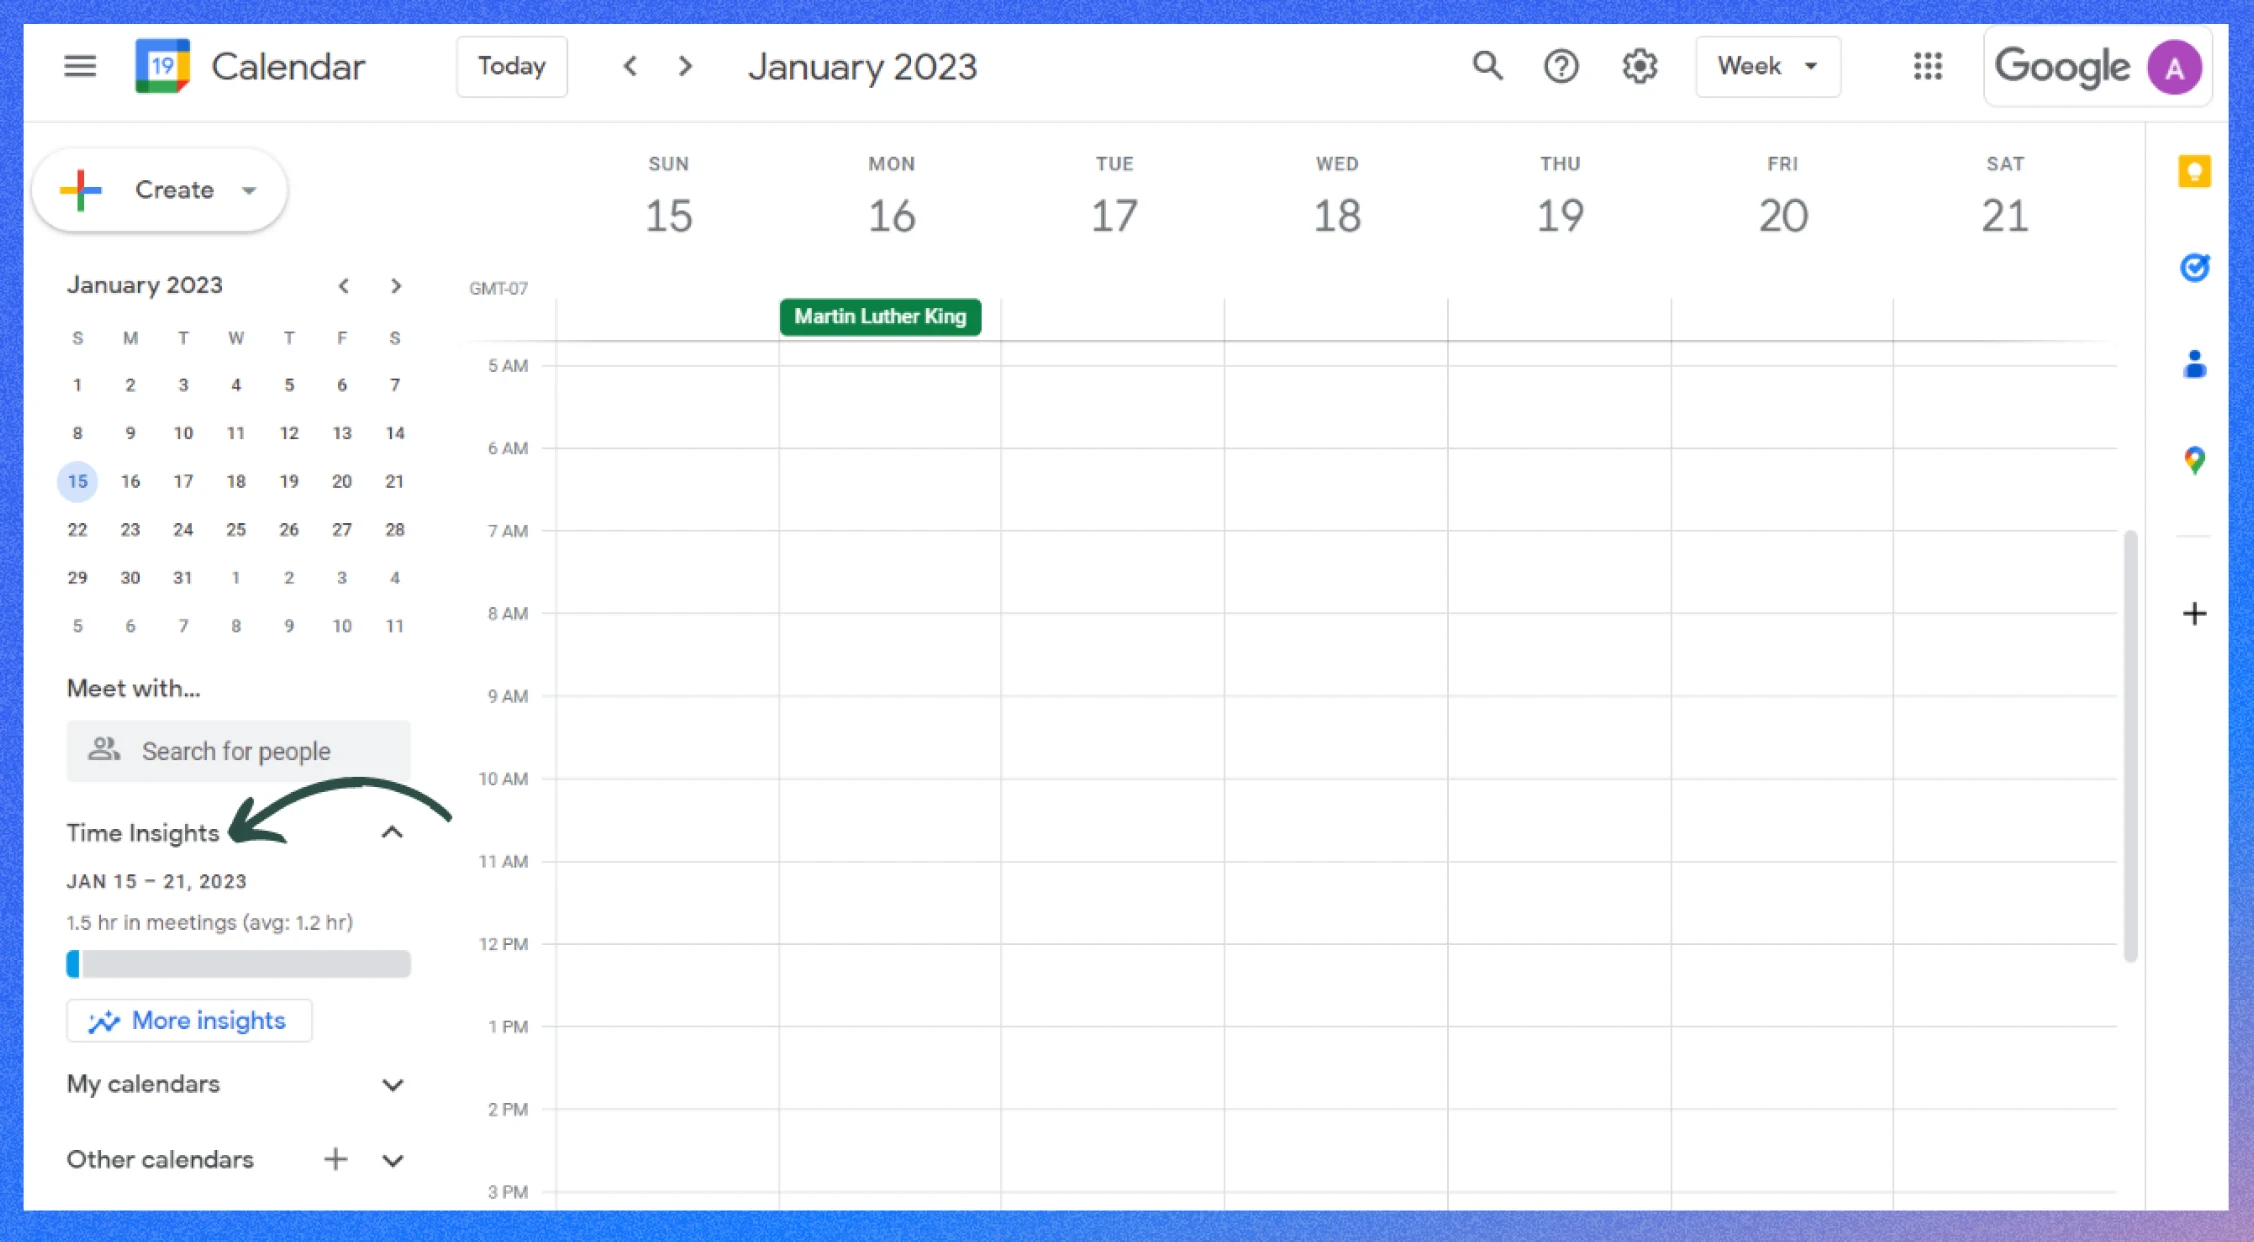
Time Insights, available for work or school accounts, analyzes how you spend time in meetings, showing metrics like meeting duration and frequent collaborators.
- How to access: Click “More” in the left sidebar, select “Insights.” Admins may need to enable this feature.
- Example: Discover you spend 10 hours weekly in meetings and adjust to free up time.
- Benefit: Helps optimize your schedule for better productivity.
Tip 14: Integrate Google Calendar with productivity tools for workflow efficiency
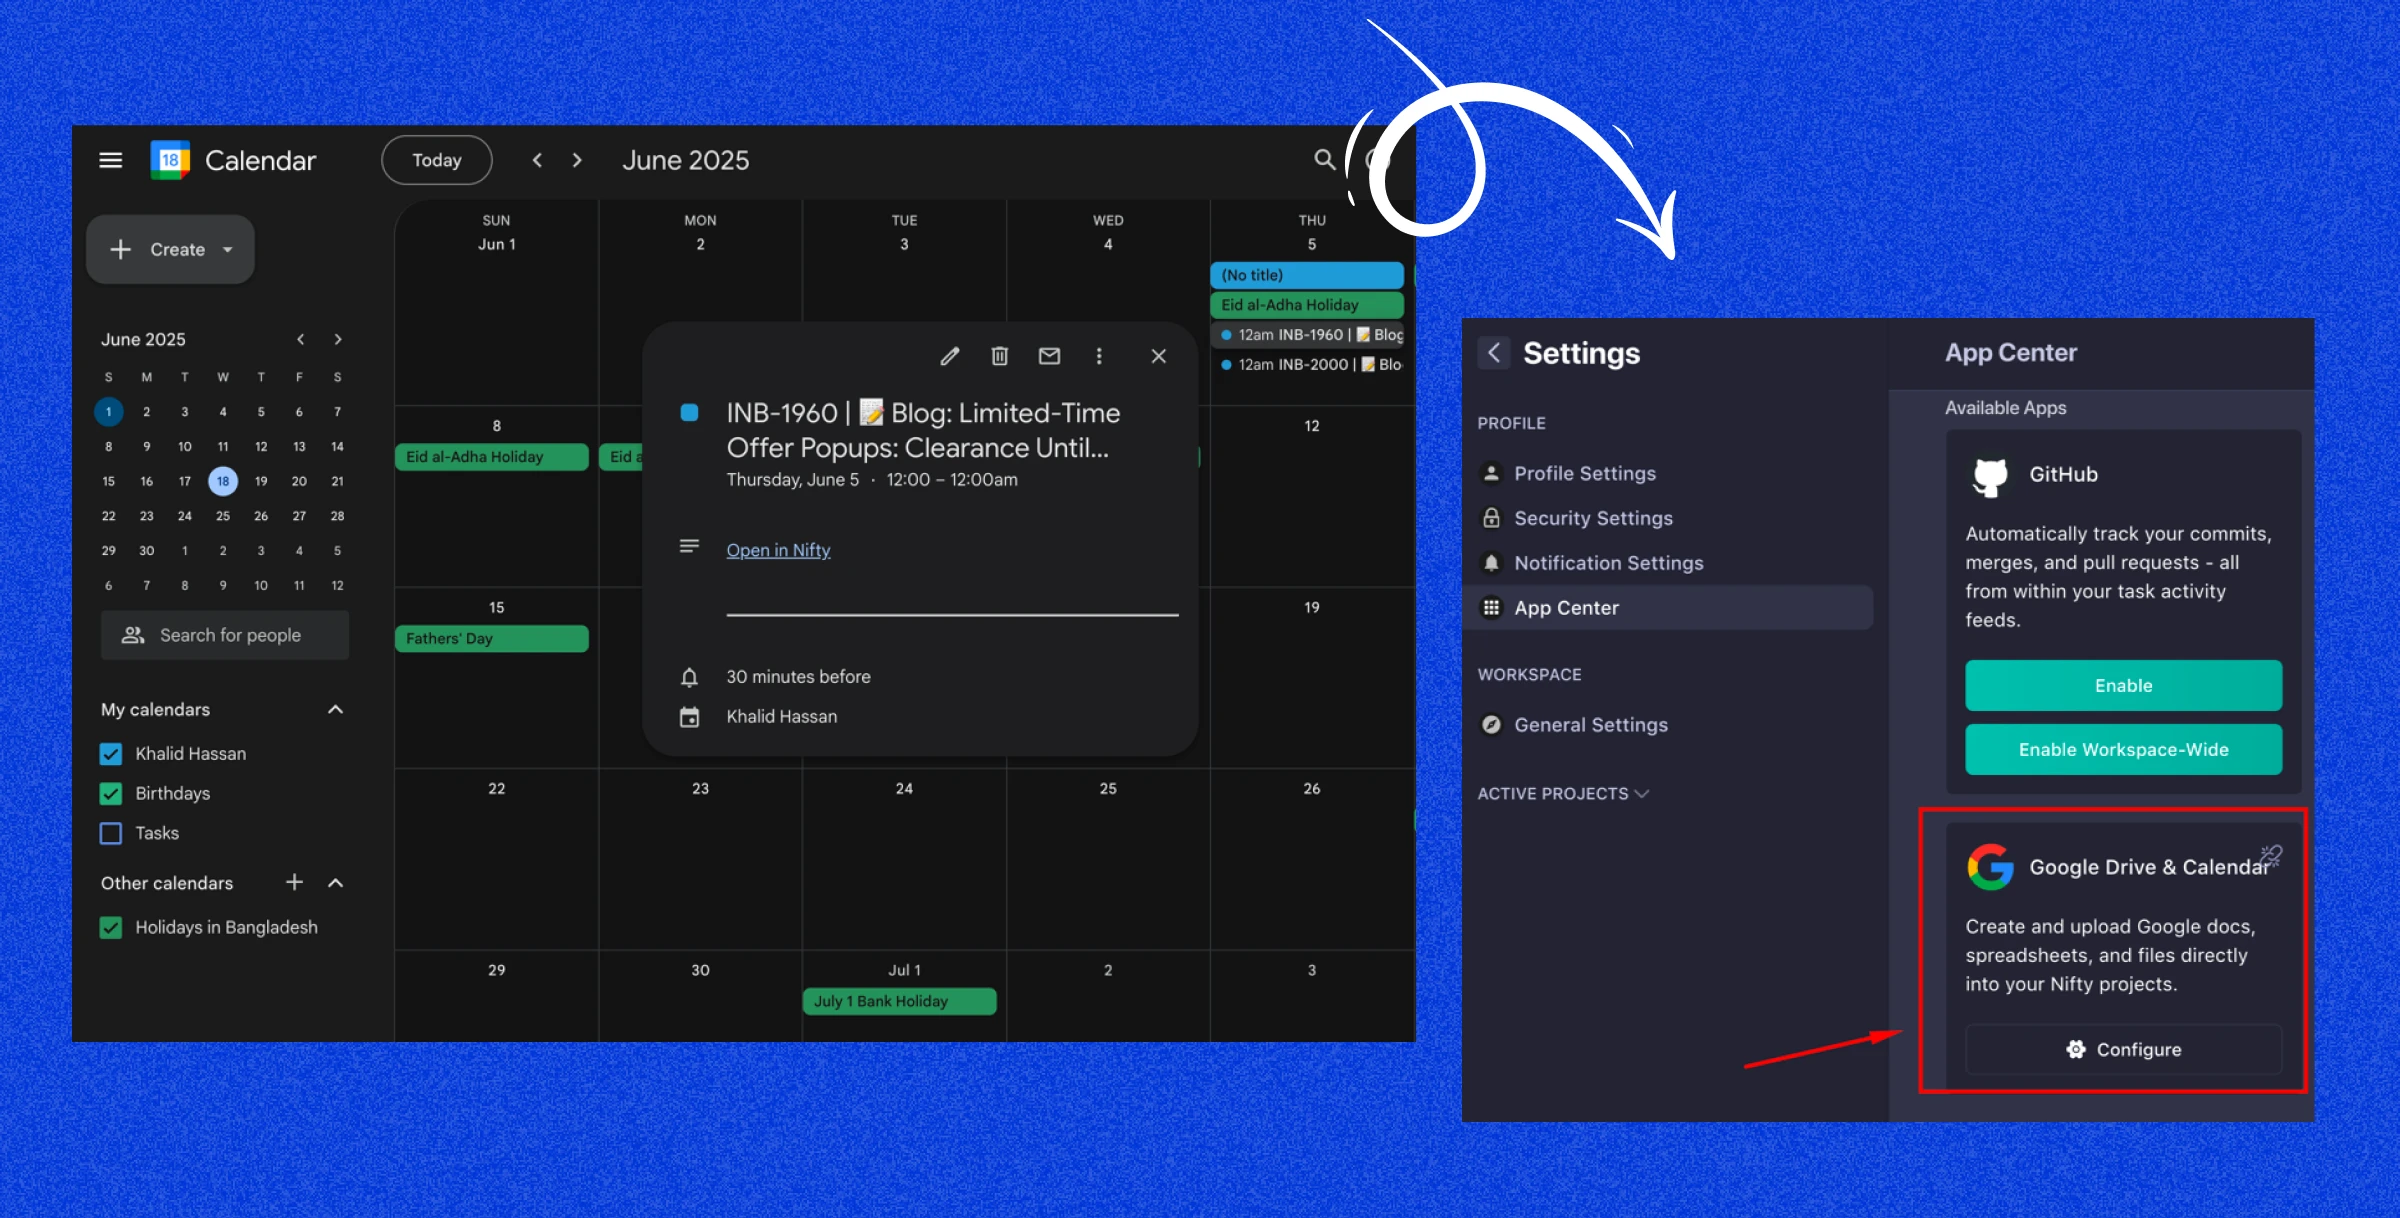
Connecting Google Calendar with other productivity tools can streamline your workflow by centralizing your tasks and schedules.
For example, you can link it with project management apps like Nifty, Trello, or Asana to automatically add deadlines to your calendar.
Communication tools like Slack allow you to schedule meetings directly from chats, while automation platforms like Zapier enable custom integrations, such as adding new CRM leads as calendar events.
- How to do it: Many tools offer native integrations with Google Calendar. For Trello, enable the Calendar Power-Up to view due dates as events. For Zapier, create a “Zap” to connect apps and automate tasks.
- Example: Sync your Nifty tasks to Google Calendar to see project deadlines alongside your meetings.
- Benefit: Reduces the need to switch between apps, saving time and keeping everything in one place.
Tip 15: Restore deleted events with ease for quick recovery
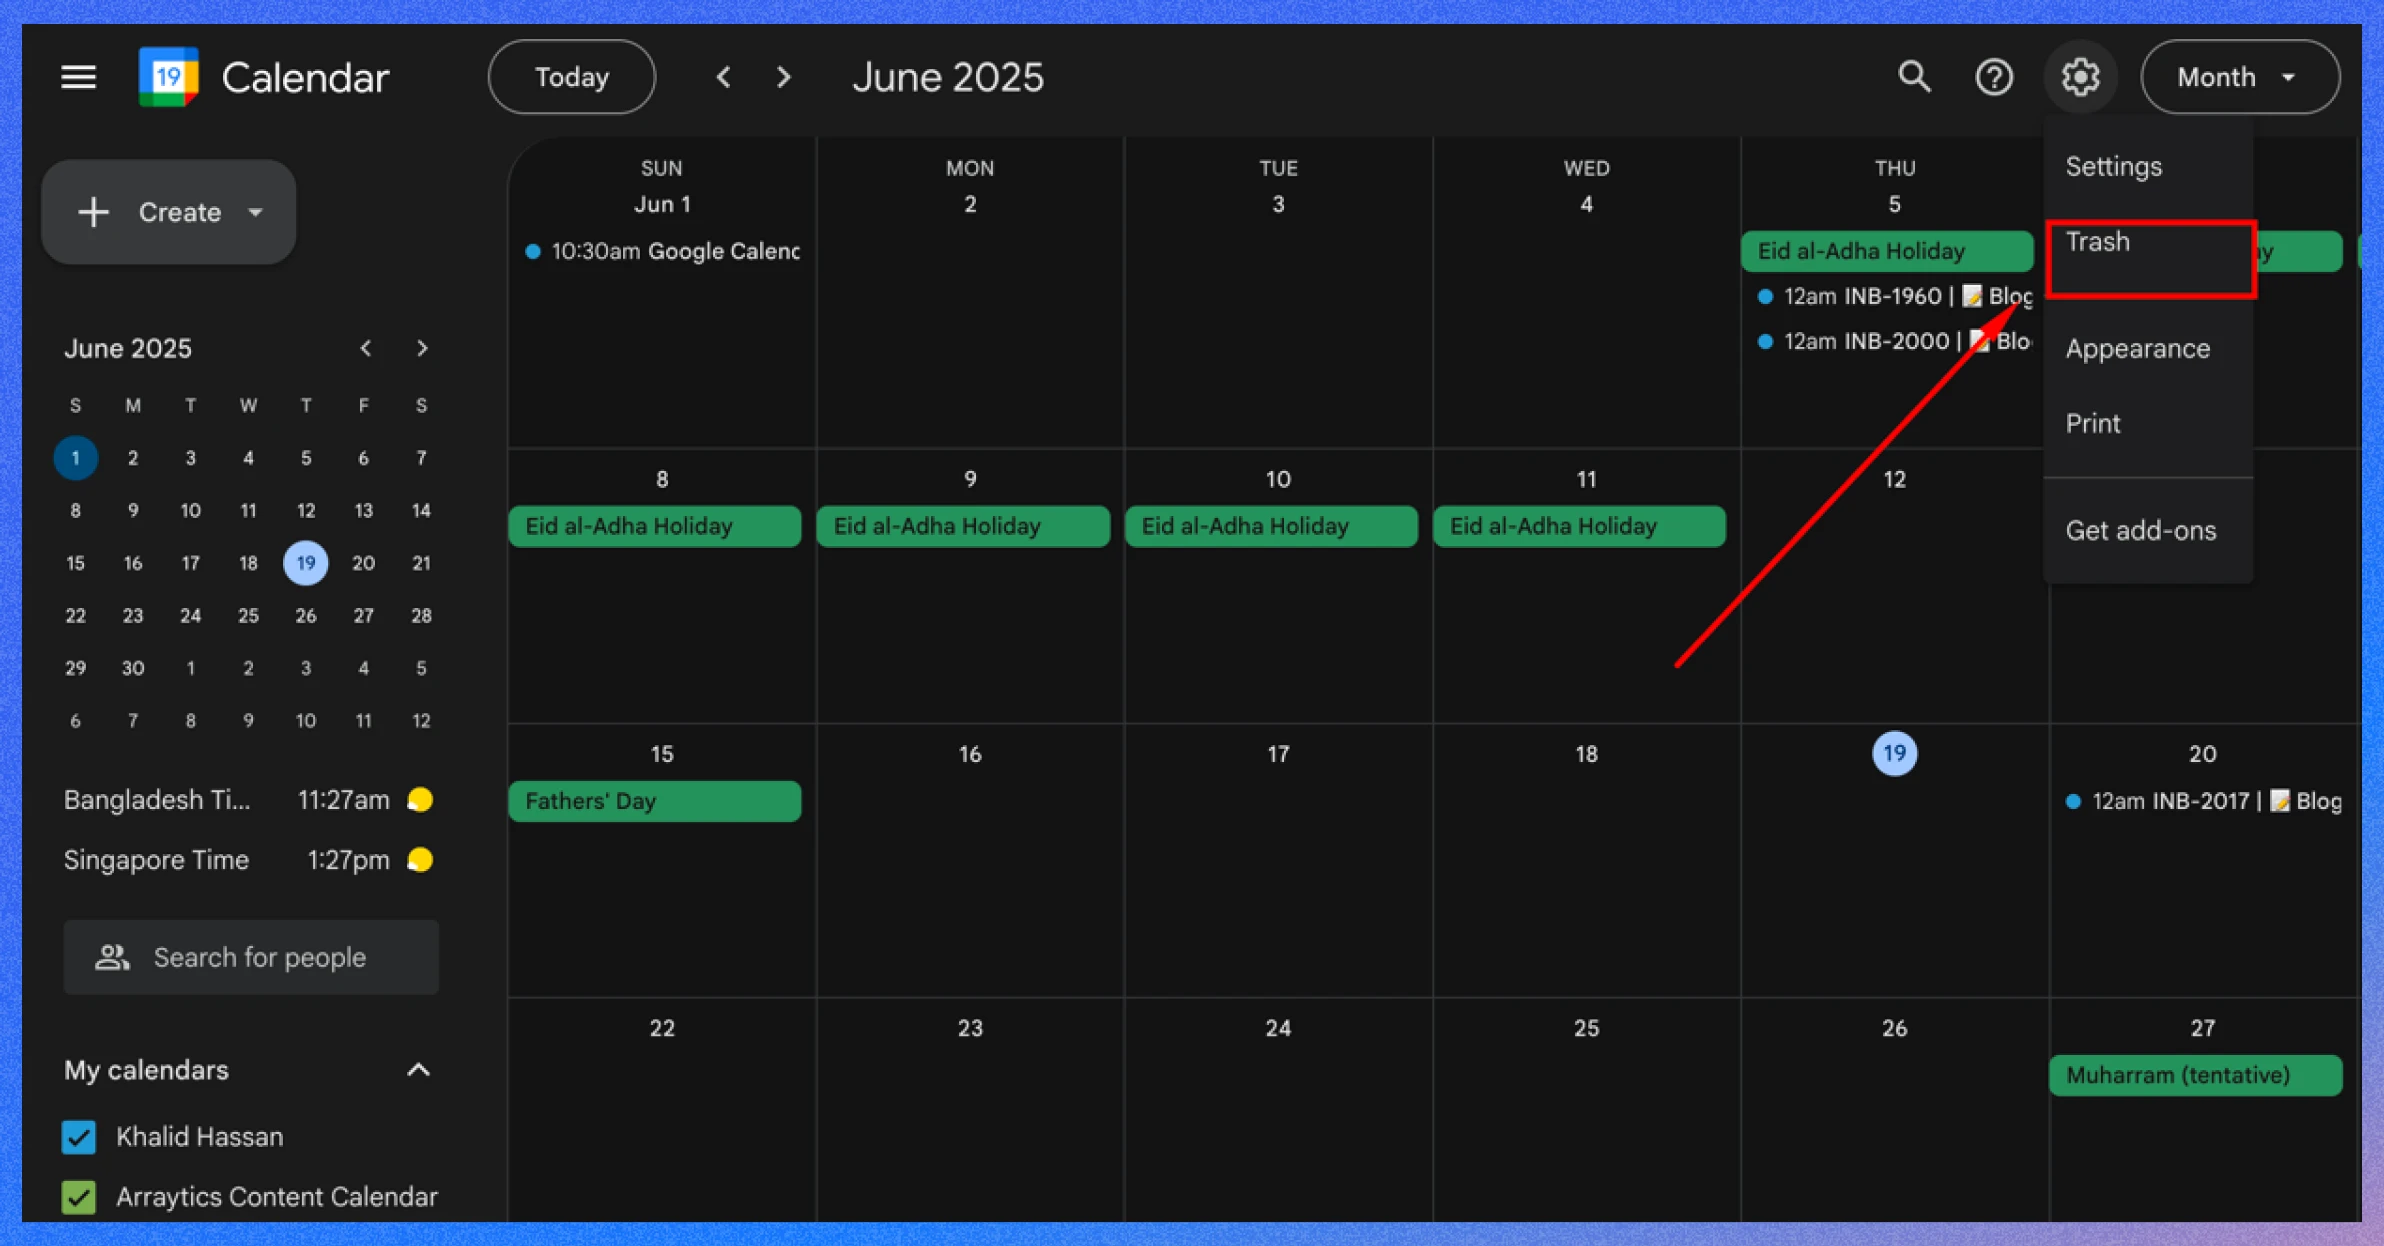
Have you accidentally deleted an event? Google Calendar’s Trash folder stores deleted events for 30 days, making recovery simple.
- How to restore: Go to Settings > Trash, select the event, and click “Restore.”
- Example: Recover a deleted meeting invite from last week’s Trash.
- Benefit: Provides a safety net for accidental deletions.
Five additional Google Calendar tips for enhanced planning and productivity
Here are five more Google Calendar tips utilizing experimental features and third-party integrations to enhance planning and productivity. Please note that these features may not be available long-term or accessible with a free personal account.
Tip 16: Create events from labeled emails
Using IFTTT (If This Then That), you can automatically create Google Calendar events from Gmail emails labeled “To Do.” This integration turns important emails into actionable calendar events, keeping your tasks organized.
- How to use: Sign up for an IFTTT account, then activate the recipe: Label emails “ToDo” to create an event on Google Calendar. Configure it to trigger when you apply the “ToDo” label in Gmail, creating a calendar event with the email’s subject and details.
- Example: Label an email “Follow up with client” as “ToDo,” and IFTTT will create a calendar event titled “Follow up with client” on your specified date.
- Benefit: Saves time by automating task creation from emails, ensuring nothing slips through the cracks.
📌 Note: Requires an IFTTT account and proper setup of Gmail labels.
Tip 17: Automate “Do Not Disturb” during focus time
Maximize your productivity by automatically adding a “Do not disturb” event to your Google Calendar during FocusTime sessions using IFTTT.
This signals to colleagues that you’re unavailable, helping you maintain uninterrupted work periods.
- How to Use: Create an IFTTT account, then use the recipe: Add a “Do not disturb” event to your calendar when a FocusTime session starts. Tag a calendar event with “#focusing” to trigger the “Do not disturb” status.
- Example: Schedule a 2-hour focus block tagged “#focusing.” IFTTT will add a “Do not disturb” event to your calendar, visible to shared calendar users.
- Benefit: Protects your focus time by clearly communicating your unavailability, reducing interruptions.
📌 Note: Requires IFTTT setup and consistent use of the “#focusing” tag.
Tip 18: Automatically decline events during out-of-office periods
Protect your time using the “Automatically decline event invitations during out-of-office periods” feature in Labs.
This automatically declines meeting invites that conflict with your out-of-office status, ensuring you’re not booked when unavailable.
- How to Use: Go to Google Calendar > Settings > Labs > enable “Automatically decline event invitations during out-of-office periods.” Then, set your out-of-office status by creating an event and selecting “Out of office” with the desired dates.
- Example: If you’re on vacation from June 20–25, any meeting invites for those dates will be automatically declined with a polite message.
- Benefit: Maintains work-life balance by preventing scheduling conflicts during time off.
📌 Note: Ensure your out-of-office status is set correctly to trigger this automation.
Tip 19: Know how much time is left before your next event
The “Next meeting” feature in Google Calendar Labs shows a countdown timer indicating the time remaining before your next scheduled event. This helps you manage gaps between meetings and stay prepared.
- How to Use: Navigate to Google Calendar > Settings > Labs > enable “Next meeting.” A timer will appear in your calendar interface, showing the time until your next event.
- Example: If you have a meeting at 2 PM and it’s currently 1:30 PM, the timer will show “30 minutes until next meeting.”
- Benefit: Helps you prioritize tasks quickly and ensures you’re ready for upcoming commitments.
📌 Note: This feature is part of Labs and may require a Google Workspace account for full functionality.
Tip 20: See at a glance who your 1:1 is with
For those who frequently have one-on-one meetings, the “Who’s my one-on-one with?” feature in Google Calendar Labs displays the name of the person you’re meeting directly on your calendar view.
This eliminates the need to open each event to check details, saving time and reducing confusion.
- How to Use: Go to Google Calendar > Settings > Labs > find “Who’s my one-on-one with?” and enable it. Once activated, your one-on-one meeting titles will include the participant’s name in the calendar view.
- Example: If you have a daily check-in with a colleague named Sarah, your calendar will show “1:1 with Sarah” instead of just “Meeting.”
- Benefit: Quickly identify meeting participants without extra clicks, making it easier to prepare for discussions.
📌 Note: Labs features are experimental and may not be available in all Google Calendar versions, particularly for personal accounts.
Bonus tips: Download the Google Calendar app for your phone
Google Calendar isn’t just limited to your desktop!. Install the Google Calendar app to check your schedule anytime and get reminders.
Google Calendar has more features and works well with other Google tools. It’s better than your phone’s default calendar.
With the app, you can quickly add or change plans while out. No need to wait until you’re back at your desk to check your calendar or follow up with someone.
Wrapping up
Google Calendar is a versatile tool that can transform how you manage your time. You can create a more organized and efficient schedule by leveraging these tips—integrating with productivity tools, setting working hours, using color-coding, and more.
Start implementing these strategies today to unlock Google Calendar’s full potential and boost your productivity.