How to Run a Virtual Meeting: 5 Easy Steps with WP Timetics
Are you scratching your head over how to run a virtual meeting on WordPress? While in-person gatherings have their perks, virtual meetings open up a realm of possibilities, bringing together participants from across the globe at a much lower cost.
After a drastic shift in the recent pandemic, the virtual meeting has become part and parcel of everybody’s work life. People feel to participate more when the meeting is online.
An industry analysis states that 66% of employees are more comfortable with contributing during virtual meetings.
So, if you want to run all online meetings through one WordPress website of your work or business and are genuinely excited about utilizing the virtual space, this guide is what you need. Dive in to discover how you can seamlessly set up and manage your virtual meetings using WP Timetics, the all-in-one solution for your virtual conferencing needs.
About A Virtual Meeting

A virtual meeting is an online meeting where participants can interact with each other using a computer, smartphone, or tablet. You can conduct virtual meetings through internet technologies, often requiring nothing more than a stable internet connection and a web camera. Virtual meetings are essential for teams distributed across different geographical locations and are becoming more relevant with the shift toward remote working conditions.
If you run websites on WordPress, you need to integrate virtual meetings directly into online platforms. Bloggers, entrepreneurs, educators, and business professionals find it increasingly convenient to host and manage virtual meetings without having to switch between multiple platforms.
WordPress allows users the flexibility to host virtual meetings through various plugins, one of the most comprehensive being WP Timetics. This plugin integrates seamlessly into your WordPress dashboard, allowing you to manage everything from meeting schedules, and attendee lists, to payment gateways, all from one place.
Challenges Of Running A Virtual Meeting On WordPress
Running a virtual meeting on WordPress, although convenient and feature-rich, presents its own unique challenges. Preparing for these obstacles can make the difference between a smooth, successful meeting and a frustrating experience for hosts and participants.
| Challenge | Description |
| Technical Issues | Software glitches can disrupt meetings. |
| Time Zone Conflicts | Global audiences may have conflicting time zones. |
| Payment Gateways | Difficulties with payment processing. |
| User Experience | Difficult booking and navigation for new users. |
| Platform Limitations | Need to switch between different platforms. |
| User Errors | Login and in-meeting issues from attendees. |
| Security Concerns | Risk of unauthorized access. |
| Lack of Physical Interaction | Missing cues from face-to-face interactions. |
| Commitment Difficulties | High cancellation or no-show rates. |
| Scheduling Conflicts | Difficulty in picking a time that suits everyone. |
Benefits of Learning How To Run A Virtual Meeting On WordPress
While running a virtual meeting on WordPress may present its challenges, the benefits of mastering this skill can outweigh the drawbacks. Using powerful plugins like WP Timetics can transform your virtual meetings into highly productive and enjoyable events for all participants. Here are some of the many benefits of learning how to run a virtual meeting on WordPress:
Cost-Efficiency & Minimal Stress: Hosting a meeting in a physical space requires renting a venue, arranging for equipment, providing refreshments, and sometimes even accommodating travel for participants. Virtual meetings eliminate these costs, making them a more affordable option. Also, Without the need to travel or adhere to a dress code, virtual meetings reduce stress for both organizers and participants.
Accessibility: The beauty of a virtual meeting is that attendees can join from anywhere in the world, as long as they have an internet connection. This opens up your meeting to a more diverse audience and allows for greater participation.
Flexibility: Virtual meetings offer immense flexibility. You should be able to schedule, reschedule, or even set recurring meetings easily. Suppose your work requires various meeting types, such as single or multi-day events, and provides customization options. In that case, you can adapt to your specific needs by arranging virtual meetings from your site.
Data Collection: By learning how to run a virtual meeting effectively, you will be able to understand how to acquire analytics, learn about attendee behavior better, and optimize future meetings accordingly.
Repeated Access to Meeting Materials: If you choose to record your virtual meeting, attendees can revisit the material later for clarification or further understanding, something not easily possible in physical sessions.
Presentation Versatility: You can share various types of content through virtual meetings- from slideshows to videos, and web links to documents, enhancing the overall experience.
How To Run A Virtual Meeting With WP Timetics
Before jumping on the steps, let me tell you that- With WP Timetics’ integration with Google Meet and Zoom, you can now efficiently run any type of virtual meeting with your audiences directly from your site. So, getting the proper tools is the first step in arranging a virtual meeting. Then follow the rest of the steps to get a perfect virtual meeting.
Step #1 Install and Activate WP Timetics
You need to install the following-
- WordPress Version: 5.2 or, higher
- Timetics Plugin
- PHP Version: 5.6 or higher
- PHP memory_limit = 512M
- max_execution_time = 600
If you need help downloading and installing, check the documentation here.
Once you are done with installing the plugins, now time for your onboarding. The plugin’s onboarding setup will be shown once you activate it. Then, enter your email to receive notifications whenever WP Timetics releases a new intriguing feature. Also, select your profession or business type. According to your selection, you’ll see your dashboard.
Now time to set your profile. Go to Timetics > My Profile and update information from there. This will change the profile information for the account you are now connected to. From the profile, you can update your password, and availability, and connect with integrations.
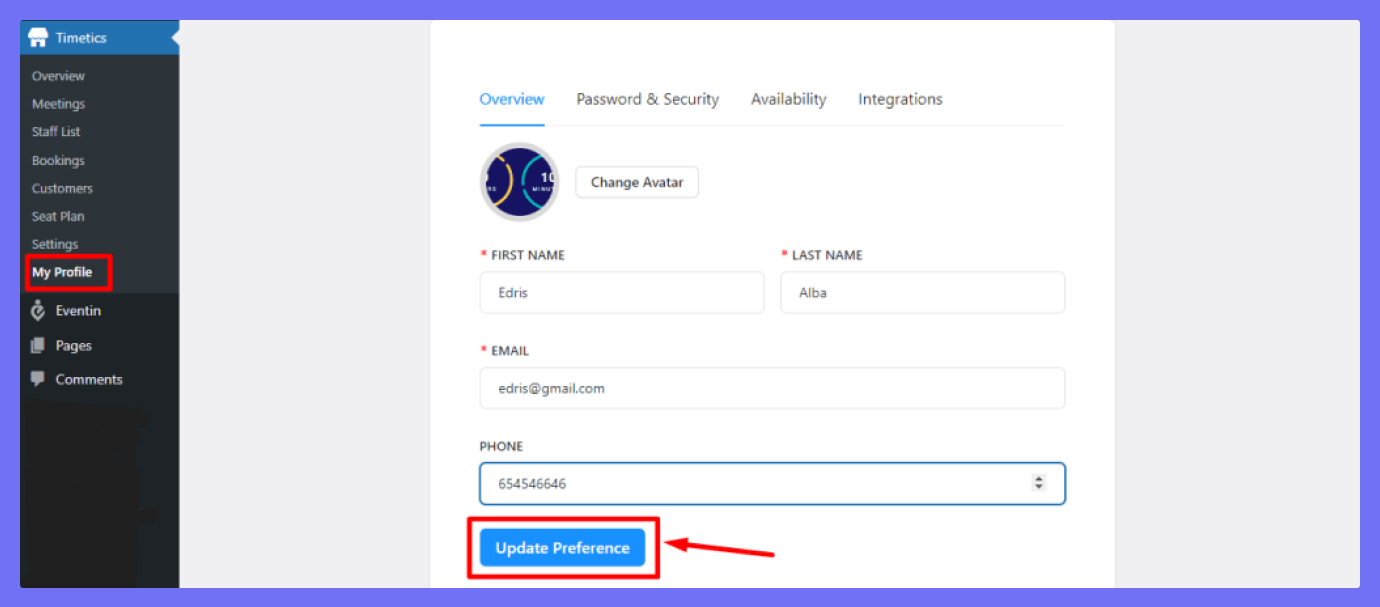
Before jumping onto the next step, you’d be happy to know that, WP Timeticshas-
- Google Meet/Calendar Integration
- Apple and Outlook Calendar Integration
- Zoom Integration, and
- WhatsApp Integration
Step #2 Integrate Google Meet with WP Timetics
Setting up Google Meet for your virtual meetings through WP Timetics is a straightforward process. Google Calendar and Meet are essential tools for anyone who needs to organize virtual meetings. Here’s how to integrate these services into your WordPress site using WP Timetics:
#1 Access WP Timetics Settings: Go to your WordPress Dashboard, and browse Timetics > Settings > Integrations. This is where you’ll link Google Calendar to sync your booked events. To do this you’ll need your Facebook page’s login credentials.
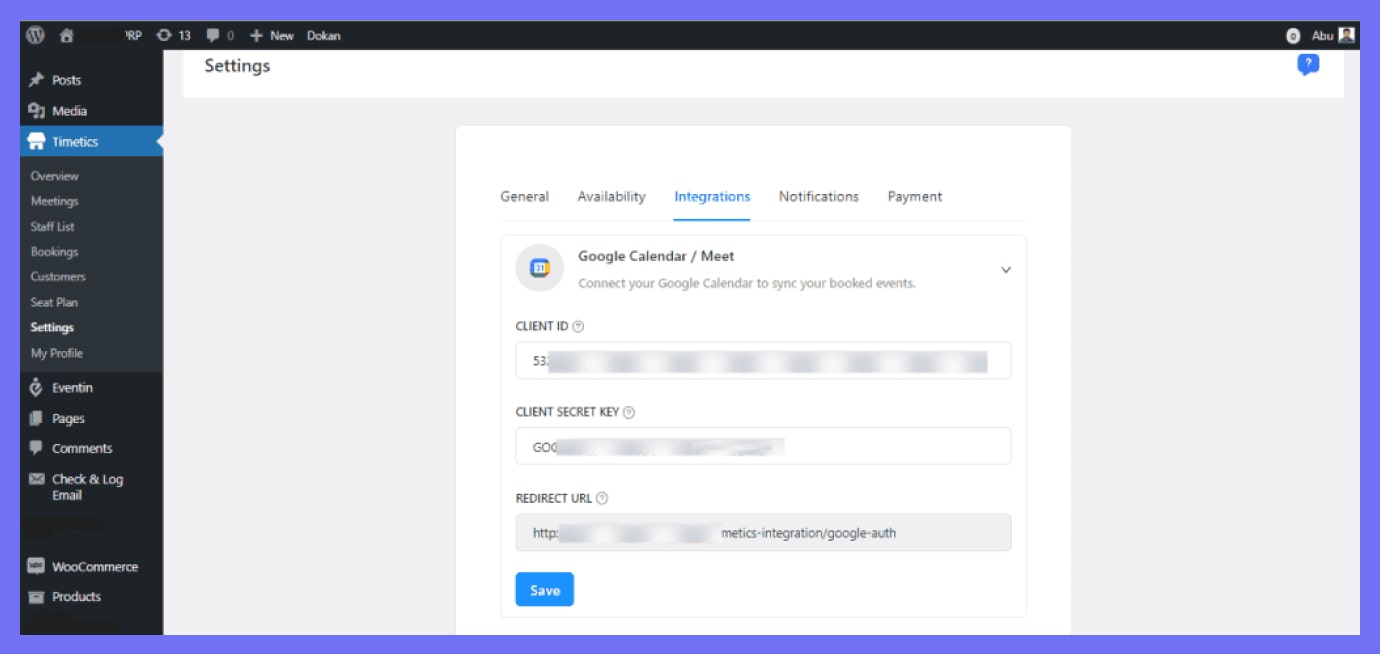
#2 Configure Google API: Now add Client ID and Client Secret Key. These are crucial for linking your Google account with WP Timetics. For that, browse Google Developer Console and create a new project under it.
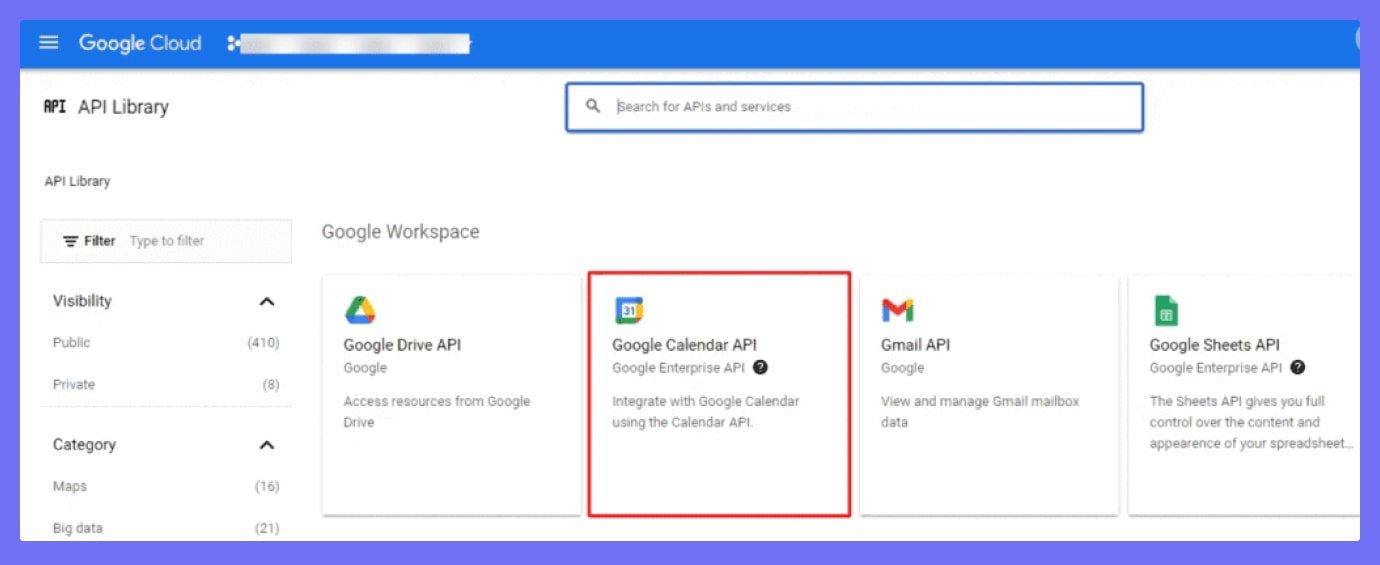
#3 Enable Google Calendar API: Visit the Google API Console. Use the Library option to search for Google Calendar API and enable it.
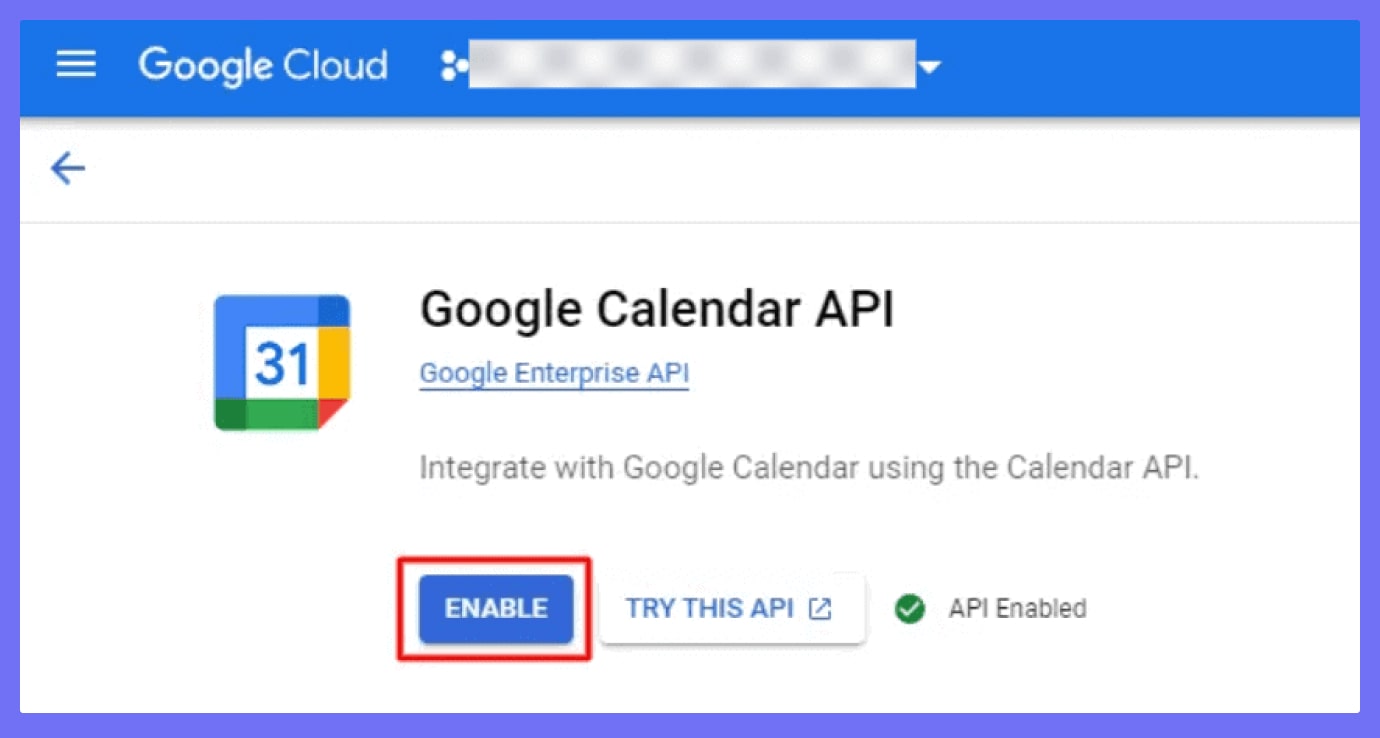
#4 Obtain Client ID & Client Secret: Go back to the Google API Console and select an existing project from the project drop-down menu, or create a new one by clicking Create a new project.
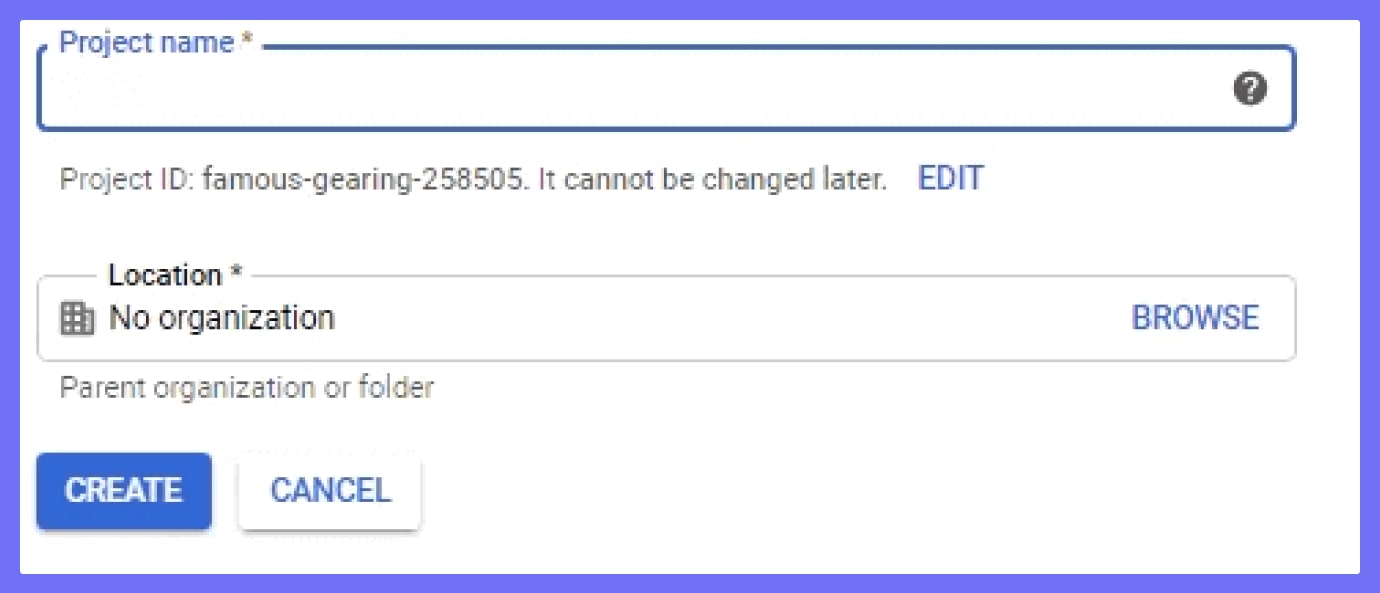
In the sidebar, navigate to API & Services and select Credentials. Open the OAuth consent screen tab, choose an Email Address, specify a Product Name, and click Save.
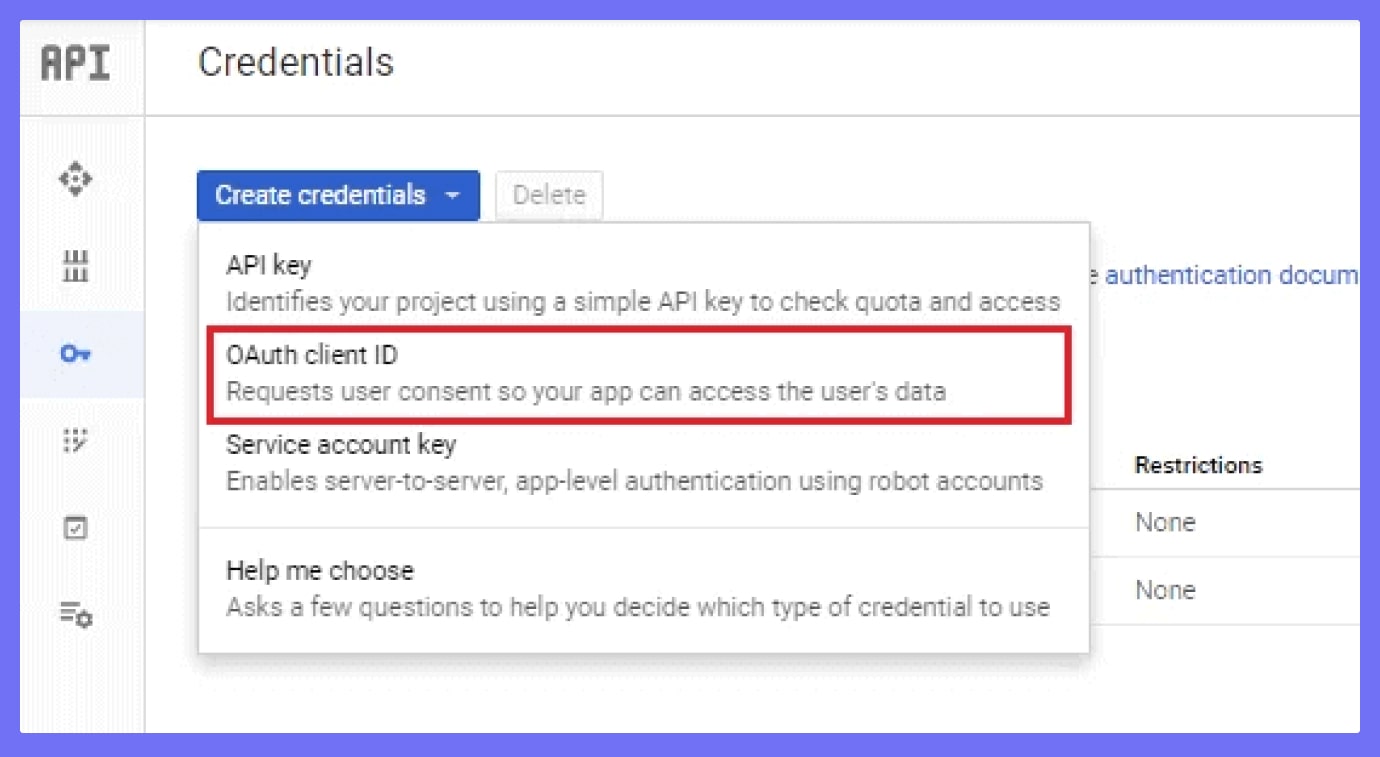
#5 Create OAuth Client ID: In this step, in the Credentials tab, go to Create credentials and choose OAuth Client ID. Under Application type, select Web application.
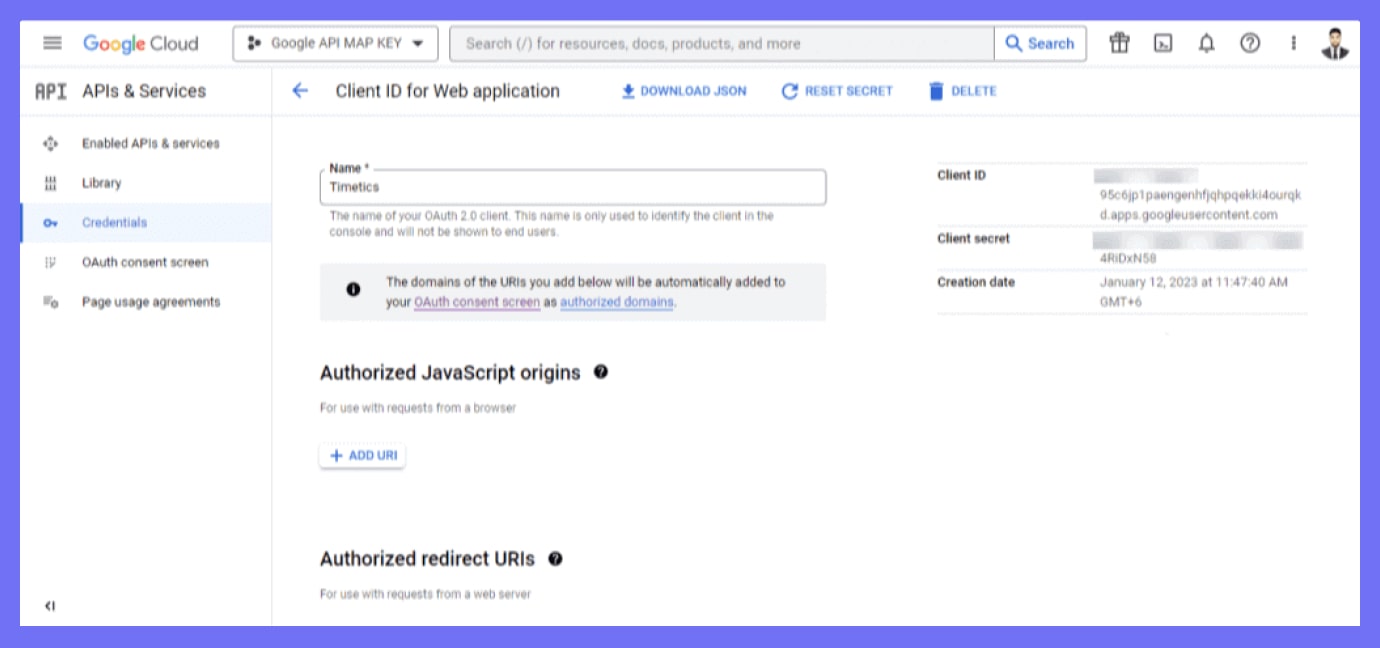
#6 Register Origins and Set Redirect URIs: Register the origins (protocol, hostname, and port) where your app can access Google APIs. You can find the Authorized redirect URIs in Timetics > Settings > Integrations.
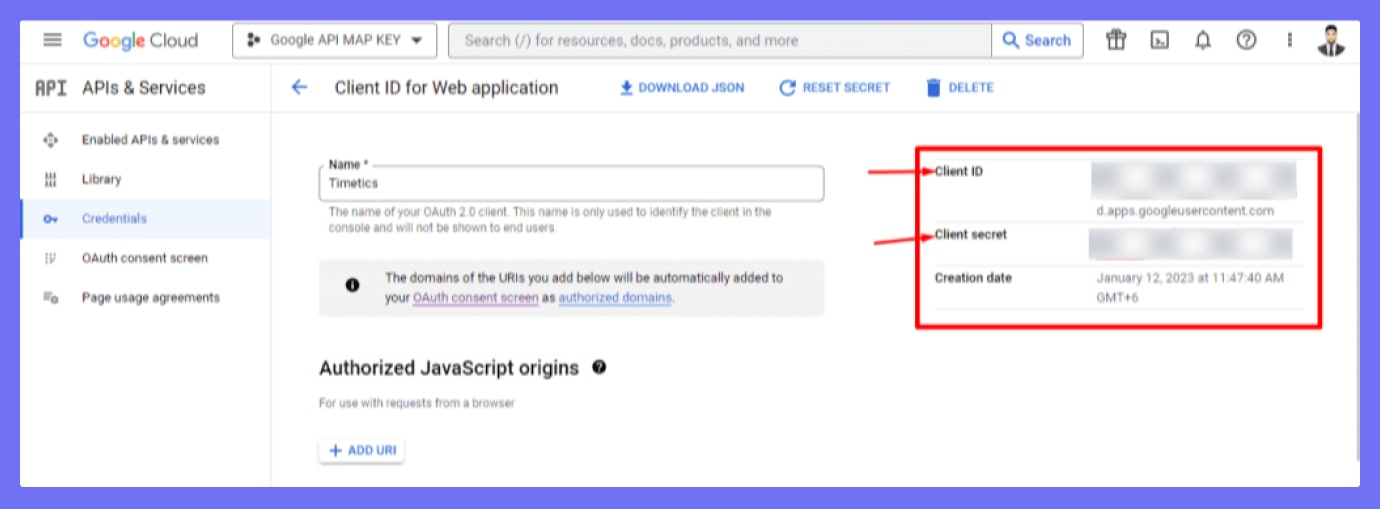
#7 Get Your Keys: After saving your configurations, you’ll receive your CLIENT ID and CLIENT SECRET KEY. Use these to complete the integration process in WP Timetics under Settings->Integrations.
Step #3 Integrate Zoom with WP Timetics
Integrating Zoom with WP Timetics for your virtual meetings is a straightforward process. Just follow these reader-friendly steps, and you’ll be set up in no time.
#1 Go to Zoom App Marketplace: Navigate to the Zoom app marketplace and click on the Develop > Build App option at the top of the page.
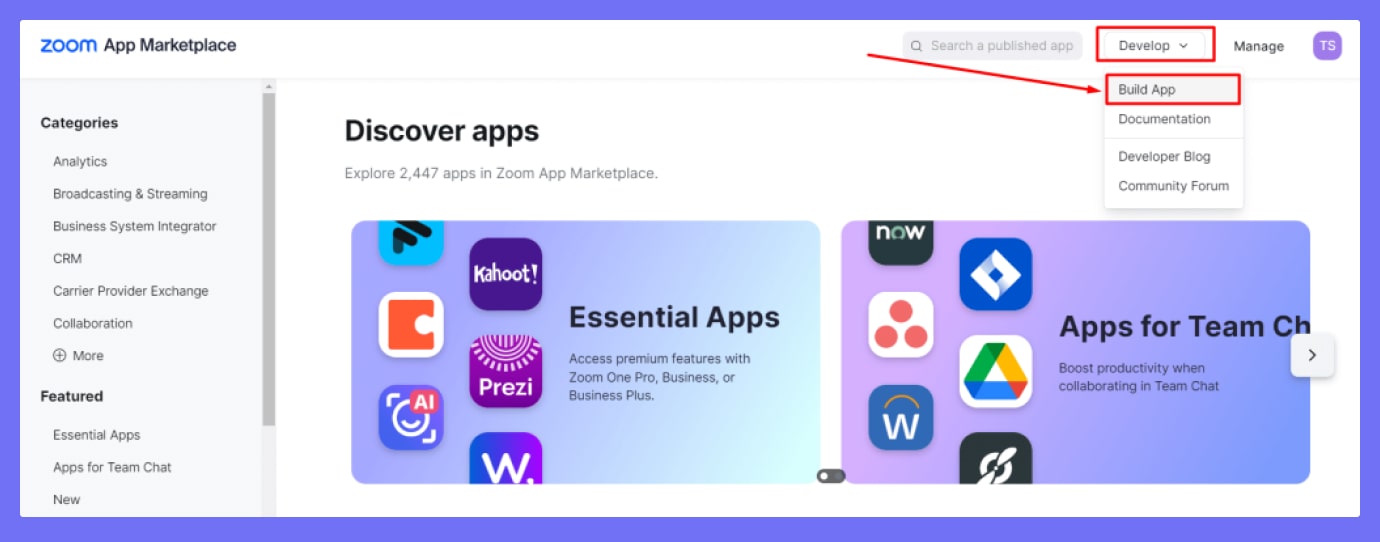
#2 Choose OAuth App Type: You’ll see various App types displayed. Select the one labeled as OAuth and then click on the Create button.
#3 Fill Out the Form: A form screen will appear. Here, you’ll need to:
- Enter the App name
- Choose the app type as “User-managed app”
- Disable the App publish option
- Click on the ‘Create’ button after filling out these details.
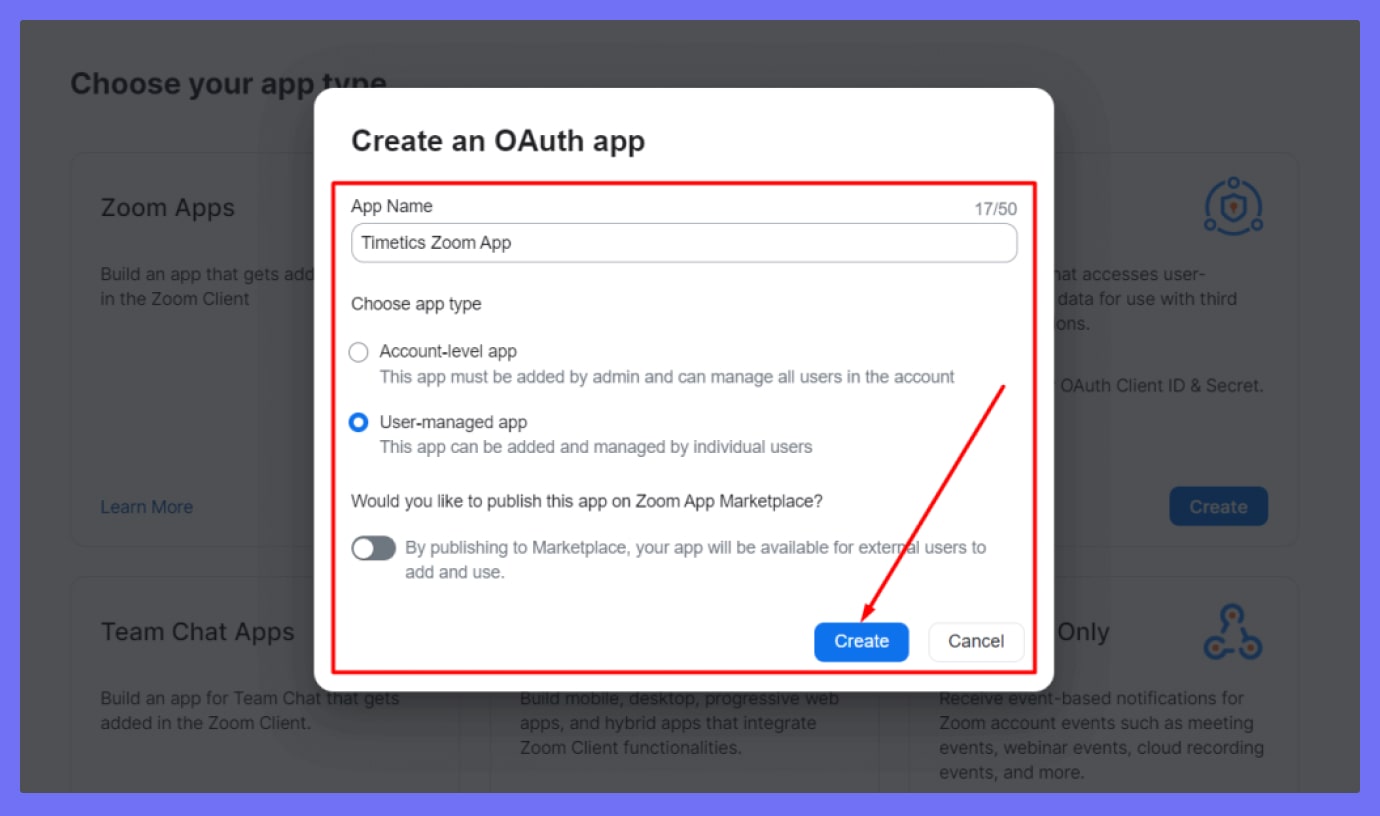
#4 Copy Redirect URL: Go to WP Timetics settings to find a Redirect URL for OAuth. Copy this URL and paste it into the corresponding fields in your OAuth app—specifically, the ‘Redirect URL‘ and ‘OAuth allows list fields‘.
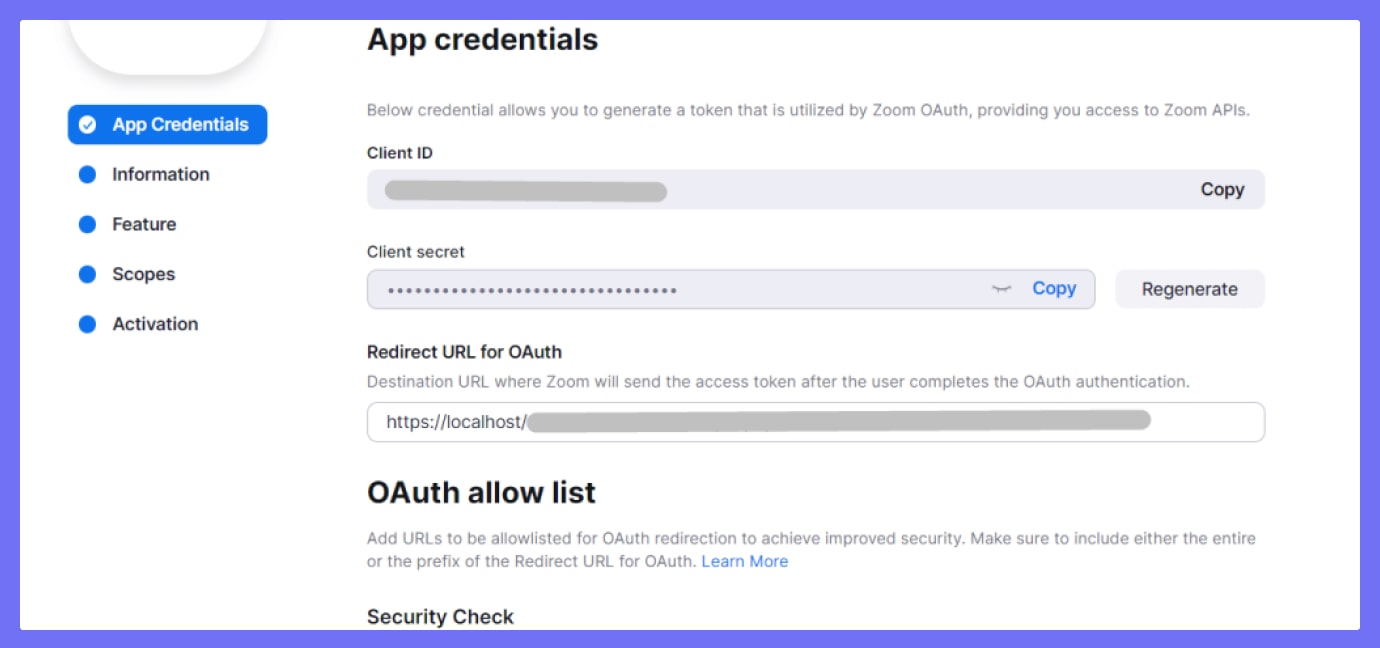
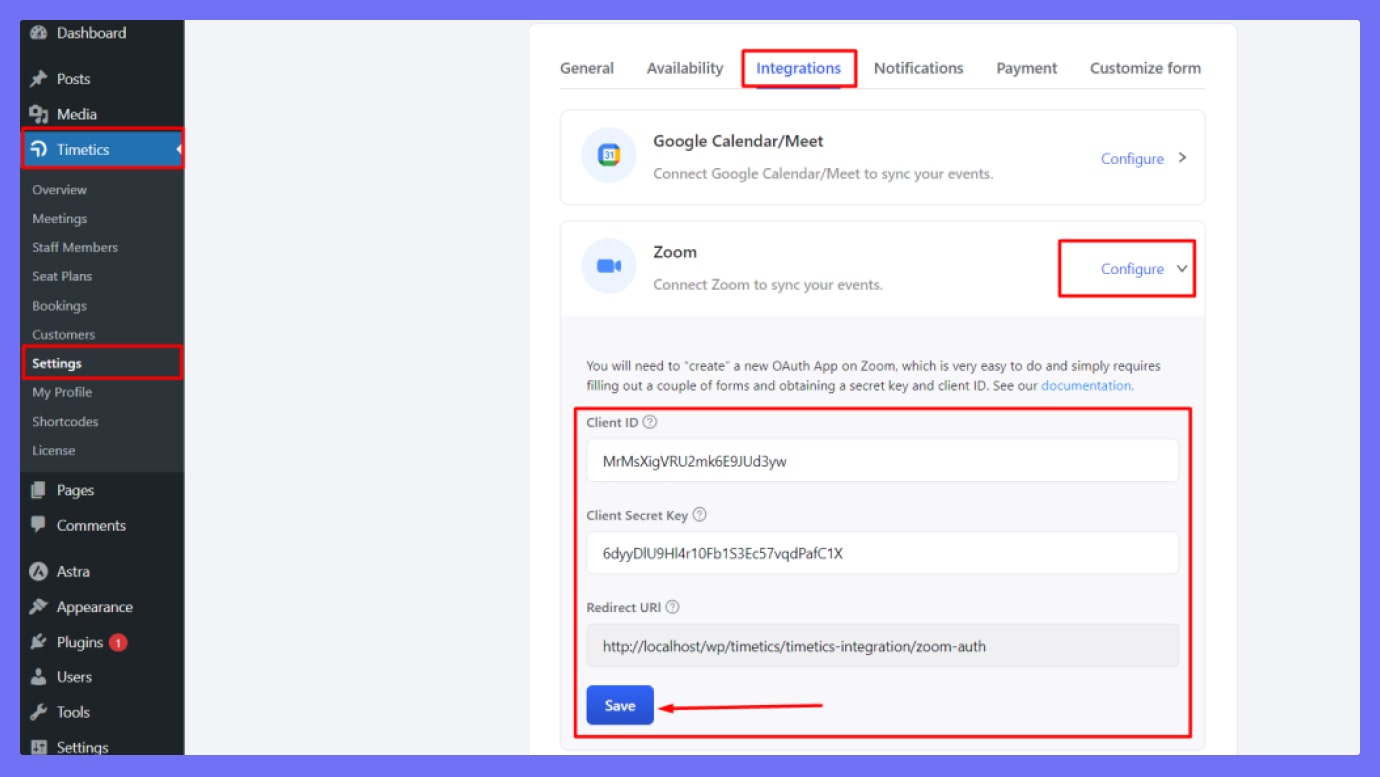
#5 Get Client ID and Secret Key: Your OAuth app will provide you with a Client ID and Secret Key. Copy these credentials and paste them into the designated fields in your WP Timetics settings. Save the changes.
#6 Provide App Information: In your Zoom OAuth app, head over to the information tab. Here, you must fill in various details like:
- Short description
- Long description
- Company name
- Developer contact details
- Without this information, the app won’t function correctly.
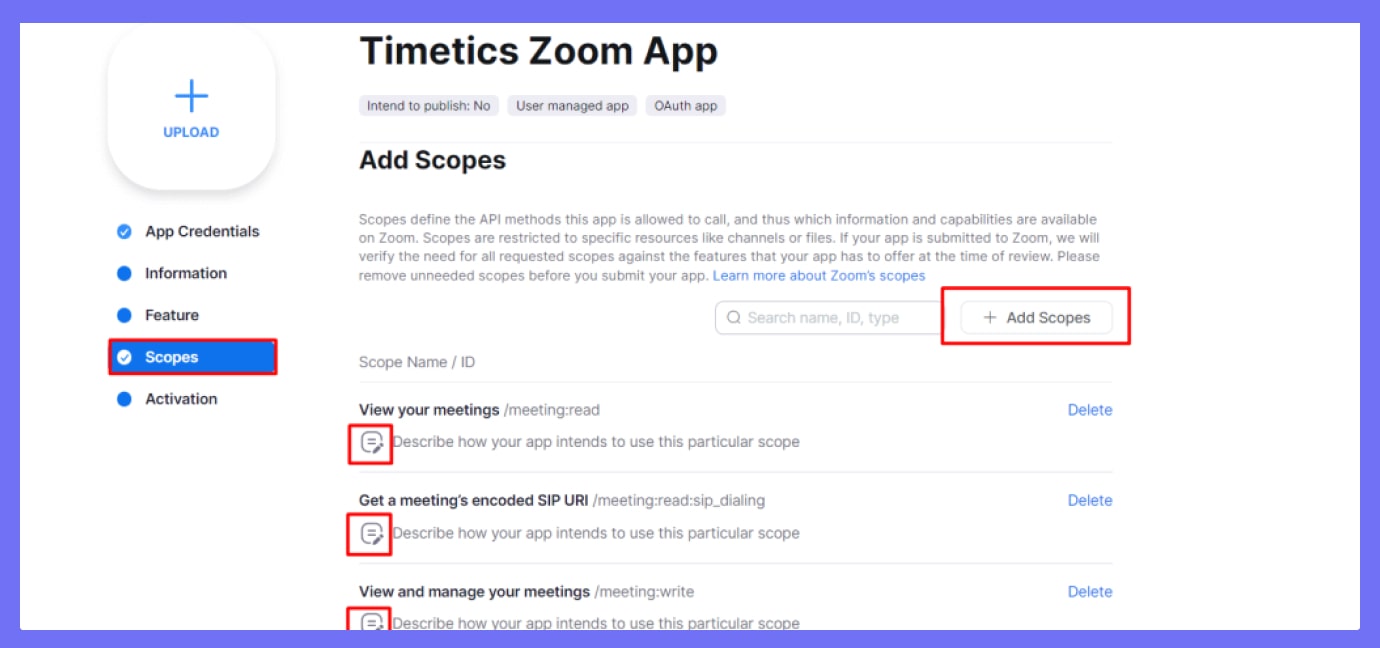
#7 Add Scope for Your App: Next, you need to define the scope of your app’s permissions. Click on ‘Add Scopes‘, and a new screen will appear. Input the necessary information for the scope. You can also add additional scope details if needed.
Step #4 Arranging Virtual Meeting
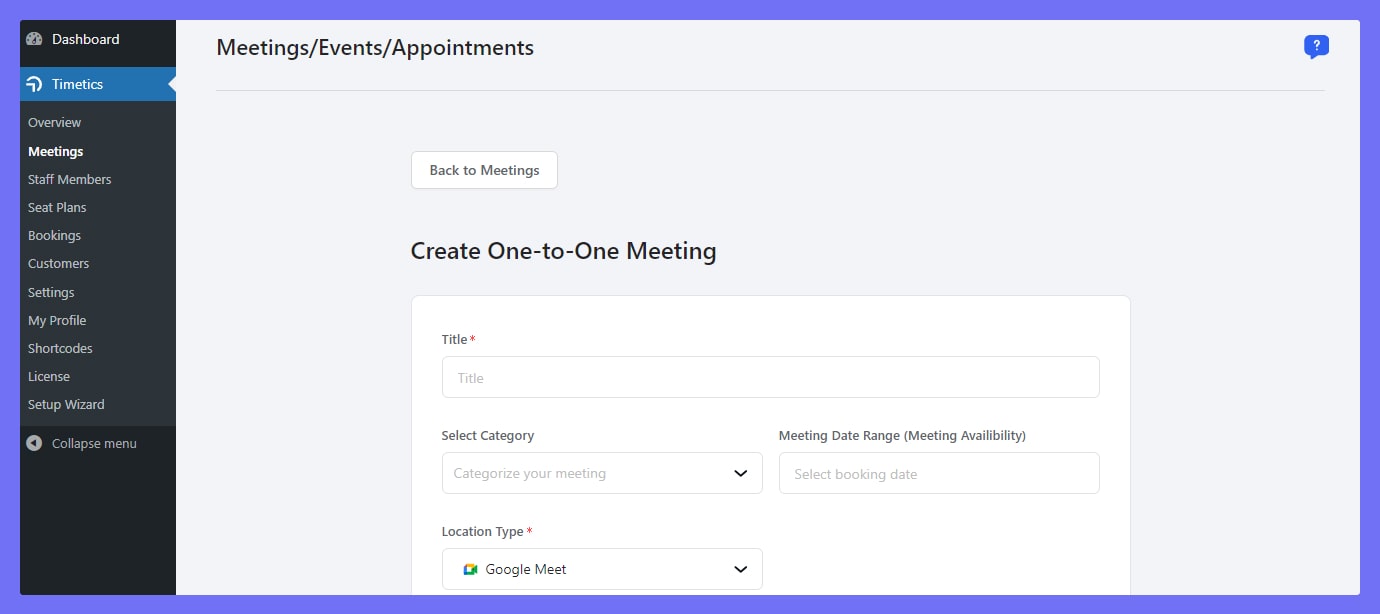
You can create one-on-one meetings and one-to-many virtual meetings on both Google Meet and Zoom. You can customize your meeting with a good title, followed by the meeting’s description, location type (you’ll receive three options), category, time zone, duration, and cost. You can also select the host and visibility of your meetings. Make it public or private- as you like. You can add or delete any meeting at any time you want. Here is what it looks like while creating a meeting-
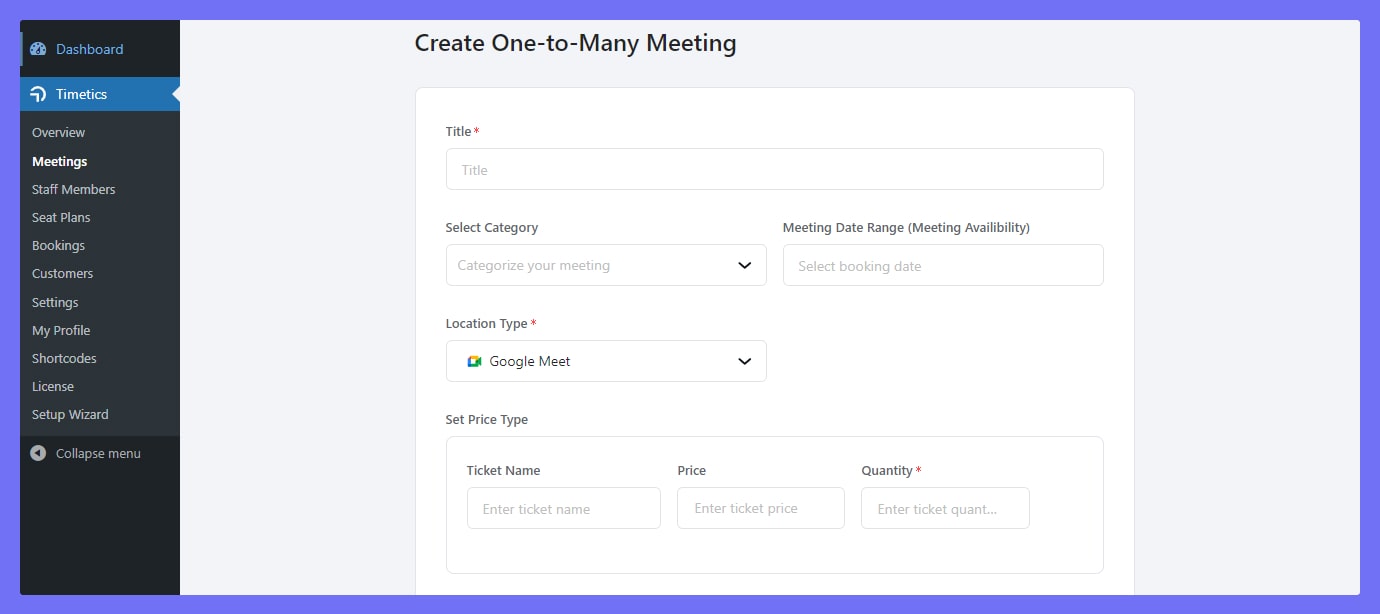
When creating a one-to-many meeting, you can add the ticket name, seating capacity, and number of tickets to the meeting. Since one-to-many interactions involve a large number of clients or consumers. This is why WP Timetics provides seat capacity and seat count options for you. Enable the options you need.
Step #5: Send Notification of Your Virtual Meeting
One of the standout features of WP Timetics is its robust notification system. It is designed to always keep hosts and participants in the loop. The plugin allows for automatic email notifications for various meeting events—such as booking confirmations, cancellations, and rescheduling. But it doesn’t stop there;
WP Timetics also supports WhatsApp notifications, offering an additional convenience layer. With email and WhatsApp notifications, you can ensure that all attendees are well-informed and engaged, making your virtual meetings more efficient and effective. Quickly have a look at activating WhatsApp notifications and email notifications.
So, after creating the virtual meeting, notify your expected attendees. That’s it! The virtual podium awaits you!
Tips To Run A Virtual Meeting Successfully

- If you are an educator and trainer, adding polls and quizzes can keep your audience engaged and assess comprehension levels in real-time.
- If you work in graphic design or advertising, you can utilize the screen-sharing feature to give live demonstrations or critiques.
- For those in the service industry like salons or repair services, use a plugin that allows for easy booking and rescheduling of appointments directly from the virtual meeting interface.
- For contracts and agreements, like in real estate or financial planning, make sure your virtual meeting platform can support digital signatures for seamless transactions.
- If you are a marketer and data analyst, real-time analytics can help you gauge participant engagement and behavior, facilitating more targeted follow-ups.
- For entrepreneurs and small business owners, choose a virtual meeting tool that offers multiple payment gateways, making it easier for participants to make transactions.
- For project managers and team leaders, utilize breakout rooms for side discussions or team-building exercises, enhancing collaboration and teamwork.
- For sales professionals, set up automated follow-up emails or reminders at the end of the meeting to keep the conversation going and increase the chances of conversion.
Wrap-Up
I hope that you’ve successfully integrated Google Meet or Zoom with WP Timetics for seamless virtual meetings. Now, all that’s left to do is to start hosting your meetings.
See, managing virtual meetings doesn’t have to be difficult, especially when you have powerful WordPress plugins like WP Timetics to help you. We’ve covered everything from overcoming common hurdles to reaping the full range of benefits that virtual meetings provide.
Don’t let the challenges of virtual meetings hold you back. Give WP Timetics a try today to improve your virtual meeting experience. Happy conferencing!
FAQs
How do you run a virtual meeting effectively?
To run a virtual meeting effectively, prepare an agenda, ensure all tech is working, and start on time. Facilitate participant engagement through interactive tools, keep to the schedule, and end by summarizing key points and next steps.
How do I host a virtual office meeting?
To host a virtual office meeting, choose a reliable video conferencing tool and schedule the meeting in advance. Send out invites with the agenda and required materials. Ensure a stable internet connection and a quiet space to host the meeting.
Can we integrate Zoom into WordPress?
Yes, you can integrate Zoom with WordPress using plugins like WP Timetics or through Zoom’s API. This allows you to schedule, display, and manage Zoom meetings directly from your WordPress site.


