How to Streamline Your Booking with An Appointment Scheduling Tool

Customers expect convenience and easy access during booking anything online. It not only saves time but also enhances customer satisfaction and boosts your overall revenue.
In fact, according to industry data, over 60% of appointments are now booked online, proving that businesses must adapt or risk falling behind. Manual booking appointments can include outdated data, create errors, or conflicts.
That’s where an online appointment scheduling tool comes in. It helps to streamline appointment management by automating confirmations, syncing calendars, and providing real-time availability—all in one place.
In this guide, we’ll explore how an appointment scheduling tool can transform the way you manage bookings—and help your business run smarter.
Why you need to streamline your booking process
Booking appointments may seem simple. But by the time it becomes so hard to manage a large set of clients, their time slots, cancellations, and follow-ups.
And all these lead to frustrated customers, missed appointments, and lost revenue. So, what happens when you streamline it?
Let’s check out below.
Manual vs. automated booking: which one is the most convenient?
A study shows that businesses that switch to automated scheduling tools report 30–40% fewer no-shows and recover 5–10 hours per week in admin time. Also, there are 5 signs to upgrade your appointment scheduling.
- You’re still taking bookings manually via phone/email.
- Double bookings or missed appointments are frequent.
- You send appointment reminders manually.
- Customers complain about booking delays.
- You spend more time managing your calendar than running your business.
Now let’s see the comparison between manual booking and automated booking:
| Manual Booking | Streamlined Booking with a Tool | |
| Booking method | Phone calls, emails, spreadsheets | Online booking page, synced calendar |
| Availability | Manually updated (often outdated) | Real-time availability is displayed automatically |
| Confirmation | Sent manually (or forgotten) | Auto-confirmation via email/SMS |
| Cancellations | Requires calls and follow-ups | One-click rescheduling or cancellation |
| Customer experience | Often clunky or delayed | Smooth, self-service experience |
So, if you want to manage your business smoothly, save hours each week, and improve client experience, automated scheduling will be the most convenient option for your business.
For example: The Gym owner
Sarah runs a fitness studio business with 4 trainers and over 40 recurring clients. She used to manage appointments through calls and Excel sheets. By the end of each week, she was spending 10+ hours manually confirming sessions and following up on cancellations.
After implementing an appointment scheduling software, she:
- Enabled clients to book and cancel sessions online
- Synced trainer calendars automatically
- Set up SMS reminders to reduce last-minute no-shows
As a result, Sarah gained back 10 hours/week and improved her class attendance rate by 28%—all by streamlining her booking process.
Must-have features for an appointment scheduling tool
To streamline appointment management, your appointment scheduling tool needs the right features to eliminate inefficiencies and delight clients. From syncing calendars to automating reminders, these tools transform chaotic scheduling into a seamless process. Below are the must-have features to look for, with examples of how WP Timetics delivers them to save time and boost bookings.
- Calendar integration: Sync your schedule with Google Calendar or Outlook for real-time availability. WP Timetics ensures your calendar reflects every booking instantly, preventing double bookings. For example, a consultant can sync their Outlook calendar to show open slots to clients automatically.
- Automated reminders: Cut no-shows with timely notifications via email, SMS, or WhatsApp. WP Timetics’ client interaction automation sends personalized reminders, reducing missed appointments by up to 90%. A salon owner might send a WhatsApp reminder 24 hours before a haircut, ensuring clients show up.
- Multiple time zone support: Simplify scheduling for global clients. WP Timetics adjusts time zones automatically, so a remote tutor in New York can book sessions with students in London without confusion.
- Mobile responsiveness: Enable clients to book on the go with a user-friendly interface. WP Timetics’ mobile-optimized platform lets clients schedule from their phones, perfect for busy professionals booking last-minute meetings.
- Payment integration: Secure payments upfront with Stripe or PayPal. WP Timetics streamlines transactions, ensuring a fitness coach gets paid when a client books a class, reducing cancellations.
- Customizable time slots: Tailor availability to match your services or staff. With WP Timetics, a spa can set 30-minute slots for massages and 60-minute slots for facials, optimizing the schedule.
- Staff/team assignment: Assign bookings to specific team members. WP Timetics lets a dental clinic route appointments to the right dentist, ensuring smooth operations.
- AI and automation: Leverage AI for smarter scheduling. WP Timetics’ natural language interface and AI features predict peak booking times, helping a gym allocate trainers efficiently during busy hours.
These features make appointment scheduling tools like WP Timetics invaluable for businesses aiming to streamline appointment management. By choosing a tool with these capabilities, you’ll save time, reduce errors, and keep clients happy.
Step-by-step guide to streamlining your booking with an appointment scheduling tool
A streamlined appointment system doesn’t just improve internal efficiency—it directly impacts client satisfaction and revenue. Below is a practical, point-by-point guide to help you get started with optimizing your scheduling workflow using a smart tool.
Identify your booking pain points
Before you dive into a new scheduling solution, it’s essential to evaluate the challenges you’re currently facing. An inefficient booking system doesn’t just waste your time; it frustrates clients, leads to miscommunication, and ultimately costs your business money.
Taking stock of these issues will give you a clearer understanding of what you truly need in a scheduling tool.
Start by asking yourself:
- Are you constantly overwhelmed by the need to manually confirm every appointment?
- Do your clients often complain about delays, double bookings, or general confusion?
- Are no-shows and last-minute cancellations becoming all too common, eating away at your productivity and revenue?
Pro Tip:
Make a checklist of your most frequent booking problems. Knowing exactly where the friction lies will help you prioritize the features that matter most during setup and tool selection.
Choose the right scheduling tool
Once you’ve identified your main pain points, the next step is finding the right scheduling tool that can address them effectively. The ideal platform should align with your business type, size, and service workflow—whether you’re a solo entrepreneur, a service-based agency, or a growing team.
Key features to look for include:
- Real-time availability syncing to prevent double bookings and eliminate back-and-forth messages
- Integrated payment gateways allow customers to pay securely at the time of booking
- Automated reminders cut no-shows with timely notifications via email, SMS, or WhatsApp.
- Multi-user and team support is perfect for managing multiple staff members or departments
- AI-based scheduling to automate decision-making and adapt to client preferences and your availability
Why WP Timetics?
WP Timetics delivers all of the above and more. It’s a smart, scalable solution packed with advanced integrations and automation features that simplify your entire appointment process, helping you focus more on delivering value, not managing your calendar.
Set up your availability and services
Now that you’ve selected your scheduling tool, it’s time to configure your availability and define the services you offer. This step ensures your booking system works seamlessly with your real-life calendar and service structure.
Be sure to define:
- Booking duration for each service, e.g., 30 minutes, 1 hour, or custom times, depending on the task
- Breaks, buffer times, and lead times to give yourself breathing room between appointments and avoid back-to-back stress
- Recurring sessions or group appointments are ideal for classes, workshops, or repeat consultations
With WP Timetics, you can go even further by customizing time slots individually for each team member and service. This gives you full flexibility and control, ensuring the system works exactly how you do.
Automate confirmations and reminders
Manual communication around bookings can quickly become overwhelming. Automating this part of the process not only saves time but also significantly reduces the chances of missed appointments.
Set up automated:
- Confirmation emails instantly reassure clients that their booking is secured
- Reminders via email, SMS, or WhatsApp are sent at intervals before the appointment to keep your clients informed
- Follow-ups for cancellations or rescheduled appointments keep communication professional and smooth, even when plans change
Integrate with your calendar and payment system
For your scheduling system to effortlessly work, it needs to sync smoothly with the tools you already use. This not only helps prevent conflicts but also streamlines operations, especially when payments are involved.
Be sure to:
- Sync with your calendar (Google Calendar, Outlook, etc.) to automatically reflect real-time availability and avoid double bookings
- Enable payment gateways like Stripe or PayPal to collect upfront payments and reduce last-minute cancellations
- Map bookings to individual team members’ schedules to ensure the right person is available at the right time
With WP Timetics, your calendar and availability stay in perfect sync—automatically. Clients can only book time slots that are open at the moment, giving both sides peace of mind.
Embed booking on your website and social platforms
Even the best scheduling tool won’t help if people can’t find it easily. Make your booking process accessible by placing your links where clients already interact with your brand.
Make sure your booking page is visible:
- On your website homepage or dedicated landing page
- In your Instagram bio, Facebook page, or LinkedIn profile
- Inside email footers, newsletters, or automated replies
WP Timetics makes this process simple. You can create fully branded booking pages or embed customizable booking forms anywhere on your site with just a few clicks.
Monitor and optimize
Once everything is set up and running, the next step is ongoing optimization. Use data insights to refine your strategy and improve the client experience over time.
Track key metrics such as:
- Appointment trends understand which services are most popular
- Customer behavior shows when and how clients are booking
- No-show rates identify areas for improving attendance
- Peak booking hours adjust staff or promotions accordingly
WP Timetics provides built-in analytics that offer actionable insights, helping you make smarter decisions that drive more bookings and better customer satisfaction.
How to set up an appointment scheduling tool for streamlining your booking with WP-Timetics
If you’re looking to simplify your booking system and save time, WP-Timetics has you covered. Whether it’s a private one-on-one consultation, a group session, or an event with a detailed seat map, Timetics makes scheduling effortless. Let’s walk through how you can set up each type of meeting with ease.
Method 1: One-to-one meeting
It is perfect for personal consultations, coaching calls, or services that require focused, private communication. One-to-one meetings are designed to connect you directly with a single client at a time.
Step 1: Start from your WordPress dashboard
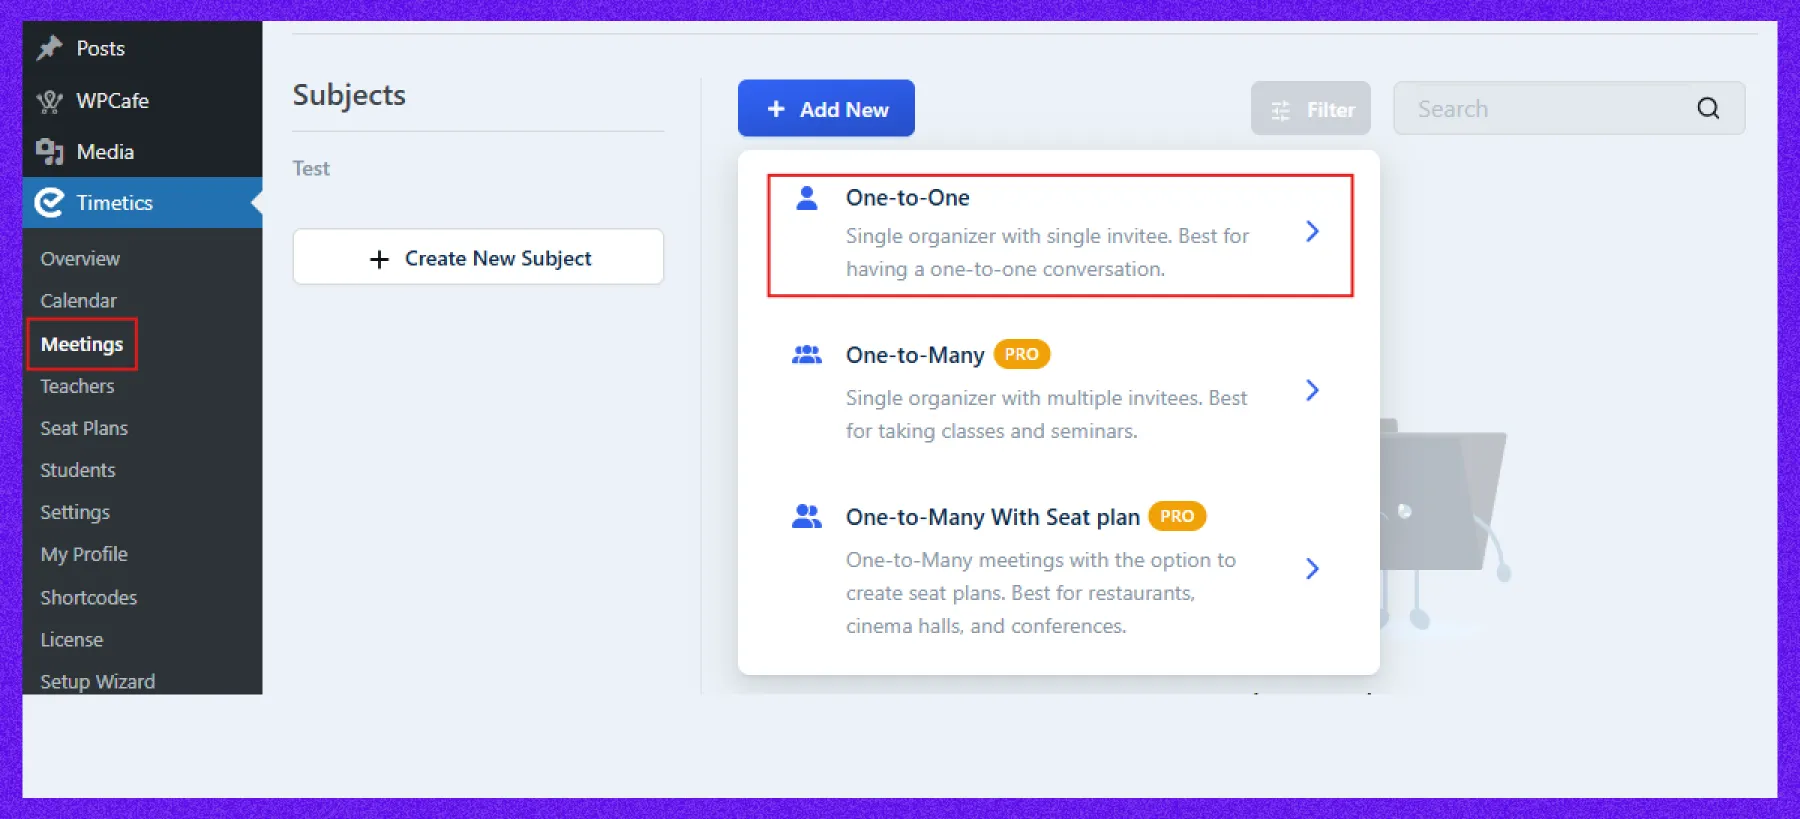
Navigate to WP-Timetics → Meetings → Create New, and choose One-to-One when the meeting type pop-up appears. You’ll be taken to the meeting setup page.
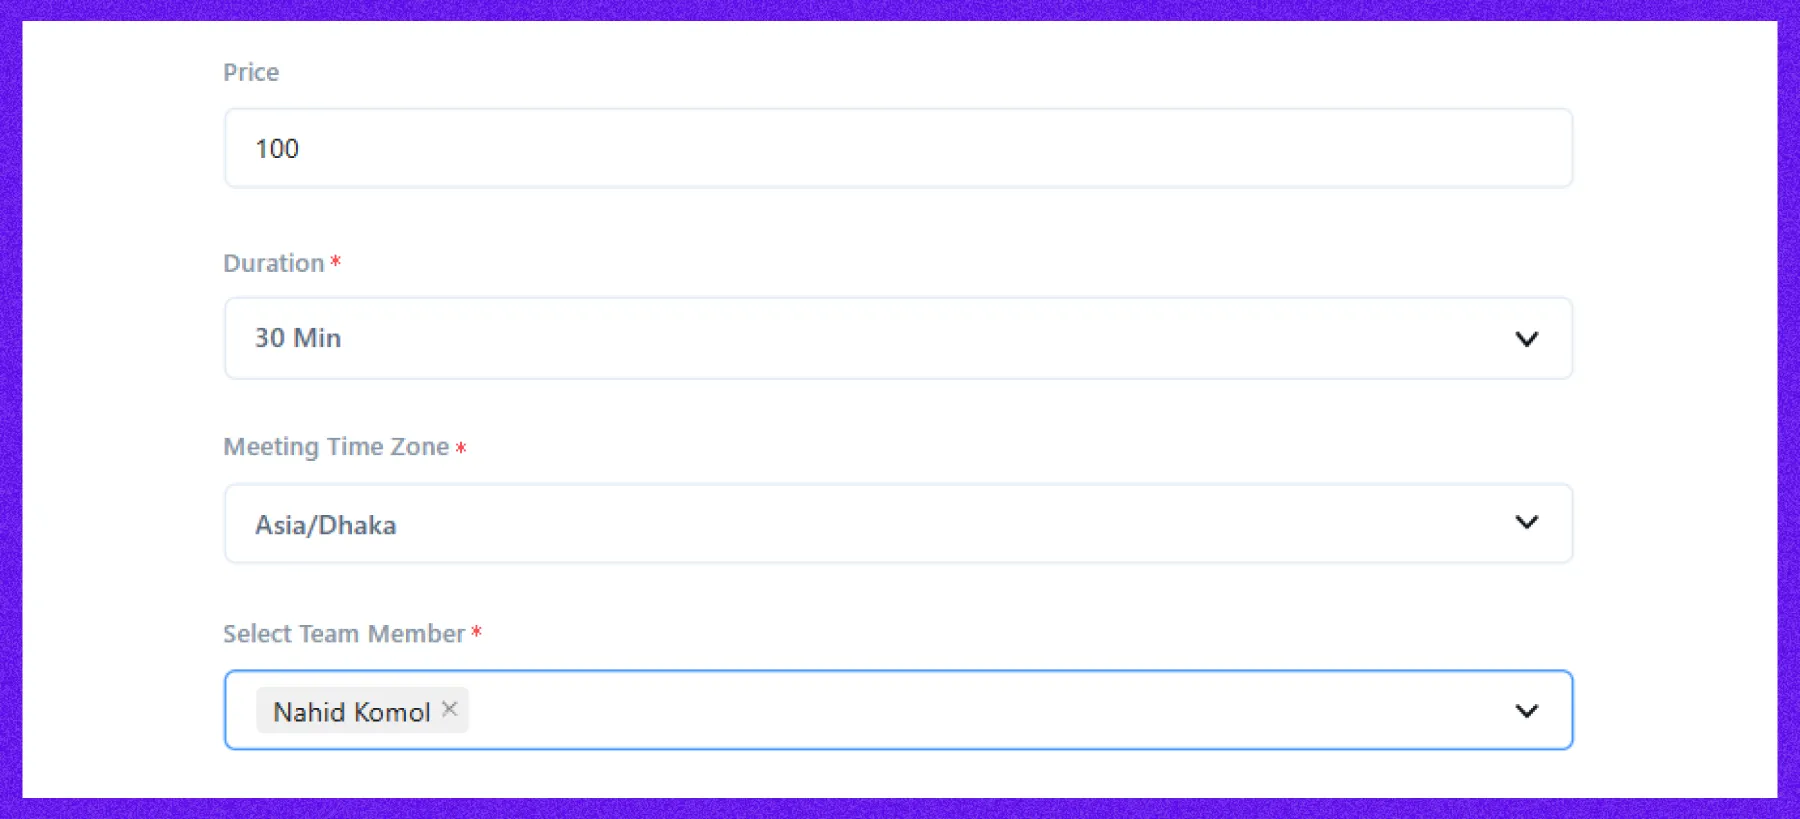
Step 2: Fill in your meeting details
Enter a meeting title that clearly describes the purpose. Then, set your meeting date(s), time zone, duration, price, and assign a host/team member.

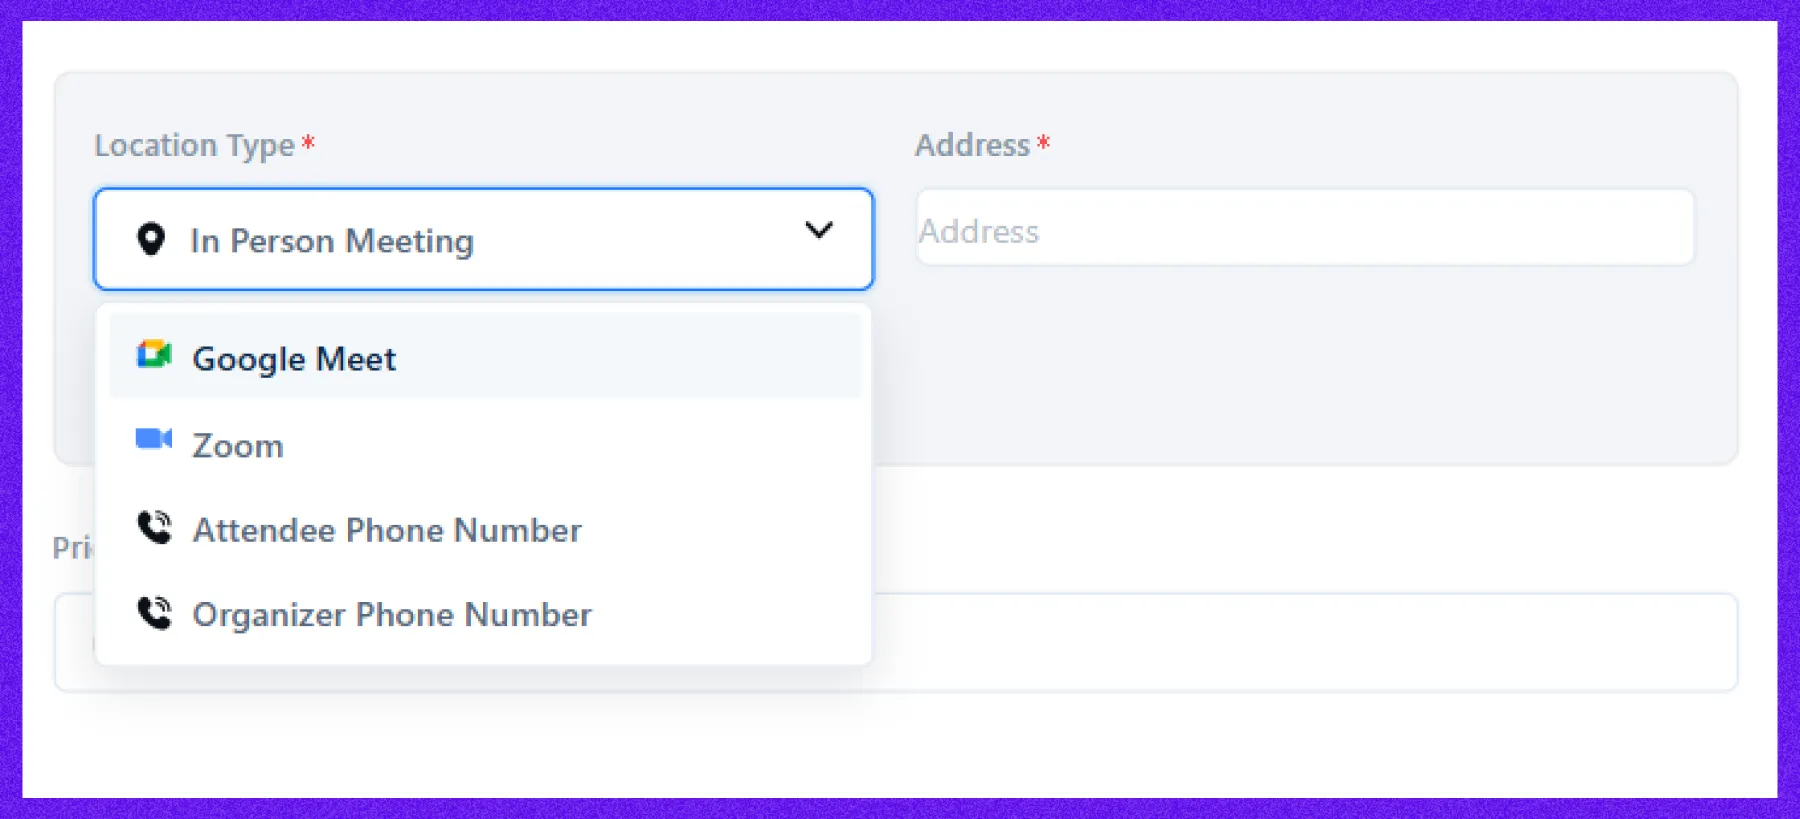
Step 3: Add your location type
Timetics offers several meeting mediums:
- Google Meet
- Attendee’s phone number
- Organizer’s phone number
- In-person
Select the one that best meets your requirements. If you select Google Meet, make sure to integrate your account beforehand. For full details, read the documentation for detailed integration steps. Don’t forget to add your physical address if relevant.
After that, put all the necessary details, such as price, duration, meeting time zone, and team member, and click on Create Meeting.
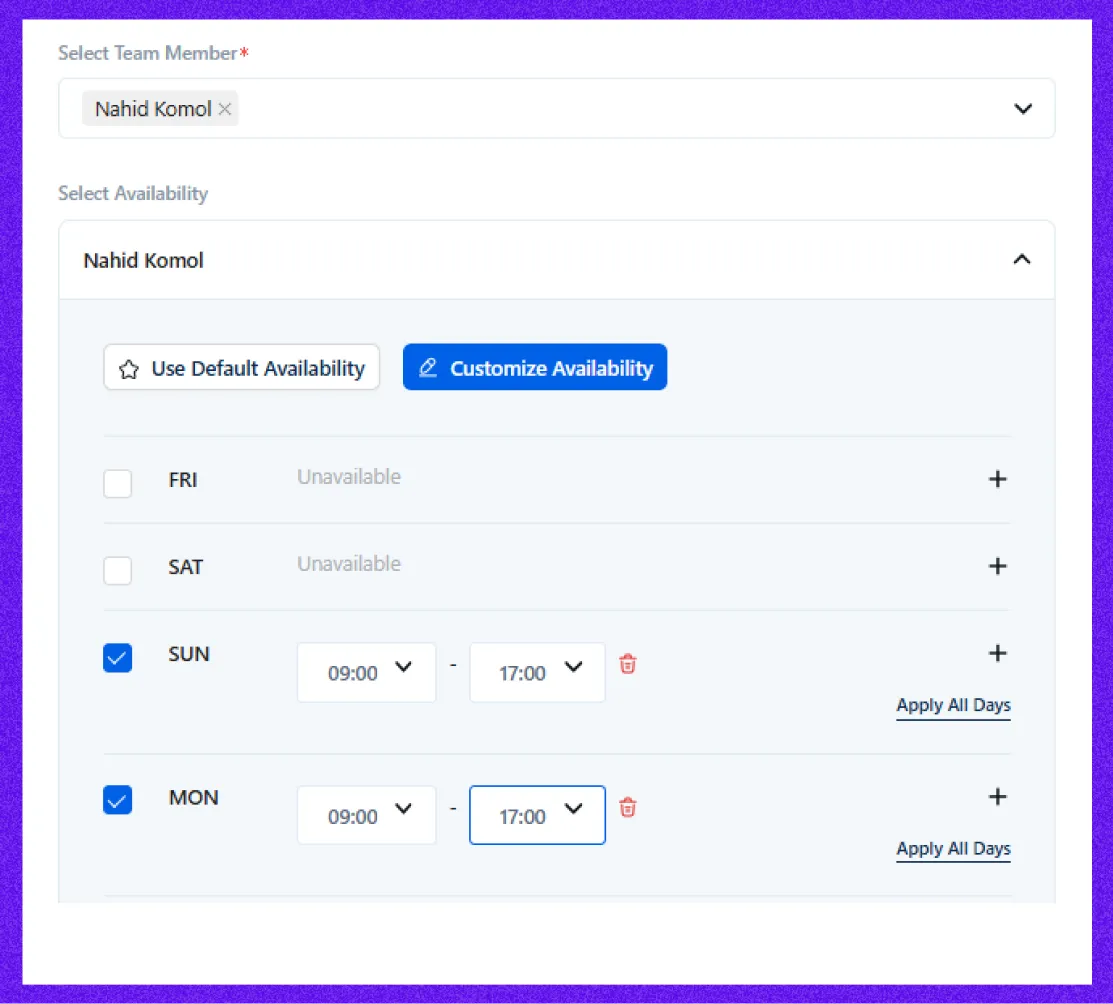
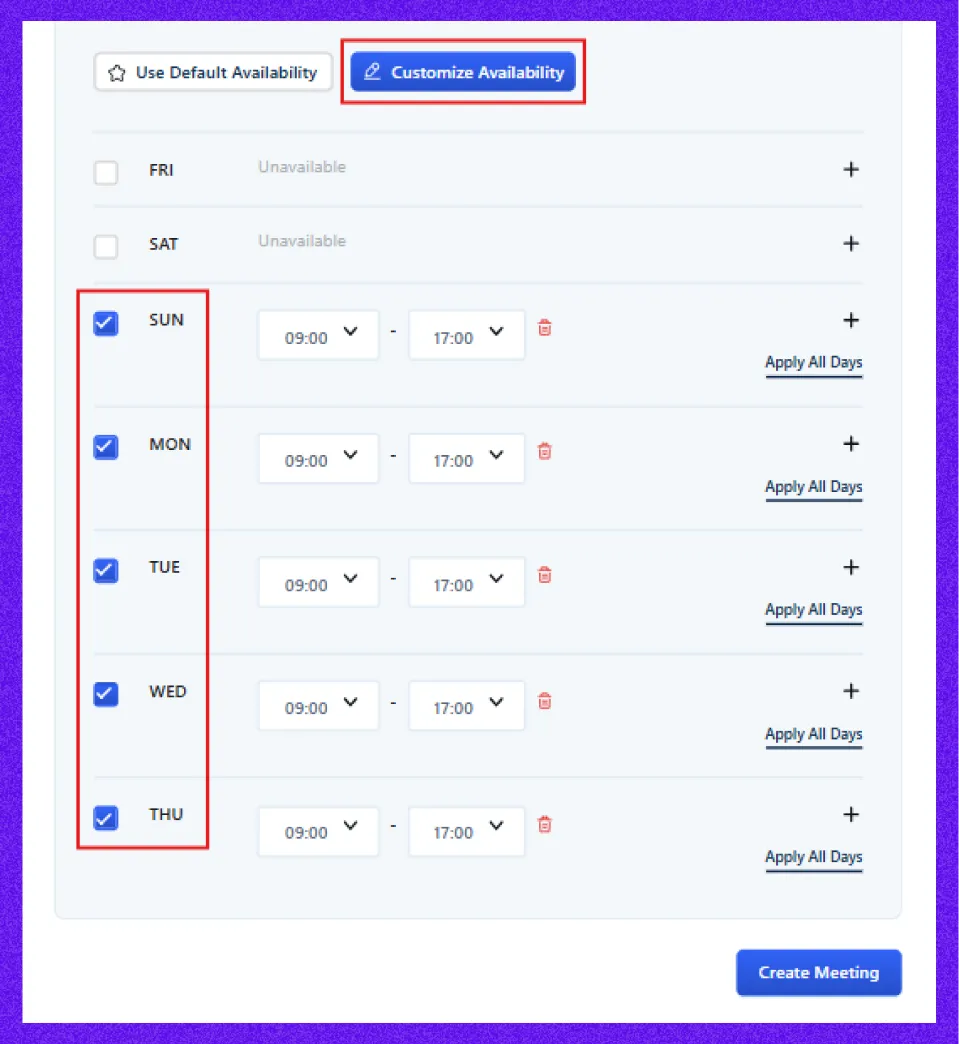
Step 4: Set availability
If you use Default Availability, then the time will be set based on the existing meeting
Availability.
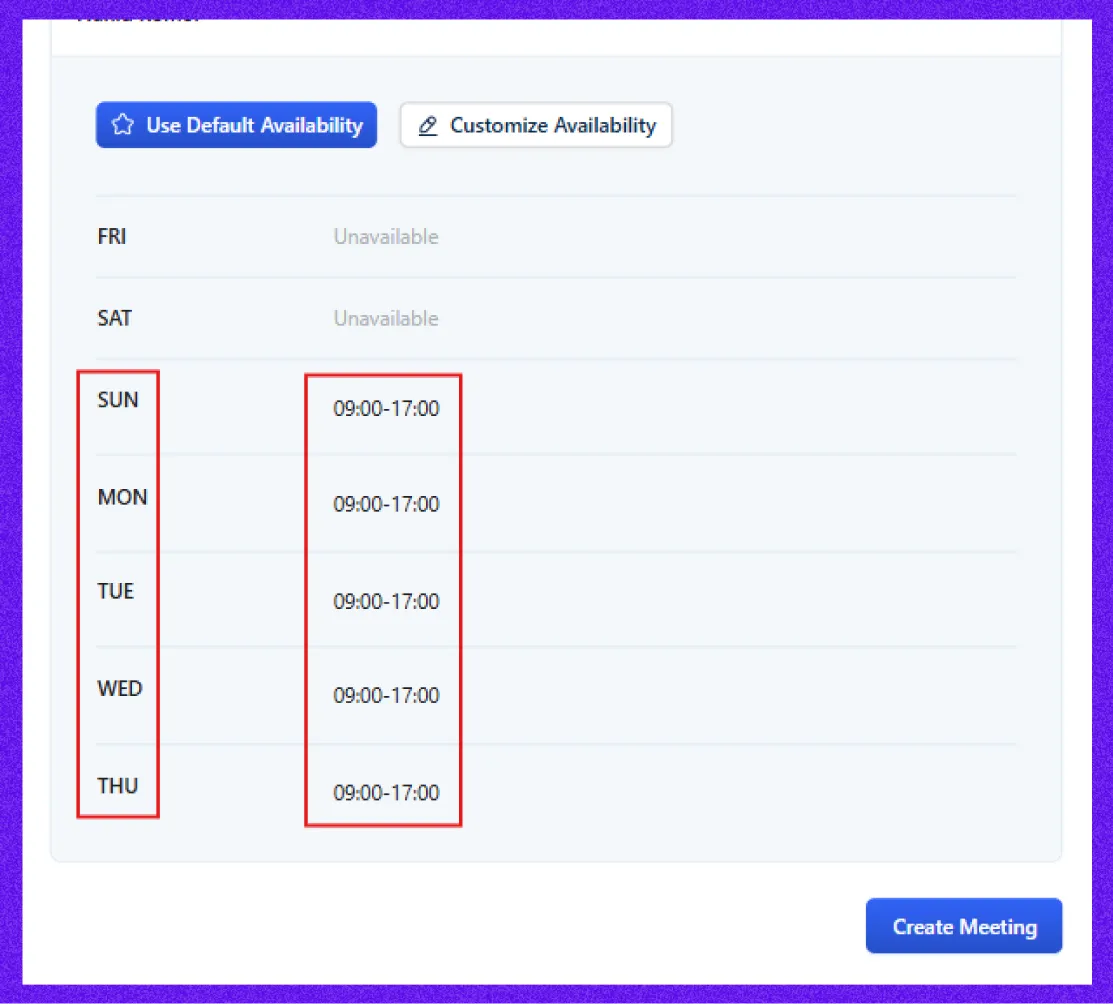
And if you want to customize the time for your team member, then choose Customize
Availability. You can edit the time and date based on your team member’s preference,
then click Create Meeting.
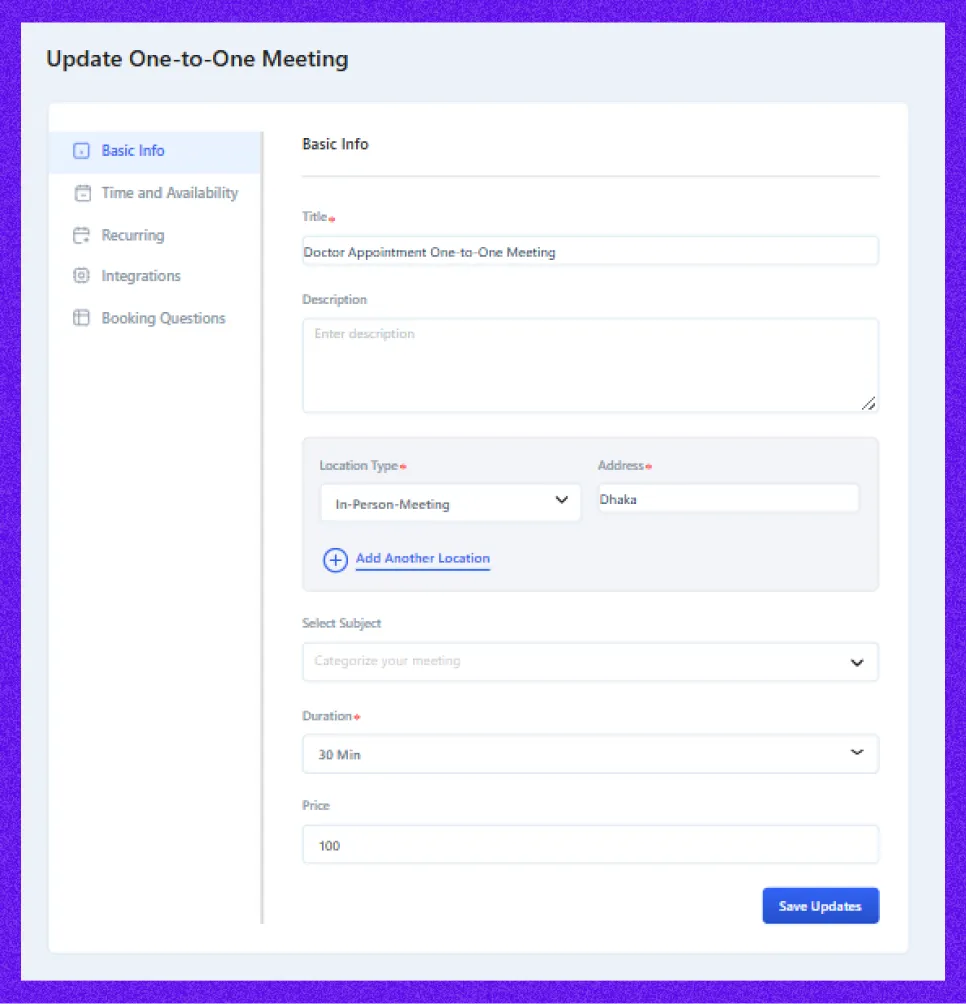
Step 5: Update one-to-one meeting
On the next page, you can add a description to provide more details about the meeting.
You can also edit or update any of the information you’ve entered. When you’re satisfied with everything, click Save Updates to finalize your meeting.
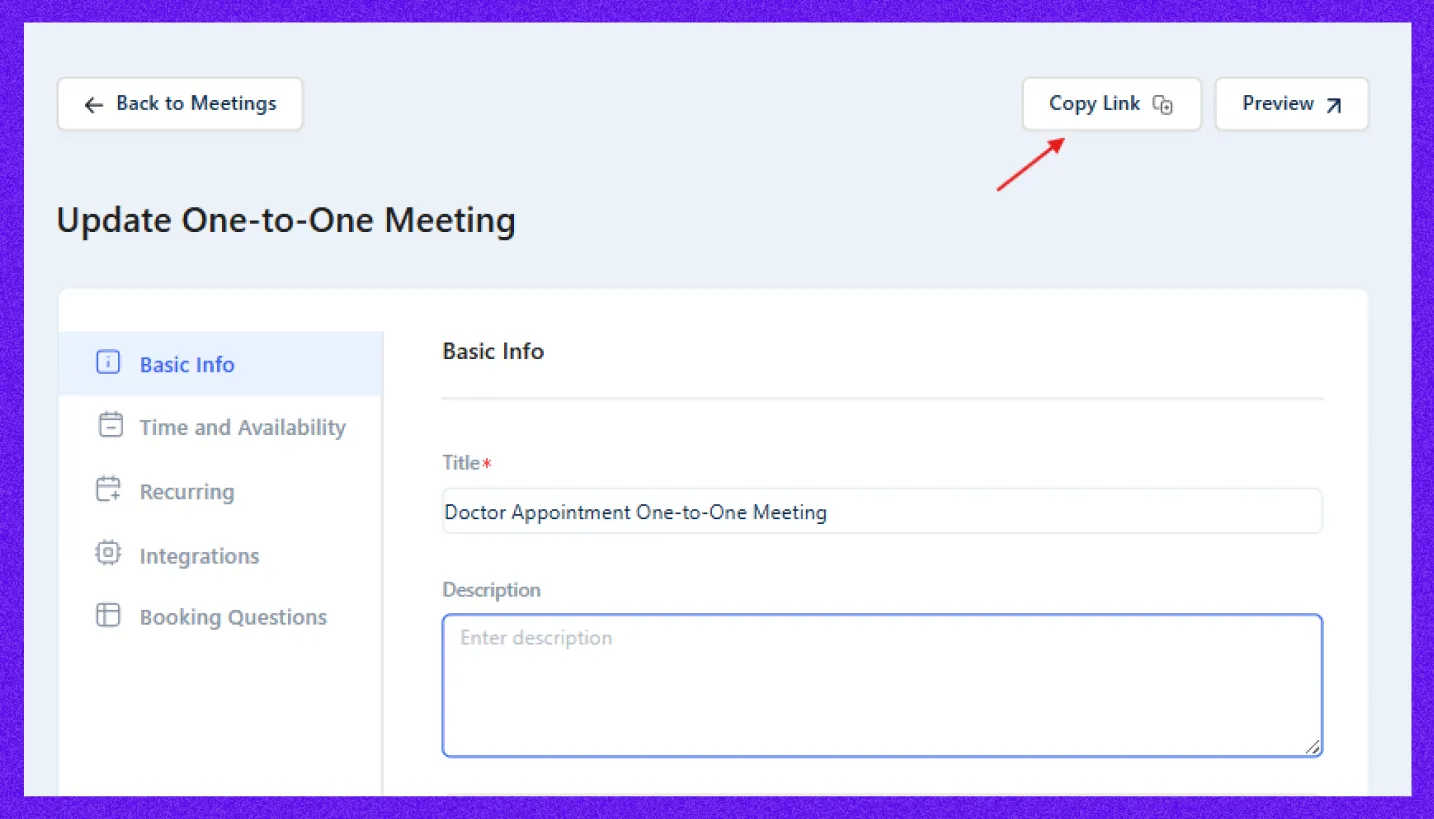
Step 6: Share your meeting
Once your meeting is set up, sharing it is simple. Copy the meeting link and paste it
onto your website.
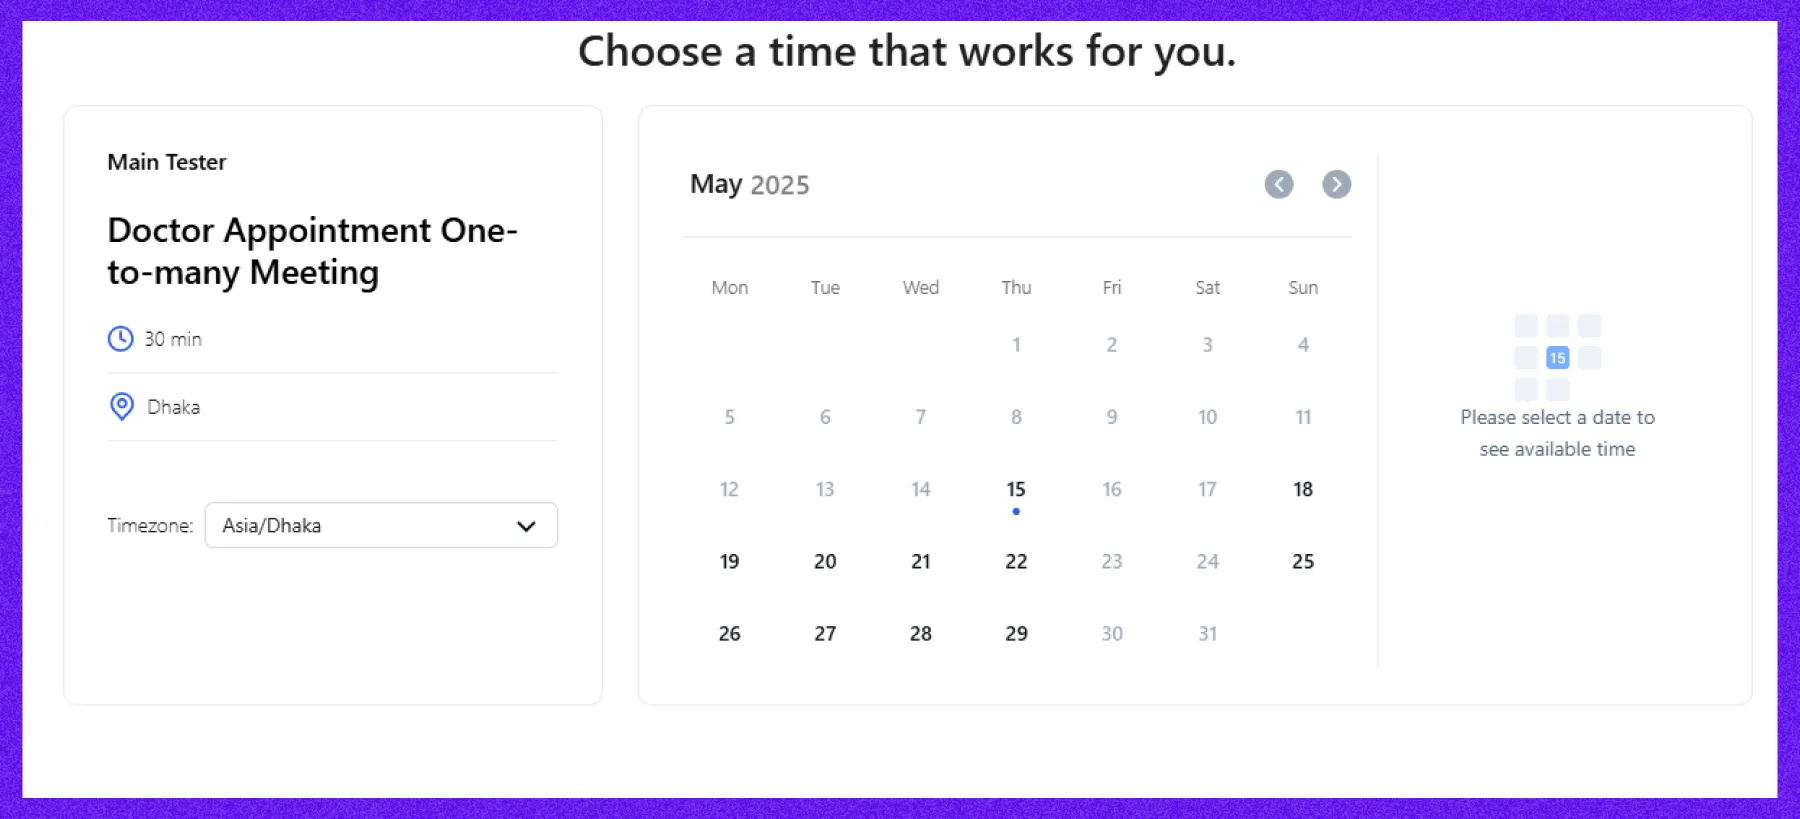
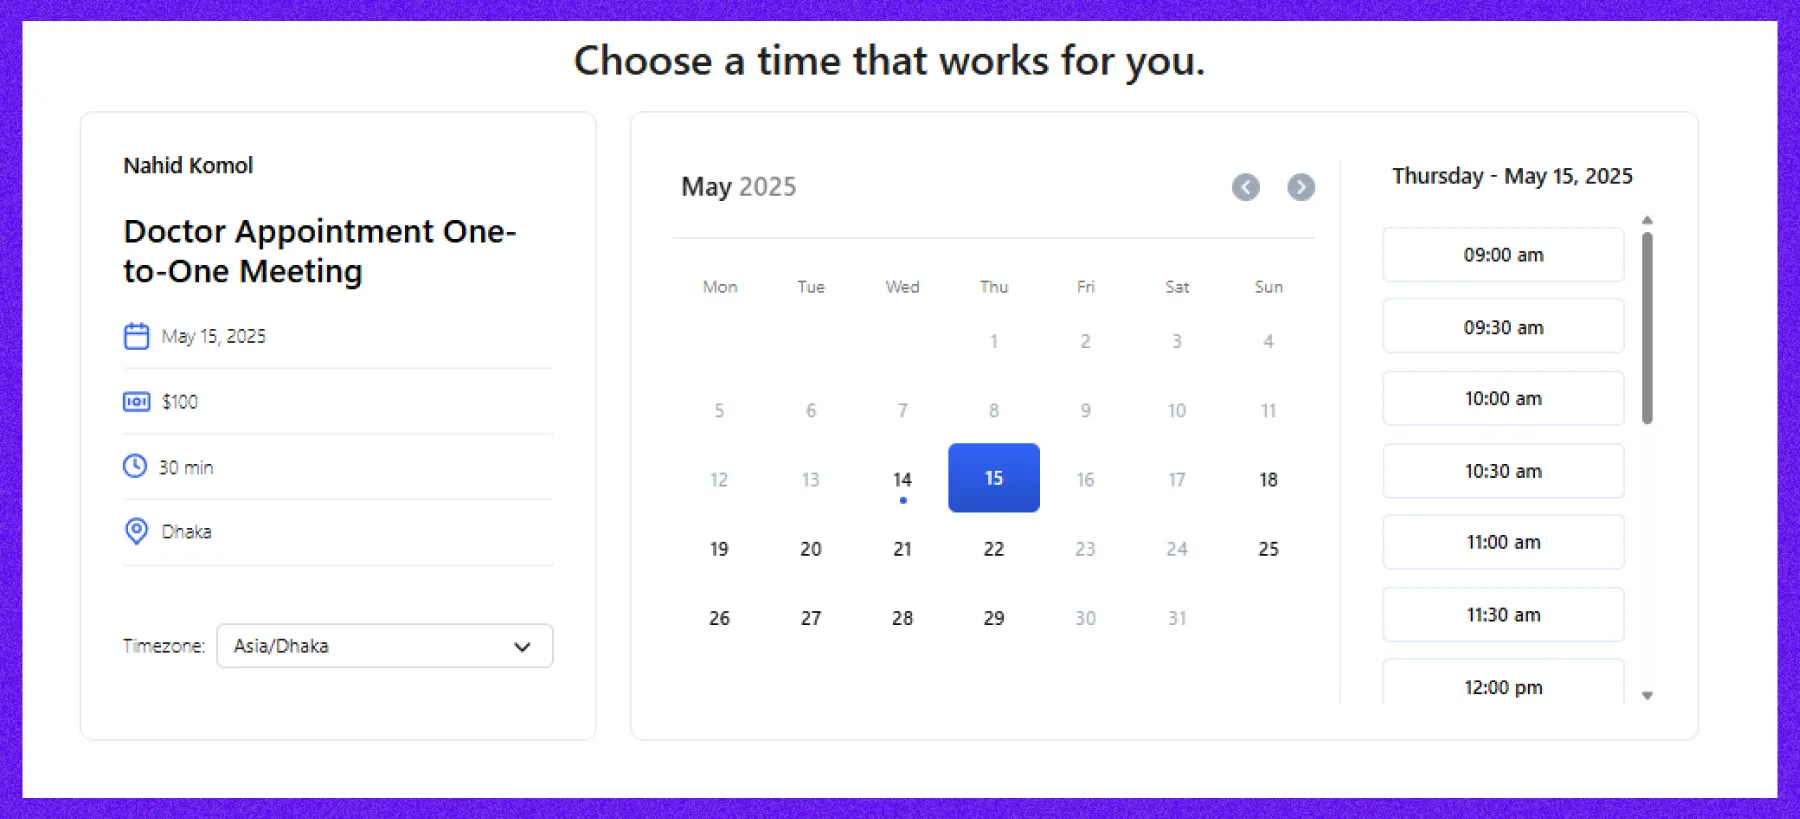
On your website, the meeting link will appear in an organized, user-friendly format,
making it easy for attendees to book their slots.
Method 2: One-to-many meeting
Setting up a One-on-Many meeting is pretty similar to creating a One-on-One meeting. The main difference is that you need to add details like the ticket name, seating capacity, and ticket quantity. Since you’re expecting multiple attendees, these fields help you manage how many people can join and keep everything organized.

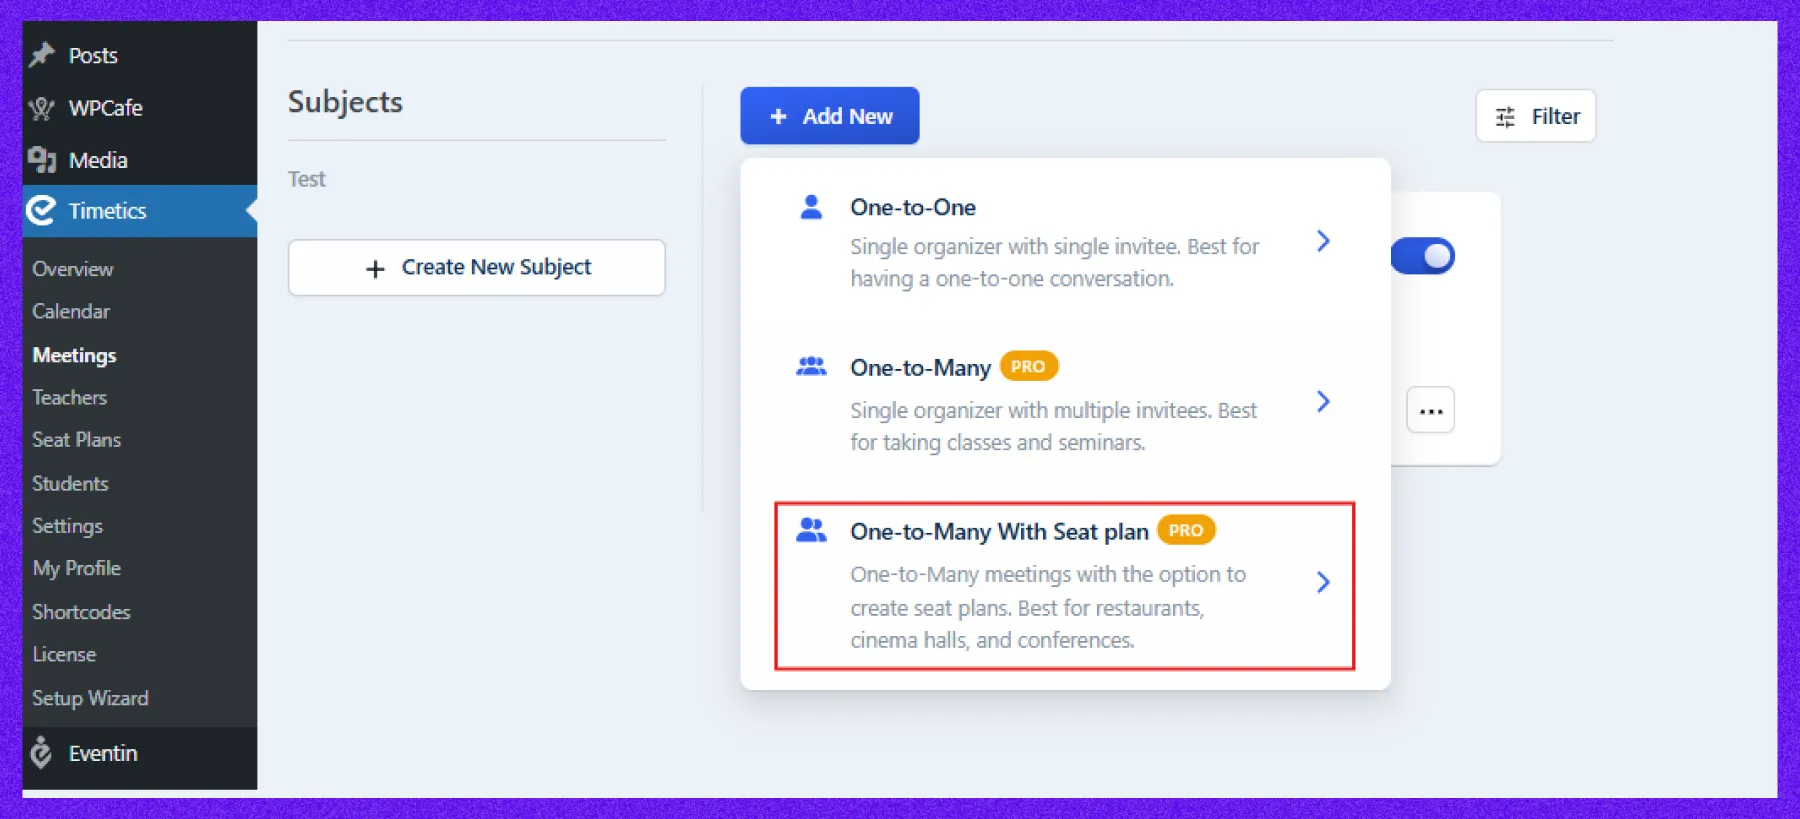
Method 3: One-to-many with seat plan
Setting one-to-many with a seat plan is similar to one-to-one and one-to-many appointment scheduling or meeting. Here, you just need to add various ticket prices or multi-tier ticket prices and seat quantities.
Step 1: Choose the seat plan option
Go to WP-Timetics → Meetings → Create New and select One-to-Many with Seat Plan. Enter your meeting title, date, duration, host, and location details.
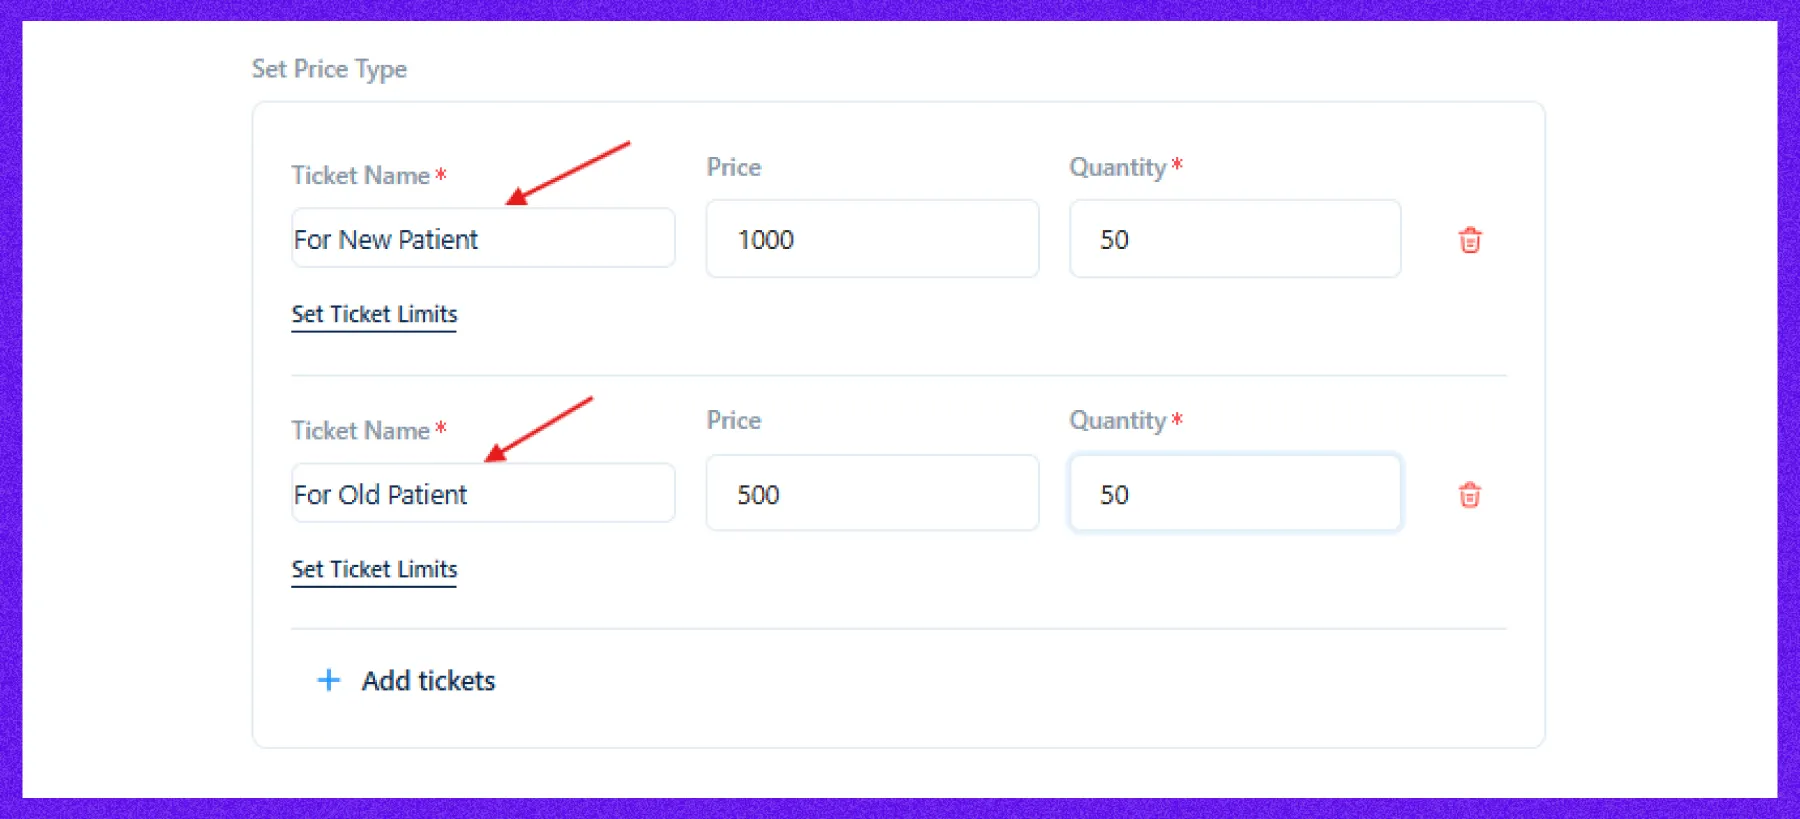
Step 2: Set up ticket types and pricing
After providing all the meeting details, now it’s time to set the price type. Here you can add multiple ticket types with prices and the number of tickets. After that click on the Create Meeting button.
Step 3: Decorate your seat map
On the next page, you can add a description to provide more details about the meeting. Now, to decorate your seat map, go to the Seat Plan option and click on the Go Seat Map.
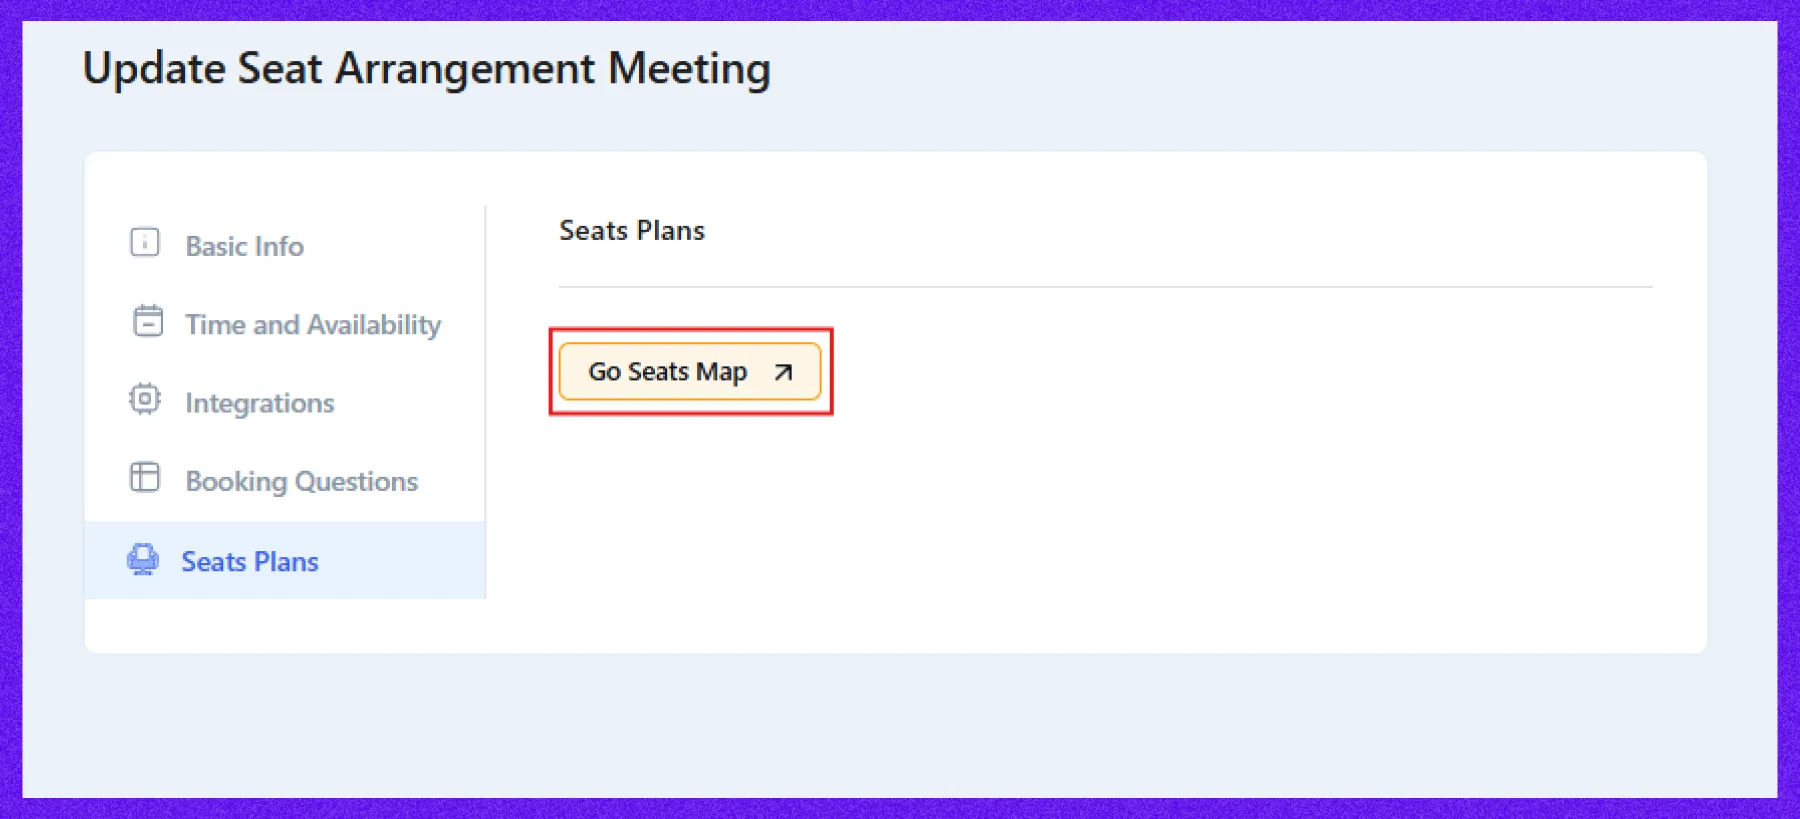
Step 3: Design your seat map
Once your meeting is created, head to the Seat Plan tab and click Go Seat Map. From there, you can:
- Choose your ticket types
- Select seat styles (chairs, tables, stage)
- Define rows and columns
- Upload a background image for your layout
- Adjust colors for headings and section elements
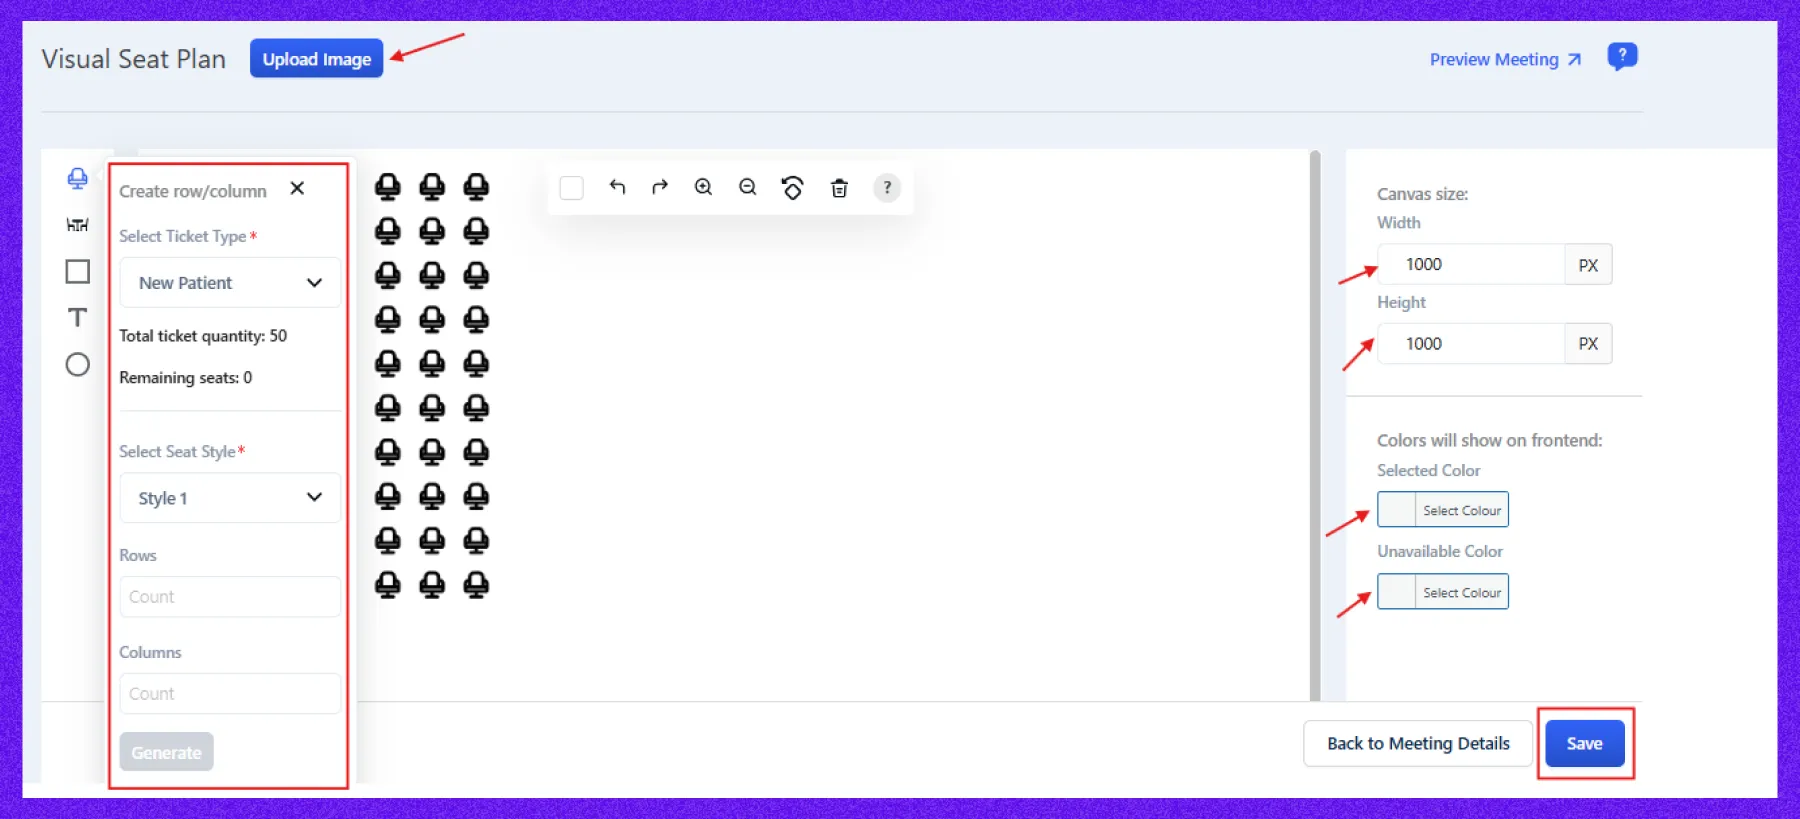
Step 4: Save and publish
After customizing your layout, click Save. Your visually appealing and fully functional seat map is now ready for bookings. Just like with other meetings, copy the link and share it wherever your audience is.
Top 10 industries that can streamline their appointment scheduling with WP Timetics
WP Timetics is designed to be flexible, powerful, and easy to use, making it the perfect solution across a wide range of industries. Here are the top 10 industries where professionals rely on WP Timetics to manage bookings, reduce no-shows, and create a smooth scheduling experience:
1. Education
In the education sector, time and organization are everything. Whether you’re a private tutor, an academic advisor, or a course instructor running online classes, WP Timetics gives you a smart, streamlined way to manage your schedule. You can set up recurring classes, one-on-one consultations, parent-teacher meetings, or even full course schedules with just a few clicks.
Educators can easily define availability, automate reminders, and reduce no-shows. Parents and students, on the other hand, get a frictionless booking experience where they can select time slots that work for them, without needing to call or email back and forth. It’s a win-win for both sides, enhancing learning experiences and improving overall efficiency.
2. Recruiting
Whether you’re a solo recruiter or part of a large HR team, WP Timetics helps you schedule interviews, screening calls, onboarding sessions, and career consultations—all without the hassle of endless email threads. Recruiters can create dedicated meeting types for different stages of the hiring process, like:
- First-round interviews
- Technical assessments
- HR introductions
Candidates simply pick a slot that fits their availability, and automated reminders ensure no one forgets. Plus, integrating video platforms like Zoom or Google Meet makes remote interviews seamless. This level of organization not only improves the candidate experience but also saves valuable time for recruiters.
3. Sales & marketing
For sales teams and marketing consultants, every meeting is a potential revenue opportunity. WP Timetics makes it effortless to schedule discovery calls, product demos, and strategy sessions, all without the back-and-forth emails or missed follow-ups.
You can set up one-on-one or group sessions directly from your WordPress site, allowing leads and clients to choose a time that suits them. Add pricing for paid consultations, integrate your calendar, and automate reminders to keep both parties on track.
With real-time availability and customizable meeting types, sales reps can focus more on closing deals and less on managing schedules.
4. Customer support
Whether it’s a one-on-one technical help session or a group training webinar, Timetics helps customer support agents manage their time effectively while offering clients an easy, self-service way to get help. You can also set minimum notice times, buffer periods between appointments, and integrate virtual meeting tools like Google Meet or Zoom.
5. Counseling
For therapists, coaches, and mental health professionals, maintaining confidentiality and consistency in scheduling is important. WP Timetics allows counselors to set up private, one-on-one appointments with ease, offering clients a secure and seamless way to book sessions.
You can define your availability, offer virtual or in-person sessions, and reduce administrative overhead—all while providing a calming, distraction-free booking experience.
6. Automotive services
Mechanics, car wash owners, and vehicle service centers use WP Timetics to streamline service bookings like oil changes, inspections, and detailing.
Instead of juggling phone calls and walk-ins, businesses can offer customers an easy online way to schedule appointments based on service types, staff availability, and location. With customizable time slots, pricing, and automated reminders, it helps reduce no-shows and ensures a steady workflow throughout the day.
7. Fitness & wellness
Personal trainers, gym instructors, yoga studios, and wellness coaches can rely on WP Timetics to manage class schedules, private training sessions, and group fitness events.
It allows clients to book sessions based on trainer availability, class capacity, and preferred time slots—all directly from the fitness business’s website. With recurring booking support and automated reminders, it enhances client retention and keeps your calendar running smoothly.
8. Healthcare
Doctors, therapists, dentists, and other healthcare professionals use WP Timetics to offer patients a seamless way to book appointments online.
Whether it’s for general checkups, specialist consultations, or therapy sessions, Timetics ensures that appointments are well-organized, minimizes scheduling conflicts, and reduces administrative overhead.
9. Real estate
Timetics streamlines the entire booking process for real estate professionals, allowing them to set up appointments with potential buyers, sellers, or tenants directly from their WordPress site. It helps manage multiple listings and client requests while ensuring timely and accurate scheduling.
Additionally, Timetics can integrate with mapping tools to automatically suggest available times and locations, making it even easier for clients to book property tours or meetings.
10. Utilities & home services
For businesses in the utilities and home services sector, such as plumbers, electricians, HVAC technicians, or pest control services, WP Timetics offers a robust solution for managing appointments and service calls.
These businesses typically deal with tight schedules and multiple clients, and WP Timetics helps streamline this process by allowing customers to easily book appointments at their convenience. Service providers can manage different job types, set availability based on technician schedules, and minimize disruptions caused by missed appointments.
This system also helps businesses manage emergencies and follow-ups by allowing quick rescheduling or updating of appointments, ensuring that all customer needs are met efficiently.
Final thoughts: Streamline your booking process with WP Timetics
Managing your booking process with an appointment scheduling tool like WP Timetics brings numerous benefits to your business. By automating scheduling, reducing administrative tasks, and offering a personalized booking experience, you can significantly improve efficiency, enhance client satisfaction, and boost revenue growth.
With WP Timetics, you can easily manage appointments, reduce no-shows, and provide seamless service to your clients, all while saving valuable time.
Interested in learning more? Check out our WP Timetics demo and see how easy it is to get started with automated scheduling and personalized booking experiences!