How to Use a Restaurant Management Plugin in WordPress to Grow Efficiency and Profit

Still managing your restaurant the old way? Spreadsheets, paper orders, or phone calls?
If your website only shows your menu and nothing else, you’re losing profit.
A good restaurant management plugin turns your WordPress site into a control panel for your business. From taking online orders to handling reservations and staff schedules, it does the behind-the-scenes work so you can focus on what matters: serving great food.
In this guide, we’ll walk you through how to actually use a restaurant management plugin—from setup to smart features that help your business run smoother and sell more.
Get started: What you need before setup
Before using a restaurant management plugin, make sure your WordPress site is ready. Here’s what you need:
- A live WordPress website: Make sure WordPress is installed, running, and accessible. You’ll manage everything from here.
-
WooCommerce plugin (if you offer online ordering)
– WooCommerce handles product listings, payments, and orders.
– Install it from Plugins → Add New → Search “WooCommerce” → Install & Activate. - A restaurant management plugin: We’ll use WPCafe as the example in this guide. It includes food menus, table reservations, ordering, and staff tools—all in one place.
- Basic content ready: Prepare your food items, categories, prices, images, and opening hours. Having these ready will make setup faster.
📌 Once you’ve checked all of the above, you’re ready to move on to setup and plugin configuration.
Set up your restaurant management plugin
Setting up a restaurant management plugin in WordPress might sound technical, but the process is actually straightforward—especially with user-friendly tools like the WPCafe restaurant management plugin. This plugin is built for restaurant owners who want to handle everything from food menus to reservations without writing a single line of code.
Below, we’ll walk you through the full setup process, including installation, configuration, and how to connect everything so your website is fully functional.
📌 Note: We use the WPCafe restaurant management plugin because it offers all-in-one features to manage a complete restaurant setup. If you want to use other plugins, you can do that too; all plugin setups are similar. Only the internal functions differ, and WPCafe provides comprehensive documentation, video tutorials, and 20/7 support. That’s why we prefer this plugin.
Step 1: Install and activate WPCafe
- Go to your WordPress dashboard
- Navigate to Plugins → Add New
- Search for “WPCafe” (Find out which plugins you’d like)
- Click Install Now, then Activate
After activation, you’ll see a WPCafe menu in your dashboard.
Step 2: Set up basic settings
Head over to WPCafe → Settings to configure the foundation of your setup:
- Set your business hours (opening and closing times)
- Enable pickup and delivery slots with time buffers
- Configure reservation settings for table bookings
- Choose currency and pricing display
- Pick a menu layout style (list, grid, tabs, etc.)
You can always update these settings later, but getting them right from the start saves time.
Step 3: Add your food items
You can list menu items using WooCommerce
- Go to Products → Add New
- Add product name, image, description, and price
- Assign categories (e.g., Starters, Desserts)
- Publish the item
Step 4: Display your food menu
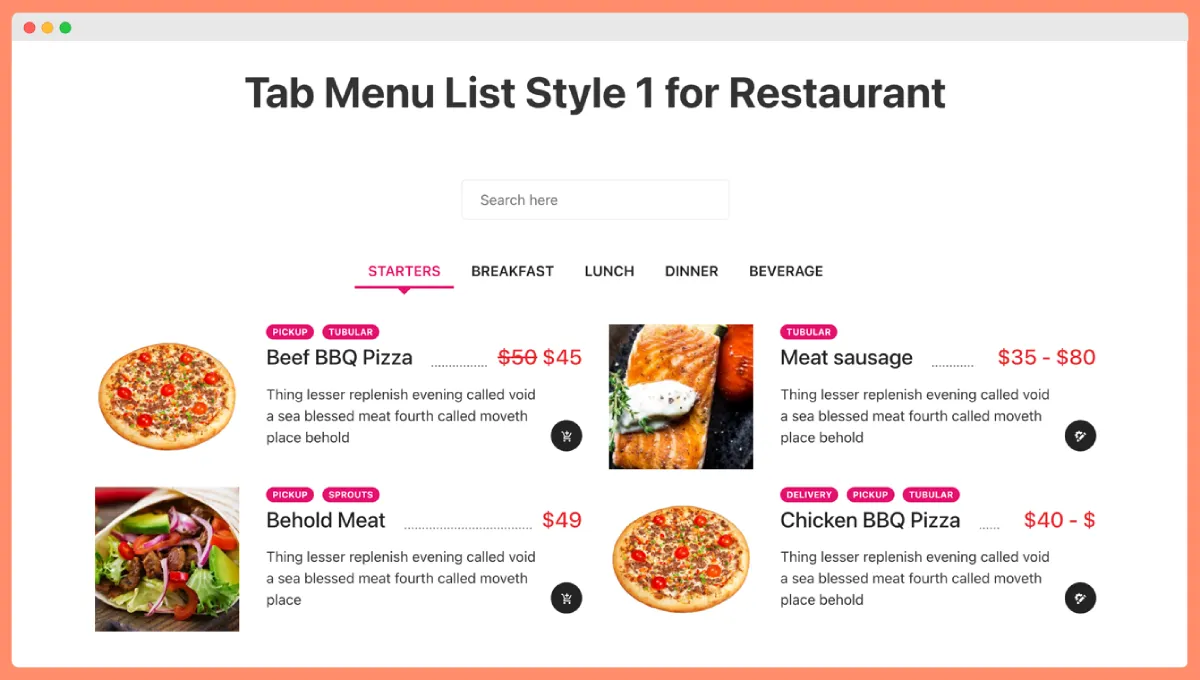
There are three main ways to show your menu on your site:
Shortcode:
- Go to WPCafe → Available Shortcodes
- Copy your preferred shortcode
- Paste it into any page or post
- Example:
[wpc_food_menu style="style-1"]
Elementor:
- Edit your page with Elementor
- Drag and drop the WPCafe Food Menu widget
- Choose layout options, filtering, and design settings
Gutenberg block:
- Open the page in the WordPress block editor
- Click the + button and search “food”
- Select the WPCafe Food Menu block
- Configure the display using the sidebar settings
Use key features to streamline your restaurant operations
Once your menu is live and basic settings are configured, WPCafe offers several powerful tools that help streamline your daily restaurant operations. These features are designed to reduce manual tasks, improve customer experience, and help you make smarter business decisions based on real-time data.
Below is a breakdown of the most valuable features WPCafe provides and how to use them effectively:
I. Set up pickup and delivery time slots
If you offer online ordering, it’s essential to manage order flow throughout the day. With WPCafe, you can control when customers are allowed to place pickup and delivery orders.
To set this up:
- Go to WPCafe → Settings → Pickup & Delivery Schedule
- Enable the order types you offer: Dine-in, Pickup, or Delivery
- Define time slots based on your kitchen’s preparation capacity
- Add buffer time between slots to reduce overlap and pressure on the kitchen
This ensures you only take orders your team can fulfill, keeping your service reliable and your kitchen workflow smooth.
II. Enable table reservations for better seating management
Accepting reservations online helps you plan ahead, avoid overbooking, and create a smoother dining experience for guests.
To enable reservations:
- Go to WPCafe → Reservation Settings
- Turn on the reservation system
- Set your daily availability, reservation slot intervals (e.g., 30 mins), and the maximum number of bookings allowed per slot
- Add a reservation form to your website using the available shortcode or Elementor widget
Guests can now book tables in advance, reducing phone calls and manual entries.
III. Add discounts to boost sales
Targeted discounts can help increase orders during slow hours, promote new items, or reward loyal customers.
To add discounts:
- Go to WPCafe → Menu Settings → Discount Options
- Choose your discount type: percentage-based (e.g., 10% off) or fixed amount (e.g., $5 off)
- Select which categories or menu items the discount applies to
- Define active time windows—specific days or hours
Examples:
- Offer 20% off all drinks every Friday
- Give first-time customers a flat discount on their first order
IV. Manage multiple locations in one place
Running more than one restaurant or branch? WPCafe lets you create separate menus for each location so that customers only see what’s available near them.
To manage locations:
- Go to Products → Locations and add each branch with its details
- Go to WPCafe → Menu Settings and enable Allow Locations
- Assign specific food items or categories to each location
Now, customers can select their preferred location and view the correct menu, prices, and delivery options.
V. Enable integrated live search option to food menu
When your menu has many items, customers may want to search directly for what they want. WPCafe allows you to enable live search functionality inside your food menu.
To add search to your menu:
- Edit your shortcode and include live_search=”yes”
- Example: [wpc_food_menu style=”style-1″ live_search=”yes”]
This displays a search bar above the food menu, making it easier for users to find specific dishes quickly.
VI. Track performance with reports
Your restaurant decisions should be backed by data. WPCafe includes built-in reports to help you analyze and improve performance over time.
What you can track:
- Top-selling food items by date range
- Reservation patterns and most popular booking slots
- Discount usage to evaluate promo effectiveness
- Busy and quiet hours for better scheduling and prep
These reports help you make smart decisions—like updating your menu, adjusting prices, or planning promotions based on real customer behavior.
Once your menu is live, WPCafe gives you more features to manage your restaurant efficiently.
Here’s how to use them:
A. Set up pickup and delivery time slots
- Go to WPCafe → Settings → Pickup & Delivery Schedule
- Enable the order types you offer: dine-in, pickup, or delivery
- Set time slots based on your kitchen’s capacity
- Add buffer time to avoid order overlaps
This setup ensures you only take orders you can fulfill and improves your delivery timing.
💁 Related reading: Best WooCommerce Food Pickup and Delivery Scheduler in WordPress- Read more
B. Enable table reservations
Let customers book tables from your website.
- Go to WPCafe → Reservation Settings
- Turn on table reservations
- Set available hours, slot intervals, and max capacity
- Add a reservation form to your site using shortcode or widget
This eliminates manual tracking and prevents overbooking.
💁 Related reading: How to Design a User-Friendly Online Restaurant Reservation System- Read more
C. Add discounts to boost sales
Promotions help drive traffic during off-peak hours.
- Go to WPCafe → Menu Settings → Discount Options
- Choose discount type: percentage or fixed amount
- Apply to selected categories or items
- Set specific days and times
This is great for weekly deals, first-order offers, or happy hours.
D. Manage multiple locations
If you operate more than one branch:
- Go to Products → Locations to add branch info
- Enable location-based menus in WPCafe → Menu Settings
- Assign specific items to branches
Customers can pick their location and view the menu for that specific branch.
E. Enable integrated live search
Make it easier for users to find items on the menu:
- Add this to your shortcode: live_search=”yes”
- Example: [wpc_food_menu style=”style-1″ live_search=”yes”]
This adds a search bar above the menu for quick item filtering.
💁 Related reading: Explore the Smartest Food Ordering & Reservation Plugin for WordPress – WP Cafe- Read more
Conclusion
Using a WordPress restaurant plugin is the golden ticket to boosting efficiency and maximizing profits on a whim. You can increase efficiency by managing tables, reservations, inventory, and team members, and maximize profits by online orders, auto table reservations, synchronizing pickup/delivery, and so many other things.
If you’re really into growing your cafe’s profits and productivity at a fast pace, then WPCafe can be a great help at reasonable pricing. Try WPCafe today, as it’s free.