
Overview
Presence Widgets in Timetics Pro are two floating boxes for your site: a Video Popup that plays a short clip in a corner and a Quick Contact Card that shows your contact details and buttons. You set both up on one page, choose the corner, pick which pages they appear on, and decide when they show.
Most visitors leave without booking. These widgets keep a welcome video and your contact details on screen while people read, so the next step is always one click away.
Requirements
- Timetics, installed and activated.
- Timetics Pro, since Presence Widgets is a Pro feature.
- An administrator account. The page is hidden from staff (team member) users.
- A short video file, or a link from YouTube, Vimeo, Loom, Wistia, or Dailymotion, if you want the video popup.
Step 1: Open the Presence Widgets page
- In your WordPress dashboard, go to Timetics.
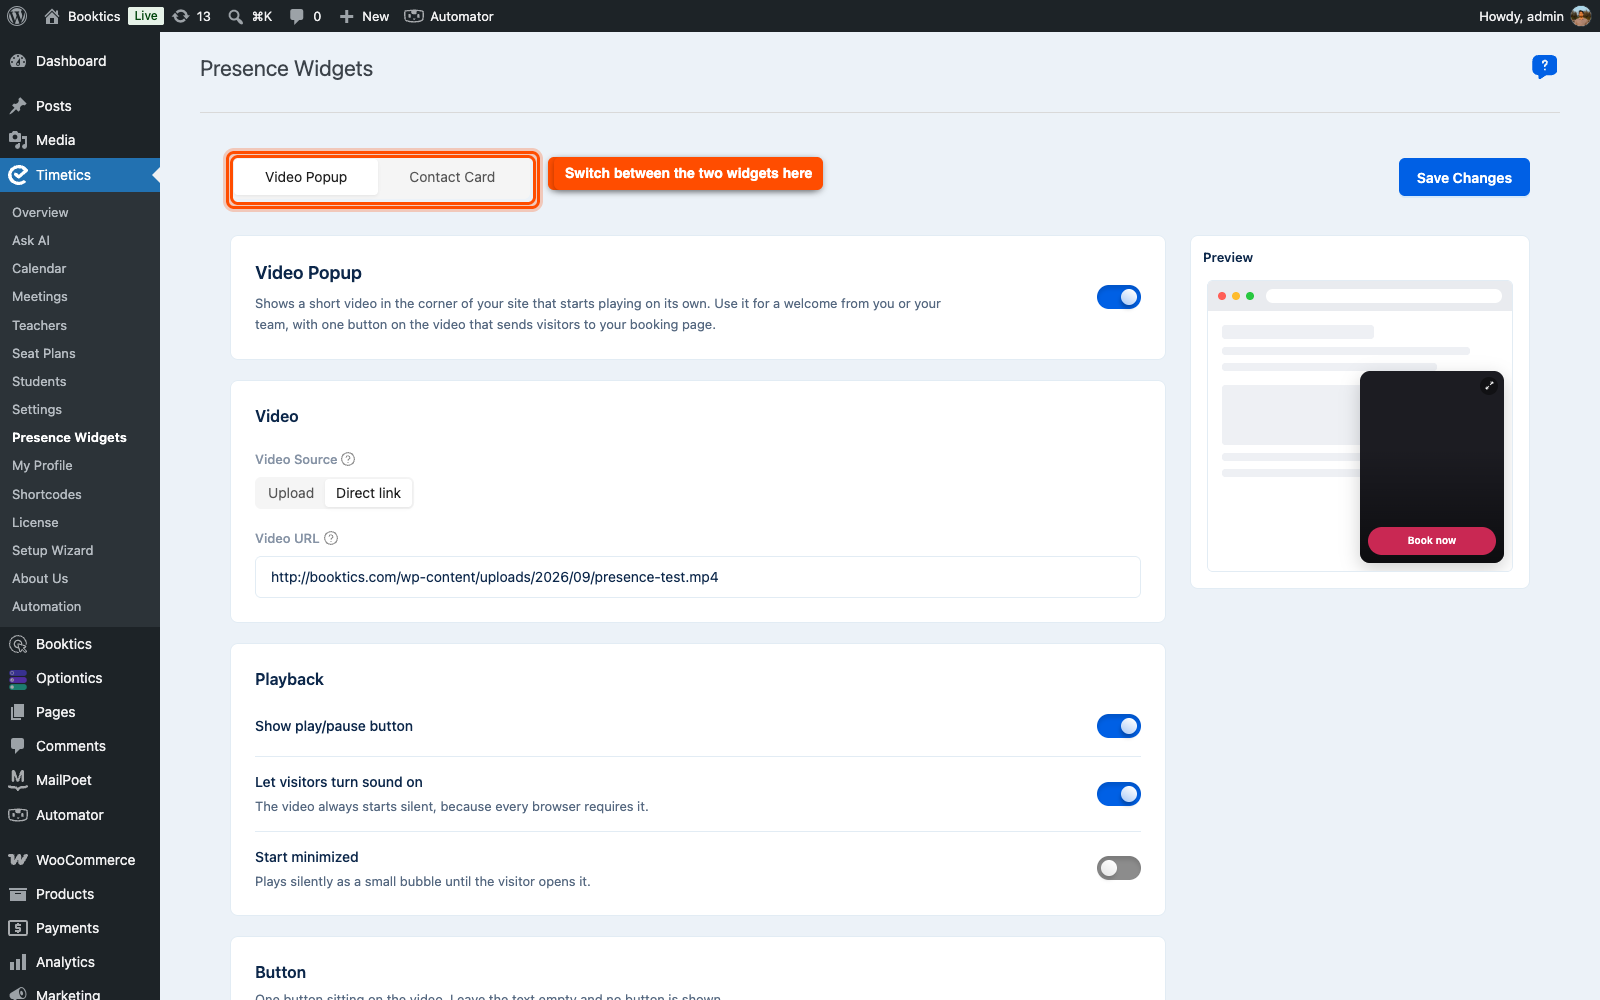
- Click Presence Widgets, right after Settings.
- Use the switcher at the top to move between Video Popup and Contact Card.
Each tab has its own on/off switch, so you can run one widget, both, or neither. Save Changes saves both tabs together, so an edit left on the other tab is never lost.
Step 2: Choose your video.
Open the Video Popup tab and turn on the switch at the top. Then pick the video under Video source:
- Upload: click Choose video file and pick an MP4 or WebM from your media library. The hint under the field shows your site’s upload limit.
- Direct link: paste a video URL. This can be a direct MP4 or WebM link or a share link from YouTube, Vimeo, Loom, Wistia, or Dailymotion.
The clip plays on its own, without sound, and loops. A short portrait clip works best, for example, a hello from you or your team.
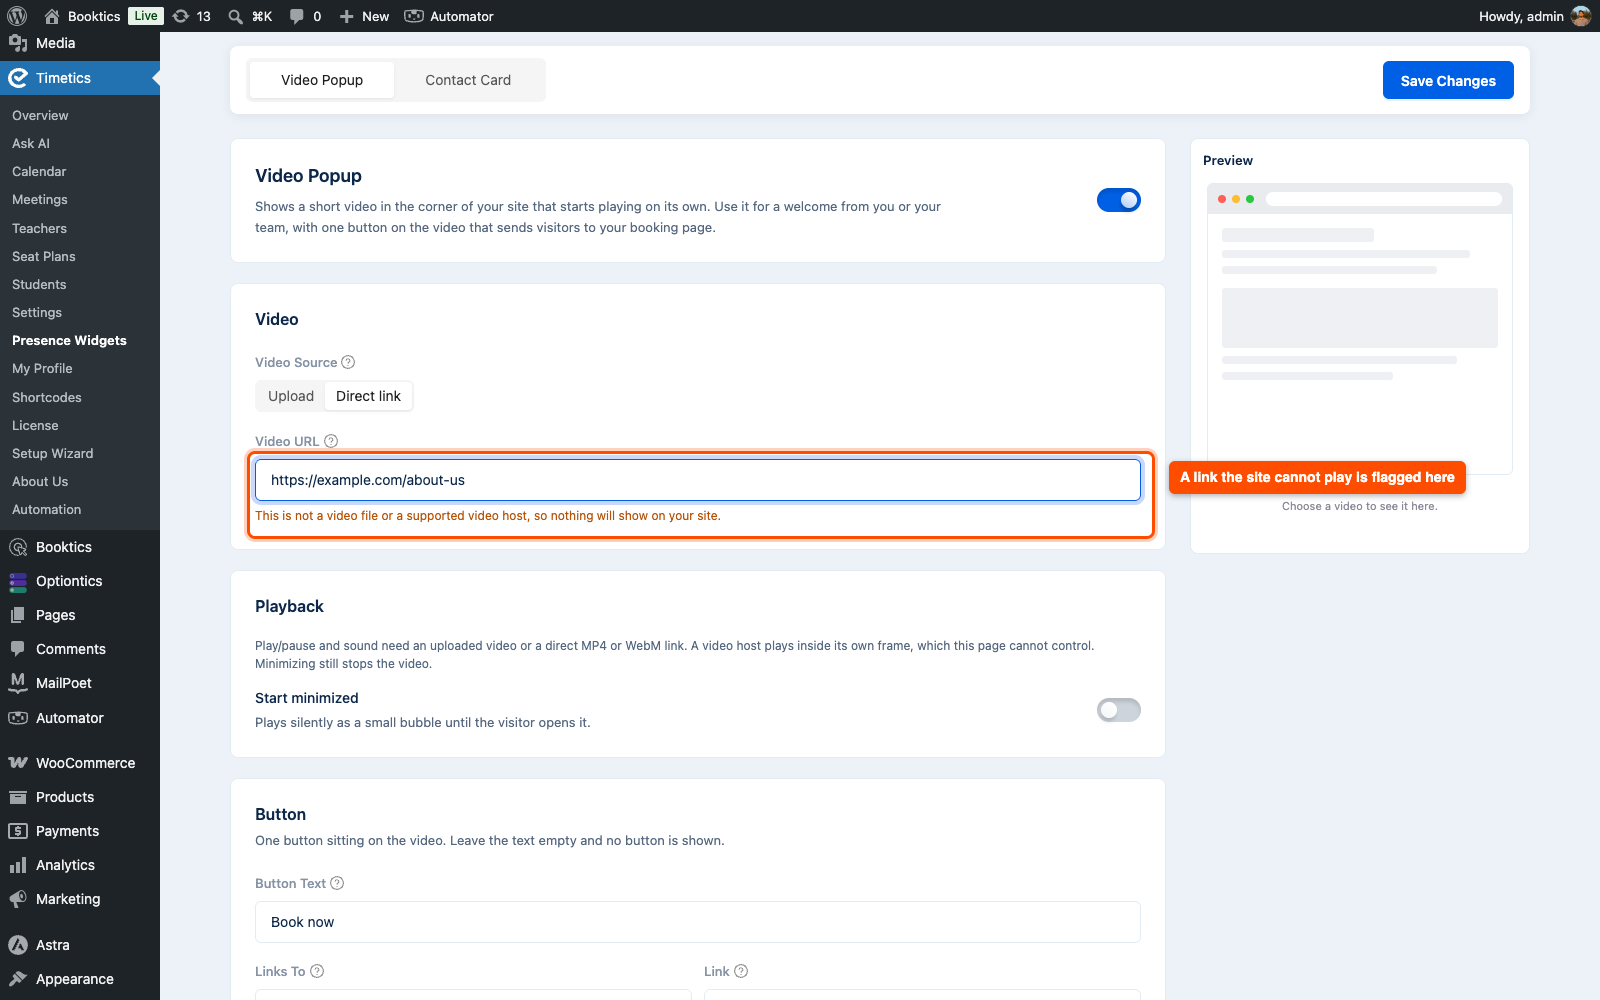
If you paste a link the site cannot play, the field shows a warning and nothing appears on your site. Change it to a supported link or upload a file.
Step 3: Set how the video behaves.
The Playback card has these settings:
- Show play/pause button and let visitors turn sound on: give visitors control over the clip. The video always starts silent, because browsers require it.
- Start minimized: the video plays as a small bubble until the visitor opens it.
The first two switches only appear for an uploaded file or a direct MP4 or WebM link. A video from YouTube or another host plays inside its own frame, which your page cannot control, so those switches are hidden. Minimizing always stops the video, whichever source you use.
Step 4: Add a button on the video.
Use the Button card to send viewers somewhere after they watch.
- Type the button text, for example, “Book now.”
- In Links to, choose A page and pick one of your pages, or A URL and paste a link.
The button sits on the video and opens in a new tab. If you add text but no link, the page warns you, and the button is not shown on your site.
Step 5: Build the Quick Contact Card
Open the Contact Card tab, turn on the switch, then fill in the card text: a title such as “Need a hand?” and a subtitle such as “Weekdays 9 to 6.”
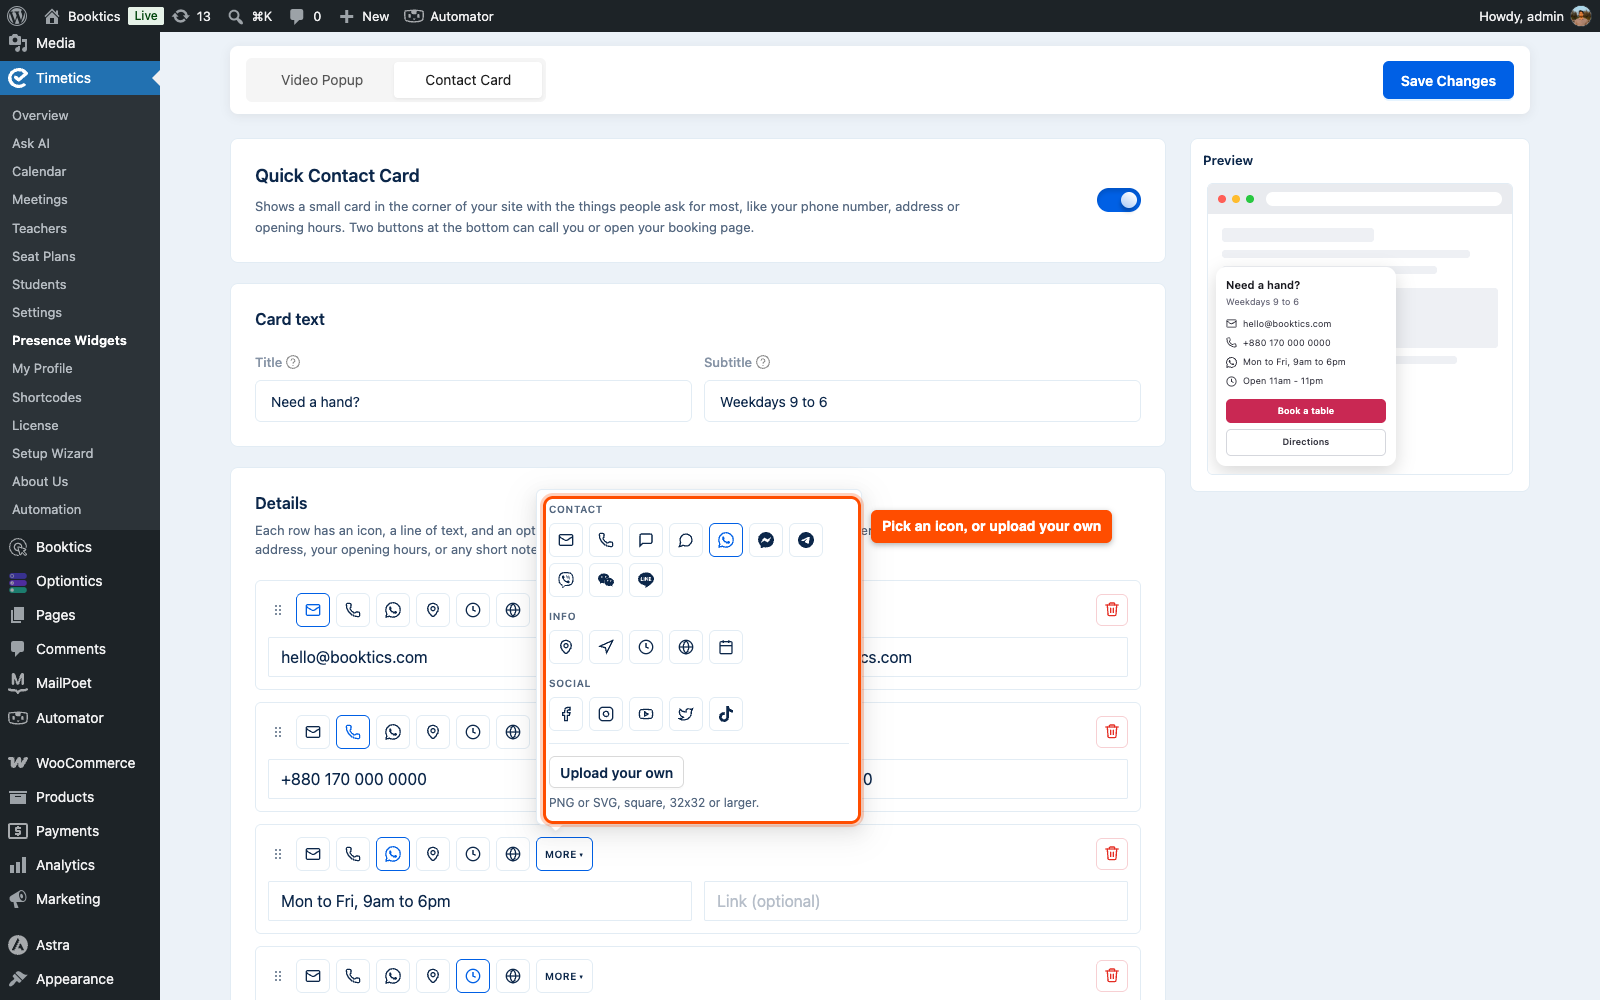
Under Details, each row has an icon, a line of text, and an optional link. Add one row for each thing people ask for, like an email address, a phone number, or your hours.
- Pick an icon from the six shown, or click MORE for the full list.
- To use your own image, click MORE, then Upload your own, and pick a PNG or SVG (square, 32×32 or larger).
- Type the row text, then add a link if it needs one, such as
mailto:[email protected]ortel:+8801700000000.
To reorder rows, drag the handle or focus it with Tab and use the up and down arrow keys. The trash button removes a row. A row with no text is not shown on your site.
The Buttons card adds up to two buttons at the bottom of the card, Primary and Secondary. Each needs both a text and a link, or it is not shown.
Buttons take the primary color from your Timetics settings, so the card matches the rest of your site. See Timetics general settings to change that color.
Step 6: Choose where and when it appears
Both tabs end with Placement and When to show. Set them for each widget.
Placement decides the position:
- Corner: click one of the four corners.
- Nudge sideways (px) and Nudge up/down (px): move the widget away from the edge, up to 500 pixels, so it does not cover a chat button or a cookie bar.
- Show on: keep all pages, or pick single pages. Leave it empty, and the widget shows nowhere, which is a way to pause it without losing your setup.
When to show decides the moment:
- Straight away: as soon as the page opens.
- After a few seconds: set Seconds to wait, between 1 and 60.
- After scrolling down: set Scroll depth between 5 and 90 percent. On a page too short to scroll, the widget shows straight away.
Click Save Changes, then open your site to see the result.
Frequently Asked Questions (FAQ)
| Q1: My video does not show on the site. What is wrong? The link is probably one nothing can play. A page link, such as a blog post, is not a video, so the popup stays hidden and the settings show a warning under the field. Use a direct MP4 or WebM link, a link from a supported host, or upload a file. |
| Q2: Why are the play and sound switches missing for my YouTube video? A video from YouTube, Vimeo, Loom, Wistia, or Dailymotion plays inside that host’s own frame, which your page cannot control, so the two switches are hidden. They come back for an uploaded file or a direct MP4 or WebM link. Minimizing the card still stops the video in every case. |
| Q3: A visitor closed the contact card. When does it come back? It stays closed for the rest of that visit, then shows again on their next one. If you want it back on the next page instead, turn off Stay Closed once the visitor closes it in the When to Show card. |
Conclusion
Presence Widgets give your visitors a welcome video and your contact details without leaving the page they are reading. Set up the Video Popup and the Quick Contact Card in Timetics Pro, then open your site and check both in the corner you picked.